

MULE CROSSING: Fine-Tuning the Aids
TRAINING MULES AND DONKEYS
CHAPTER 28
Fine-Tuning the Aids
By Meredith Hodges
As you attempted the exercises in balance by riding without the aid of your reins, you probably discovered a lot more shifting of your own balance than you imagined. This nearly imperceptible shift of balance, however, can grossly affect the balance of your mule. Until now, I have always given you a visual point of reference by allowing you to glance down at the outside front leg. Now you will want to be more inwardly conscious of your own body position.
You need to repeat many of the old exercises to cultivate this kind of sensitivity. This time, close your eyes for brief periods to get the “feel” of each movement in your own body. Do not simply allow your mule to travel freely in any direction, because this  will not give you an accurate feeling for any specific task—you must plan your course of action. If, for instance, you set up your mule to bend through and impulse out of the corner, you can close your eyes for a few seconds down the long side and feel the balance that comes out of that corner when the movement is executed correctly. In this particular situation, once you’ve closed your eyes, you may notice that your animal is starting to leans lightly to the inside. A squeeze/release from your inside leg, sending your mule forward and into the outside rein, corrects the balance and keeps him going straight down the long side.
Your seat bones are closest to your body’s center of gravity, making them the best sensors for balance. “Feel” the weight shift from one seat bone to the other through turns and circles, and then even out as you ride straight lines and diagonals. You will soon discover that, in order to do a circle in better balance, you must have slightly more weight on the outside seat bone. This situates your weight over the outside hind leg, which is the impulsion leg. Putting the weight over the outside hind leg clears the mule’s shoulders, allowing freer movement in front. If you ride on your inside seat bone, the weight begins to fall to the inside of the circle and puts pressure on the shoulder, inhibiting the upright, forward balance and this will put your mule on the forehand instead of engaging the hind quarters.
Remember to plan your course of action and use your half-halts between changes of direction and transitions from one gait to another. You cannot expect your mule to maintain his balance when he is constantly being surprised with changes of direction or gait. Use your eyes correctly to enhance your balance and to help you more realistically plan your course. Teach yourself to be accurate with your eyes—look well ahead at all times and try to stay exactly on the lines and the arcs of your circles. When you plan a circle, look halfway around your circle so you can plan the arc more accurately, and then you can make the next half of the circle the same as the first half to complete your circle with minimal trouble. Keep your eyes on a visual horizontal line that runs parallel to the ground. Remember—you have two eyes, and any movement as slight as a tip of your head to one side or the other can affect the upright balance of your mule. Dropping your eyes to the ground shifts your mule’s balance forward and onto his shoulders, again interrupting his balance.
Do small circles, but only as small as your mule can handle without losing his balance. Once he can easily maintain his balance without interruption, you can begin to decrease the size of the circles. Keep movements planned and large. This will give your mule plenty of response time through planned movements and will allow you to ride and correct the balance with more ease. If, for some reason, your mule loses his balance, falls out or rushes, stop him by using even pressure on both reins, with a squeeze/release action. Back him up slowly and deliberately remembering to walk backward with your seat and legs, one step at a time, and then calmly go back and try to repeat the movement. If he makes the same mistake a second time, halt, back up and then walk through the area that is giving you the problem. Resume trotting or cantering when he complies. When you approach that area again, slow him down again, go through and resume your plan.
 If he “ducks out” with you and begins to run, keep your connection on the rein that he has pulled as best as you can, and try to stop him by pulling on both reins together with a light squeeze/release action. Try to verbally calm him, and when he finally stops, praise him for stopping. Then, turn him with the rein that he has just pulled out of your hand, and return him to the task. Do not try to pull him around with the other rein, because this will cause him to lose his balance and will frighten him even more. If he is praised for stopping, he will not be afraid to stop. If he’s punished for running, he may never want to stop.
The main goal is to cultivate a mule that is moving calmly between your two hands and your two legs and responsive to changes in your aids—to your seat, to your legs and to your hands. If you keep your eyes focused ahead and your hands and legs evenly balanced over your seat bones, you can strongly affect your mule’s vertical balance. Your correct and repetitive use of the aids will eventually allow your mule to become lighter in the bridle and more responsive. In addition, his muscles will begin to be properly conditioned. An animal that is restrained and forced will develop muscles incorrectly. In turn, this will cause him stiffness through many movements. Most commonly, you see a slight “U” in the base of the neck in front of the withers. This is caused by stiffness in the poll from riding from front to back, rather than from back to front. Actually, the stiffness will transmit to other parts of the body and can cause chronic soreness, but the most obvious signs show in the neck and poll. Incorrect development of the muscles will undoubtedly inhibit your mule’s best performance.
 I ride my equines diagonally through the aids to get the best lateral and vertical response. I want to maintain a good forward movement, which means that the impulsion must come from the hindquarters and from the push forward. Think of your hands and legs as four corners of a box that contains your mule. If you push forward on one side at a time from, say, left leg to your left hand, it leaves the other whole side of the animal unchecked, and he will proceed forward with a tendency to drift into the “open” side. This is why you have to ride alternately and diagonally from the left leg to the right hand and from the right leg to the left hand. It is why you ride from back to front, leg to hand, in a diagonal fashion—it pushes your mule from the outside leg forward into a straight and balanced inside rein, and from the supportive inside leg to the outside rein—he remains upright on the arcs and sufficiently bent. The wider the space between your legs and between your hands, the more lateral “play” you will feel in your mule. If you keep your hands close together and your legs snugly around his barrel, there is a lot less lateral “play” and a great deal more accuracy when doing your patterns. Think of your legs and hands creating a “train track” with rails between which your mule must move. The wider the space between your hands and legs, the more “snakier” his movements will become.
But what if he will not turn without you really pulling on the inside rein? He will turn if you do it correctly. Remember: It doesn’t matter how far you turn his head to the side. His head is not attached to the ground and he will only go where his legs go. You will be helpful to your mule and correct if you always try to keep his head and neck straight, in front of his shoulders. When you wish to turn, give a slight half-halt to slow for the turn. Be sure to support your mule with your legs as you do this—the inside leg should become stronger with each squeeze and give with each release. Keep your outside rein slightly checked back compared to your inside rein (which pulls and releases), and hold your hand in close to the withers on the outside. Do not check too hard or your mule will turn out instead of around the circle. Take your inside rein away from the withers a little to encourage the turn, but be careful not to take it any farther than necessary, because this will disconnect your mule’s hindquarters from his shoulders. As you repeatedly do this exercise, your mule will learn to bend his body through his rib cage, and not just his head and neck, to the arc of the circle. If necessary, you can counter bend his head and neck to move the shoulders onto the arc of the circle, but do not counter bend too much or you will get a turn instead.
The finer you tune your own aids, the lighter and more responsive your mule will become. To summarize: Plan your course of action; in the beginning, keep movements large and flowing; keep your eyes looking ahead; and keep your aids even and close in, employ the aids laterally, while being strong and encouraging from back to front, vertically. Do not be too concerned about where your mule’s nose is if his body is correct. As he becomes more confident, fit and relaxed, and as your aids become more correct, his head and neck will drop into the improved posture of their own accord. If you try to set the head and neck on the vertical before the body has been conditioned to balance and round, you will produce an animal with a hollow back and a lot of vertical and lateral stiffness. This will prevent him to correctly respond to your aids even if he wants to, because he will be physically unable to do so. It may take a little longer to correctly condition both your body and his, but the result is a sound, cooperative animal, possessing the mental and physical qualities necessary for the best performance upon your request. You may even experience the surprise of good posture, balance and strength in your own body, as well.
To learn more about Meredith Hodges and her comprehensive all-breed equine training program, visit LuckyThreeRanch.com, MEREDITH HODGES PUBLIC FIGURE Facebook page, or call 1-800-816-7566. Check out her children’s website at JasperTheMule.com. Also, find Meredith on Pinterest, Instagram, MeWe, YouTube and Twitter.
Covered in TRAINING MULES & DONKEY: A LOGICAL APPROACH TO TRAINING, TRAINING WITHOUT RESISTANCE, EQUUS REVISITED and A GUIDE TO RAISING & SHOWING MULES at www.luckythreeranchstore.com.
© 2024 Lucky Three Ranch, Inc. All rights reserved.


 No training series would be complete without examination of the principles and philosophy behind the training techniques. The philosophy of my training techniques is based on the principle that we are not, in fact, training our equines. In fact, we are cultivating relationships with them by assigning meaning to our own body language that they can understand.
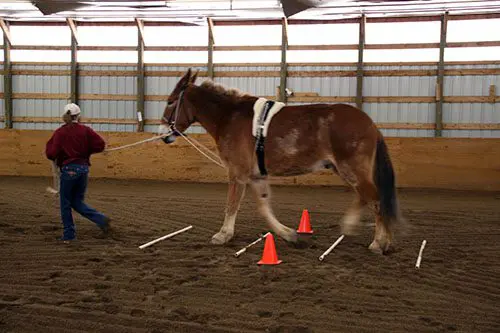
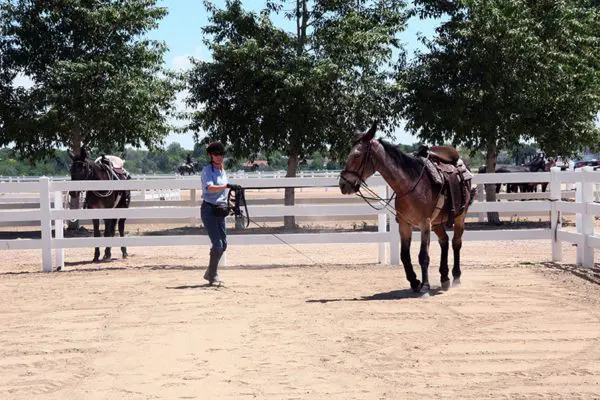 For instance, we had a 3-year-old mule learning to lunge without the benefit of the round pen. The problem was that she refused to go around you more than a couple of times without running off. Assess the situation first by brainstorming all the probable reasons she might keep doing such an annoying thing. Is she frightened? Is she bored? Is she mischievous? Has she been calm and accepting of most things until now? And most important, is my own body language causing this to occur?
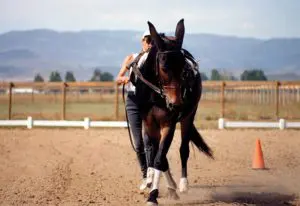 As mental changes occur, so do physical changes. As muscles develop and coordination gets better, the animal will gain confidence. As a trainer, you will need to do less and less to cause certain movements. For example, in the case of the leg yield, you may have to turn your mule’s head a little in the opposite direction to get him to step sideways and forward. As he becomes stronger, more coordinated, and understands your request, you can then begin to straighten his body more with less effort. Granted, we have begun by doing this the wrong way, yet we have put our mule “on the road” to the right way. We have assimilated an action in response to our leg that can now be perfected over time. In essence, you have simply said, “First you learn to move away from my leg, then you can learn to do it gracefully!”
 In training horses and mules, there is really little difference in one’s techniques or approach, provided we maintain patience and understanding and a good rewards system. The major difference between these two equines is their ability to tolerate negative reinforcement, or punishment. The mule, being part donkey, does not tolerate punitive action very well unless he is fully aware that the fault was his own and the punishment is fair. For instance, you ask for a canter lead and your mule keeps trotting, one good smack with the whip, or one good gig with the spurs, is negative reinforcement that will bring about the desired response, but be careful of an over-reaction from an overdone cue. More than one good smack or gig could cause either a runaway or an extremely balky animal. This kind of resistance comes from the donkey and requires a much different approach when training donkeys. The horse part of the mule allows us an easier time of overcoming this type of resistance in mules, making them different and easier to train than donkeys.


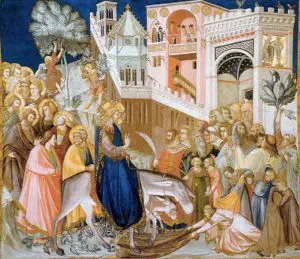 Long before the Founding Fathers drafted our constitution, the roots of America were as a religious nation under God. Today’s mule also has his roots in religion. The mule’s ancestor—the donkey—is mentioned in the Bible numerous times as an animal acknowledged by God and blessed by Jesus Christ. The donkey was even chosen to bring Mary and Joseph to Bethlehem and, later, as the mount Jesus himself used for his ride into the city of Jerusalem.
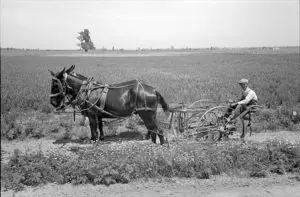 As early-nineteenth-century America continued to develop and its population grew, the American people came to depend more and more on self-sustaining agriculture. Because of the mule’s extraordinary ability to work long hours in sometimes harsh and unrelenting climates, his sure footedness which allowed them to cross terrain not accessible by any other means, and his resistance to parasites and disease, he became the prized gem of agriculture and remained so for the next hundred and fifty years.
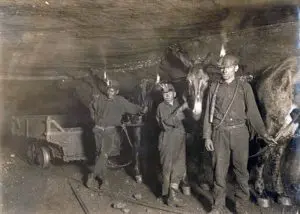 In 1882, the Harmony Borax Works opened with one big problem—how to get their product 165 miles across the treacherous Mojave Desert from Death Valley to the nearest railroad spur. The answer? Mules! “The borax wagons were built in Mojave at a cost of $900 each…When the two wagons were loaded with ore and a 500-gallon water tank was added, the total weight of the mule train was 73,200 pounds or 36 and a half tons. When the mules were added to the wagons, the caravan stretched over 100 feet. The Twenty Mule Teams hauled more than 20 million pounds of borax out of Death Valley between 1883 and 1889.” 1
 Because of their traits of strength, intelligence and loyalty, mules were a crucial part of our country’s greatest conflicts, from the Civil War through the Spanish American War, and in both World War I and World War II. A well-known tale from the Civil War states that, “In a battle at Chattanooga, a Union general’s teamsters became scared and deserted their mule teams. The mules stampeded at the sound of battle and broke from their wagons. They started toward the enemy with trace-chains rattling and wiffletrees snapping over tree stumps as they bolted pell-mell toward the bewildered Confederates. The enemy believed it to be an impetuous cavalry charge; the line broke and fled.” 3 During World War I, mules and horses were still the primary way that artillery was carried into battle. Although the 75mm Howitzers proved too heavy for most horses, it was a common sight to see the big guns strapped to the back of a sturdy mule.
 One of the world’s greatest natural wonders, the Grand Canyon, has been home to mules since the 1800s. First brought in by prospectors, it was soon realized that the tourists wanted a way down to the Canyon floor, and so began the Grand Canyon mule pack trips. Famous mule-riding visitors to the Grand Canyon have included Presidents Theodore Roosevelt and Howard Taft, famed naturalist John Muir and painter/sculptor Frederic Remington.


 Imprinting is defined as “rapid learning that occurs during a brief receptive period, typically soon after birth or hatching, and establishes a long-lasting behavioral response to a person or object as attachment to a parent or offspring.” 1 When we speak of “imprinting” in the scientific sense, it is a reference to the way the brain accepts input. The brain compartmentalizes impressions and images, and the animal reacts to the stimulus that the image produces. A collection of “imprints and images” produces memories. Imprinting training with a foal of any breed will give him a jump-start on his life with human beings.
 When imprinting your foal, think about the kind of adult you want him to be. A foal is very similar to a human baby regarding emotional needs—both need attention, love, guidance and praise to become loving, cooperative adults. Start your relationship with a positive attitude and approach your foal with love, patience, kindness and respect. Be sure to set reasonable boundaries for his behavior through the way you touch him and speak to him, the facial expressions you use, and even how you smell when you are around him so he can learn to trust and respect you and be happy at the sight of you.
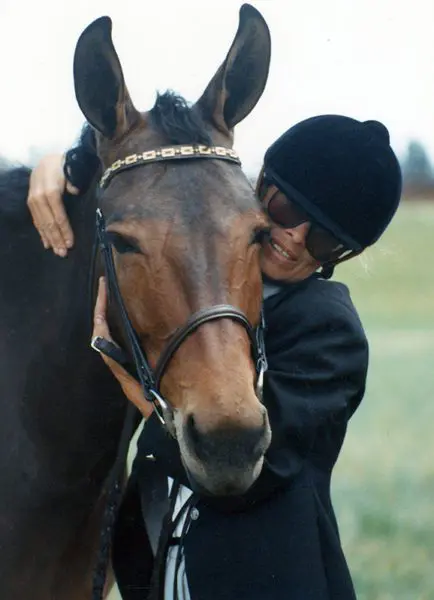
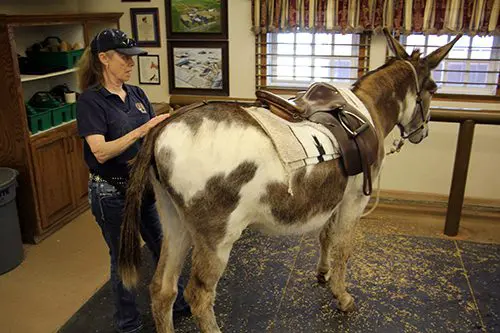
 The most important sensation to which you can expose your equine is touch. If your touch is gentle and considerate, it will feel good to him and he will be interested in your attention. When you run your fingers over his body, being careful not to press too hard on sensitive areas, he will experience pleasure and begin to look forward to your visits. Learning how your equine likes to be touched will also help things go more smoothly when you begin grooming him and tacking him up and during his training lessons, when he must learn to take his cues from your hands, legs and other aids. Even how you mount and sit down in the saddle—for instance, how your seat is placed on his back—denotes your consideration of him through touch. The wrong kind of touch, no matter how slight, can be a trigger for adverse behaviors. However, the right kind of touch—done correctly—produces pleasure in your equine and instills a willingness to perform in a positive way each time you interact with him.
 To begin imprinting training, run your hands all over your equine’s body and down his legs, and put your hands in his mouth and in his ears. His reactions will help you learn how he likes to be touched. Getting your equine used to touch in this way eventually evolves into exposing him to grooming and working with tack and equipment. You are continuing to build on the initial imprinting work, but now, when you are grooming, the grooming tools will become extensions of your hands, and when you introduce various tack and equipment like clippers, they will also become an extension of your hands. Allow your equine to use his sense of touch (usually with his nose) when introducing any new object. Work toward getting your equine’s response to your touch as highly sensitive as possible, so that he can use his own body language to communicate with you. NOTE: Many owners pat their equine on the top of the head with the flat of their hand as a sign of affection, without realizing that, as a rule, most equines don’t take kindly to people patting their foreheads or faces. A pat on the forehead works if you want to distract your equine, but save it for that purpose only. It is much better to show affection by stroking your equine (always in the direction in which his hair lies), in a soothing and reassuring manner.
 The tone of your voice is another important element of imprinting. If your general tone is soothing and encouraging, he is more likely to comply. Then, when he needs to be disciplined, the change in your tone of voice will convey your disapproval before you even have to touch him to make a correction—giving him the opportunity to straighten up before you actually need to apply the physical backup of negative reinforcement. If, no matter what the situation, you always speak in low tones, he will not be able to differentiate between what’s acceptable and what is not, but if you modulate your voice to clearly express what you want to convey, your equine will be much better able to understand and react appropriately.
 The next sense to which you should appeal is your equine’s sense of taste (a no-brainer). When you dispense the oats reward for all of his new positive behaviors, he associates that wonderful taste with you and will follow you to the ends of the earth to get more oats.
 Work on evolving your own body language as a natural and truly wonderful way to “talk” with your equine. You can also use verbal language, but body language should be your primary form of communication.


