Meredith Hodges
MULE CROSSING: Multiple Facets of Longears Hybrid Vigor
By Meredith Hodges
“Hybrid vigor is the increase in certain characteristics like growth rate, size, fertility, yield etc. of a particular hybrid organism over its parents. Hybrid vigor is also known by some other names, including heterosis and inbreeding enhancement. Hybrid vigor occurs because the hybrid offspring’s traits are enhanced due to the mixing of genetic contributions of its parents.”
What are mules and hinnies?
The mule is a hybrid cross between a male donkey (jack) and a female horse (mare). Because the mule most often demonstrates the best traits from each parent, he possesses what we call hybrid vigor. The mule inherits from the donkey his incredible strength, intelligence, patience, perseverance, endurance and surefootedness from the jack and his equine beauty, athletic ability and speed from the horse.

The hinny is also called a mule. However, the hinny is the hybrid cross between a male horse (stallion) and a female donkey (jenny, or jennet). Mules and hinnies are very difficult to tell apart without a DNA test. A hinny generally resembles a horse more than it does an ass. It looks more like a horse with long ears and looks very much like a mule. The hinny has been used as a saddle animal from antiquity and is more difficult to produce than the mule, because the jennet does not conceive well with the stallion.
 The hinny is a somewhat slower and more meticulous mover than the mule, but a laid back mule can offer similar characteristics. The hinny inherits his way of going from the jennet as does the mule, which tends to be a little faster, more energetic and more agile—like his dam, the mare. The hinny, because of his meticulous way of going, is actually better in very steep, rocky terrain and, especially, in loose rock, and will not tire as quickly as a mule. Hinnies are the preferred equine in Mexico and Central America due to their diligence when working. Gaited hinnies are preferable in this kind of terrain where there is little opportunity to gallop because they have a smooth, more ground-covering gait and offer a smooth ride.
 The hooves of a hinny tend to be more donkey-like—narrow, oval and more upright—where the hooves of a mule will look more horse-like; a little rounder (although still oval), with slightly more angle than the donkey hoof, but not as flat, round and angled as the horse’s hoof. On both hinnies and mules, the hooves should be trimmed more upright and the heels should be left longer than the hooves of the horse.
The hinny will also eat a variety of different kinds of shrubs and bushes to sustain himself, where a mule will be more selective, again because of the influence of the mare. This makes the hinny more desirable to those people living in remote mountain areas with little vegetation.
Both the mule and the hinny have more endurance by far than the horse. They are more resistant to parasites and disease, require less feed for good health, have tougher hooves than the horse, and have an incredible sense of self preservation that keeps them safe, which is often mistaken for stubbornness. The horse has a flight reflex when startled and the donkey has a freeze reflex; mules and hinnies can exhibit both the freeze and flight reflexes, depending on their own unique personalities and the situation at hand.
Certain breeds of mares do not conceive as well with the jack as other breeds. When breeding for mules, since the jacks are generally smaller and of slighter build than a horse, mule foals are generally smaller than horse foals and the mare has very little problem foaling. When breeding for hinnies, one needs to be cautious, as the jennets are smaller and of a slighter build than mares. A large stallion could produce a foal that would be too large and difficult for the jennet to easily foal. This is the reason that breeding for mules is more popular than breeding for hinnies. Matching the size of the parents is much more important with hinnies. It is more difficult for a jennet to settle after being bred to a stallion than it is for a mare to settle after being bred by a jack, so breeding for hinnies can take significantly longer.
What are the physical characteristics of the Ass?

The ass has a distinctive bray, Long ears, a short upright and thin mane with hair only on the end of its tail. Mules tend to look more horse-like than donkeys. Asses and mules can come in a wide variety of colors. Their hooves are narrow and boxlike, unlike the oval shape of horse hooves. Their hooves are upstanding, and made for rock and mountain climbing. They are tough and elastic, non-chipping and can grow to long lengths when the animal is on soft ground and the hooves are left untrimmed. The ass has a long body with long, wiry muscles and a short, straight back. He lacks upstanding withers and is excellent for packing and weight bearing and his bone is dense and hard. Gestation is 12 months, whereas the gestation period for a horse is 11 months.
The ass usually has a white belly and muzzle, and circles around the eyes. His colors are much like that of a horse. They can  come in more colors than a horse, even an Appaloosa. Mule’s conformation falls somewhere in between that of the donkey and that of the horse. Mules inherit the best traits from both its sire and its dam. Mules get their athletic ability from the horse, while strength and intelligence come from the donkey. Mules today come in all shapes sizes and colors, from minis under 50 pounds to maxis over 1000 pounds, and in many different colors. Mules from Appaloosa mares produce wildly colored mules, much like their Appaloosa horse relatives, but with even wilder skewed colors. The Appaloosa color is produced by a complex of genes known as the Leopard Complex (Lp). Mares homozygous for the Lp gene bred to any color donkey will produce an Appaloosa colored mule.
What are the mental characteristics of the Ass?
The ass is highly intelligent, alert, curious and affectionate, when not worn down by bad conditions (i.e., cruel treatment, bad shelter, bad food and water or overwork). They are quick to learn. A well-trained mule is calm, tolerant, loyal, affectionate, obliging and patient and sensitive. Mules and donkeys might be mistaken as being stubborn when they’re actually afraid or confused. The ass has common sense and is not prone to panic or carelessness. He can readily recognize danger!
What kinds of hybrid equines are there?
The following are simple definitions for the horses, mules and donkeys we will discuss:
Stallion: male horse
Mare: female horse
Jack or Jackass: male donkey
Jennet or Jenny: female donkey
Horse mule, john mule: male mule
Mare mule, molly mule: female mule
Horse, Mule and Donkey Hybrids:
Mule: donkey father + horse mother
Hinny: horse father + donkey mother
Donkule, Jule: donkey father + mule mother
Hule: horse father + mule mother
Zebroids (Zebra Hybrids)
Zedonk, Zebrass, Zebronkey, Zonkey, Zebonkey, Zebradonk, Zebryde: zebra father + donkey mother
 Zorse, Golden Zebra, Zebra mule, Zebrule: zebra father + horse mother
Zony: zebra father + pony mother
Zetland: zebra father + Shetland pony mother
Zebret, Donkra: donkey father + zebra mother
Hebra, Horbra, Zebrinny: horse father + zebra mother
Although hybrids are typically sterile, two documented cases of fertility do exist. One was known as Old Beck from Texas A&M, bred first by stallion, Pat Murphy, and yielded the hule, Pat Murphy, Jr. She was bred a second time to a jack and produced the jule, or donkule Kate. The other was Krause, belonging to Arthur Silvester in Champion, Nebraska. She was bred to a jack twice and foaled first with Blue Moon, and then with White Lightning. More numerous cases have emerged with the new technology and better national and international communication.
Happy Hinnies
This story comes from our friend, Luzma Maria Osorio, of Criadero Villa Luz in Colombia.

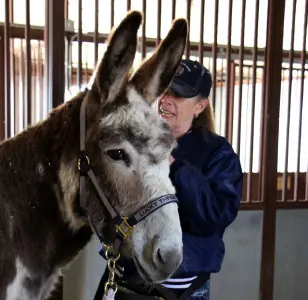
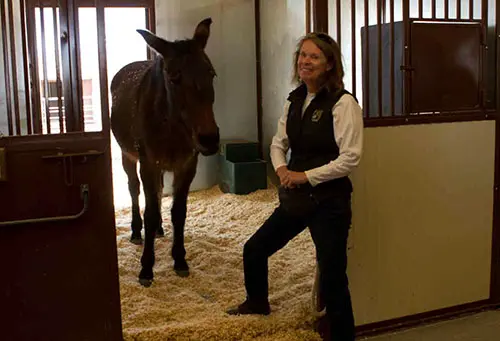
At our Stud Farm, Villa Luz, in Colombia, South America, we have been breeding mules and donkeys for more than fifteen years. There has been a big demand for our Paso Fino male donkeys (Jacks) to produce gaited mules through the years. But we were left with many female donkeys (Jennies), and nobody would buy them to produce mules even though they have the same good genetics and Paso Fino gait of their brothers. So we thought, let’s breed Hinnies–and the project began!
It is said that Hinnies often have shorter ears, although they are still longer than those of horses, and more horse-like manes and tails than mules. Well, our Hinnies certainly have the ear shape of their sire–they are beautifully pointed at the top just like his, but bigger. Up until now the behavior and characteristics of our Hinnies don’t differ much from the mules, they are lovely animals. It is our goal to study Hinnies and help to understand them better.

The good news is, the Paso Fino gait has passed to the Hinnies! This gait is natural and we have seen it in our baby Hinnies shortly after birth! Paso Fino is a lateral gait, four beat footfall, which provides a constant, rhythmic cadence. The rider should not experience any bumping or jolting. They say you can carry a tray with a glass of champagne on a Paso Fino equine as they are so smooth!!
We don’t know if they got the Paso Fino gait from the sire or the dam because both have it, but we certainly will have Paso Fino Hinnies! Very smooth, intelligent and well behaved!
Mules are good mothers too!
They say Mules cannot give birth and are hostile to foals, but the mule Chucurena has proved completely the opposite. On 25 September 2011 she gave birth to a beautiful baby mule in Colombia South America and she is proving to be a great mother! This miracle was achieved thanks to the Embryo transplant technique. A three day old embryo was extracted from a mare and implanted in the mule’s womb to develop it. Embryo transplants are a complicated process that requires synchronizing the ovulating time in both females, in this instance it was carried out by the specialized Colombian Veterinarian Hector Mendez.
 The embryo was from a Paso Fino Mare called La Querencia and the Paso Fino Donkey Cosaco XVI de Villa Luz. The pregnancy was 11 months and the delivery was normal with no complications, the mule knew exactly what to do and behaved as an expert mother even if it was her first time! The baby is a female and it was called “La bien querida” (The much loved).
But that is not the end of the story, just 12 hours before the mule Chucurena gave birth, the egg donor mare also gave birth to another mule foal from the same donkey Cosaco XVI. Two foals born the same day, with the same dame and sire and they are not twins! Are you a bit confused? The explanation is easy: 18 days after the embryo was taken out of the mare, she had her cycle and was inseminated again and got pregnant, this time they left the embryo in, and another mule was born!
 Even if most mules are sterile, they have a maternal instinct, we had a case in our Farm where the mule La Rosa de Villa Luz, fell in love with a foal of a mare and tried to steal it, she kept very close to it for weeks, showing angry signs to the mare and a maternal attitude to the foal; when the mare and the foal were transferred to another pasture, the mule brayed for days. We have also been told of another case where an orphan foal was adopted by a mule and after two days the mule started producing milk!
Even though some mules have ovulation cycles, only 60 cases of mules giving birth have been documented in the last 500 years around the world. In 1976 in Colombia, South America a mule called Gaviota gave birth not only once but twice. First to a baby foal that looked like a horse and after 16 months, to a baby foal that looked like a mule, both fathered by the same horse called Arandu. There are no documented cases involving fertile male mules.As you can see mules never stop surprising us, they are lovely animals and there are still loads to learn about them!
Mules Producing Offspring
Most mules are sterile but, very rarely, they can reproduce. However, you are more likely to be struck by lightning than own a mule that is able to have a baby. Here are the stories of some of the mules who have had babies throughout history.There have been two documented cases in America where mules have conceived and given birth and even more in other parts of the world. Several female mules have produced offspring when mated with a purebred horse or donkey. Since 1527, there have been more than 60 documented cases of foals born to female mules around the world. There are no recorded cases of fertile mule stallions.
Since mules and hinnies have 63 chromosomes, and donkeys and horses have 62 and 64, respectively, the different structure and number usually prevents the chromosomes from pairing up properly and creating successful embryos. In most fertile mule mares, the mare passes on a complete set of her maternal genes (i.e., from her horse/pony mother) to the foal; a female mule bred to a horse will therefore produce a 100 percent horse foal.
One of the first historical accounts of a mule producing offspring comes from Herodotus’ The Histories: “There happened also a portent of another kind while he was still at Sardis,—a mule brought forth young and gave birth to a mule.” Such a thing was considered a very bad omen indeed (in fact,Herodotus considered it foreshadowing of Xerxes’ invasion …
A fertile mule would also disprove ancient theories of biology as determined by Aristotle and other Greek philosophers –an animal’s species is determined based on its ability to reproduce. So, a mule is not a separate species (like a horse or donkey). But what is the species of a mule’s offspring, then? Without the DNA pairs matching, the rest of meiosis does not happen, which means that there are no viable eggs or sperm. Besides the differences in DNA sequence, the mule also has a lonely horse chromosome. This extra chromosome, some research conjectures, might be another reason most mules are infertile.
Cornevin and Lesbre stated that in 1873 an Arab mule in Africa was bred to a stallion and produced female offspring. The parents and the offspring were sent to the Jardin d’Acclimatation in Paris. The mule produced a second female offspring sired by the same stallion and then two male offspring, one sired by a donkey and the other by a stallion. The female progeny were fertile, but their offspring were feeble and died at birth. Cossar Ewart recorded an Indian case in which a female mule gave birth to a male colt.
A comparable case is that of a fertile hinny (donkey mother, horse sire – the reverse of a mule) in China. Her offspring, named “Dragon Foal,” was sired by a donkey. Scientists expected a donkey foal if the mother had passed on her maternal chromosomes in the same way as a mule. However, Dragon Foal resembles a strange donkey with mule-like features. Her chromosomes and DNA tests confirm that she is a previously undocumented combination.
 In Morocco, a mare mule produced a male foal that was 75 percent donkey and 25 percent horse (i.e., she passed on a mixture of genes instead of passing on her maternal chromosomes in the expected way). Miracle mule ‘confirmed’ DNA tests have confirmed that a Moroccan mule did give birth to a foal. Veterinary experts say the foal’s father was a donkey and its mother a true mule. “The foal inherited a mixture of horse and donkey chromosomes via the mother’s ovum ”
Mule cases with offspring have been reported to be quite numerous in Morocco. Morocco’s mules are also used in the equine industry for embryo transplants. Pregnancy is rare, but can occasionally occur naturally, as well as through embryo transfer. A few mare mules have produced offspring when mated with a horse or donkey stallion.

Herodotus gives an account of such an event as an ill omen of Xerxes’ invasion of Greece in 480 BC: “There happened also a portent of another kind while he was still at Sardis—a mule brought forth young and gave birth to a mule” (Herodotus The Histories 7:57), and a mule’s giving birth was a frequently recorded portent in antiquity, although scientific writers also doubted whether it was really possible (see e.g. Aristotle, Historia animalium, 6.24; Varro, De re rustica, 2.1.28).
Between 1527 and 2002, approximately sixty such births were reported. In Morocco in early 2002 and Colorado in 2007, mare mules produced colts.] Blood and hair samples from the Colorado birth verified that the mother was indeed a mule and the foal was indeed her offspring.
In the 1920s, Old Beck, a mare mule {at Texas A&M), produced a mule daughter called Kit. When Old Beck was bred to a horse stallion she produced a horse son (i.e., the horse stallion sired horse foals). When bred to a donkey, she produced mule offspring. Old Beck was a mare mule owned by a farmer in East Texas. Mules are usually considered infertile, but Old Beck had been mated to a jack and produced a foal that was very clearly a mule, named Kit. When she was brought to Texas A&M in 1921, Old Beck was mated to a stallion and also produced a living colt, however this time a horse, named Pat Murphy, Jr. No other offspring were ever produced from subsequent matings. Kit never produced any offspring; however, Pat Murphy was a fertile sire. This story caught the attention of many, making Old Beck quite famous. #tbt #tamuansc
 In 1995, a group from the Federal University of Minas Gerais described a female mule that was pregnant for a seventh time, having previously produced two donkey sires, two foals with the typical 63 chromosomes of mules, and several horse stallions that had produced four foals. The three of the latter available for testing each bore 64 horse-like chromosomes. These foals phenotypically resembled horses, though they bore markings absent from the sire’s known lineages, and one had ears noticeably longer than those typical of her sire’s breed. The elder two horse-like foals had proved fertile at the time of publication, with their progeny being typical of horses.
The best documented fertile mule mare was “Krause,” who produced two male offspring when bred back to her own sire (biological father).
“Nebraska Mule Makes History”
They said it couldn’t be done but “Krause” did it! The young mule owned by the Arthur (Bill) Sylvester family, of Champion, Neb., foaled a healthy mule last July 6. The Sylvesters were as surprised as anyone.
Because of the extreme “once in a Blue Moon” odds under which such a phenomenon occurs, the Sylvesters named the new arrival Blue Moon. The birth of a mule results from the breeding of a mare horse with a male donkey (jack). Krause (Blue Moon’s mother) was produced on the Sylvester farm. Her mother is a Welsh mare pony named Annie, and her father a jack named Chester. Chester is a prolific jack who also is the father of the newborn mule Blue Moon. The Sylvesters permitted Chester to run with the mules because the females were thought to be infertile.
Because “everyone” knows that mules do not reproduce, you can imagine what Bill thought when he looked out in the pasture of mules to find what appeared to be a newborn colt. He told his son Kim they’d better head out to investigate. Sure enough, there was Krause, a two year old mule they had raised from birth, with a perfectly normal mule colt. The colorings and markings were almost identical to her mother.
When Blue Moon was born, the Sylvesters contacted Dr. Dave Johnsen, a local veterinarian, to have him vouch for the unusual birth. Within a short time, Dr. Kurt Benirschke, director of the Center for the Reproduction of Endangered Species at the San Diego Zoo, in California, was called to arrange for scientific testing and vertification. Dr. Johnsen was commissioned to take blood samples from Krause, the mother; Blue Moon, the foal; the grandmother, a Welsh pony mare (horse); and the father and grandfather, a jackass (male donkey). A horse is supposed to have 64 chromosomes, a donkey 62; and a mule 63.
 Blood samples and other “technical testing” have verified that Blue Moon is indeed the first scientifically verified mule colt foaled from a molly mule. In mid-August, the Sylvesters received word from Dr. Benirschke with the big news: Krause is a true molly mule with 63 chromosomes and her new son Blue Moon is also a mule with 63 chromosomes. The father and grandfather is a verified jackass with 62 chromosomes, and the grandmother a true female horse with 64 chromosomes.
So what do you call the foal of a mule? The cross of a male horse and a jenny (female donkey) is called a hinny. Therefore, the cross of a jack and mule could logically be called a Jule. This would make Blue Moon a real “Jule”. Scientists will be studying Blue Moon carefully to test his capacity to reproduce as he matures. And Krause will be observed closely for the remainder of her life. Will she continue to beat the odds by producing more foals, or was her amazing fete truly “once in a Blue Moon?” Krause from Nebraska did foal twice by a jack with 2 mule-like foals, first with Blue Moon and then with White Lightning.
2003: U. of Idaho Reports Birth of Cloned Mule
By NICHOLAS K. GERANIOS, Associated Press Writer
 SPOKANE – Two weeks after announcing the birth of the first cloned mule, the same research team said a second cloned mule with identical DNA has been born. The mule, named Utah Pioneer, was born natural and unassisted Monday morning. The male foal joined his brother, Idaho Gem, whose birth was announced May 29, as the only equine clones in the world. The clones are the result of work by researchers Gordon Woods and Dirk Vanderwall from the
University of Idaho and Ken White from Utah State University. Both cloned foals are siblings of Taz, a champion racing mule owned by Idaho businessman and mule enthusiast Don Jacklin of Post Falls, Idaho. The foals carry identical DNA from a fetal skin cell culture established five years ago at UI with Taz’s mother and father. Utah Pioneer weighed 78 pounds at birth, and “is healthy and already very active,” Woods said in a news release. The cloning team will again submit samples to a University of California Davis laboratory for independent verification, as was done with Idaho Gem. “He’s a male mule, and he looks like Idaho Gem,” Woods said.
Preliminary testing last year showed the method developed by the researchers to clone a mule should work equally well with a horse, something Woods said he plans to do. “This is an important birth because it provides repeatability to the project and strengthens the results,” White said. The May 4 birth of Idaho Gem, announced by Science magazine May 29, added mules to the barnyard of cloned animals that already included sheep, cows, pigs, cats and rodents. Mules are bred by mating a male donkey with a female horse. The breeding success is about the same as among horses alone. To clone the racing mule’s brother, researchers bred Taz’s parents, a jack donkey and a horse mare, and allowed the resulting fetus to grow for 45 days. This provided the DNA needed for the clone. The researchers then harvested eggs from horse mares. After removing the nucleus from each egg, the researchers inserted the DNA from the male fetal cells. The eggs were then placed into the wombs of female horses. Of 307 attempts, there were 21 pregnancies and three carried to full term. The third cloned mule is due in August. Jacklin paid $400,000 to finance the four-year mule cloning project.
To learn more about Meredith Hodges and her comprehensive all-breed equine training program, visit LuckyThreeRanch.com, MEREDITH HODGES PUBLIC FIGURE Facebook page, or call 1-800-816-7566. Check out her children’s website at JasperTheMule.com. Also, find Meredith on Pinterest, Instagram, MeWe, YouTube and Twitter.
Covered in TRAINING MULES & DONKEY: A LOGICAL APPROACH TO TRAINING, TRAINING WITHOUT RESISTANCE, EQUUS REVISITED and A GUIDE TO RAISING & SHOWING MULES at www.luckythreeranchstore.com © 2024 Lucky Three Ranch, Inc. All Rights Reserved.

LTR Training Tip #3: Work Stations
Meredith gets a lot of letters and emails from people with training questions about their equines. Here, she discusses how to set up a work station for tack and grooming your equine.

MULE TALK! PODCAST: Keys to Successful Training Part 1
Keys to Successful Training Part 1 –
- The Work Station
- Tack and Equipment
- In the Round Pen
- Be aware of how your own body language and verbal commands elicit certain behaviors in your animal.
- The Hard Tie as a restraint and how to use it.
- In the Arena
- Open Areas
Follow along: read the transcript
Learn more on Mule Talk podcast.
For more training info: www.LuckyThreeRanch.Com and click on the Training tab.
Mule Talk is an Every Cowgirl’s Dream production – www.EveryCowgirlsDream.Com

MULE TALK! PODCAST: Fine-tuning the Rider/Fine-tuning the Aids
Fine-tuning the Rider/Fine-tuning the Aids —
- The benefits of using positive reinforcement early on in your mule’s training.
- Apply corrective measures appropriately when working with your young mule.
- Each mule learns in their own way and at their own pace.
- Using your seatbones to fine-tune your aids.
- Use half-halts when making a transition will alert your mule a change is going to occur.
- Using circles to benefit your training.
- Working at a pace so as not to confuse or create anxiety in your mule.
- Establishing fine-tuning will create harmony and balance in your work.
- This and more details in this episode!
Learn more on Mule Talk podcast.
For more training info: www.LuckyThreeRanch.Com and click on the Training tab.
Mule Talk is an Every Cowgirl’s Dream production – www.EveryCowgirlsDream.Com

LTR Training Tip #2: The Danger of Halters
Meredith gets a lot of letters and emails from people with training questions about their equines. Here, she talks about the dangers of leaving the halter on your equine, and some alternatives for catching them.

MULE TALK! PODCAST: Making History With Mules Part 3
Making History With Mules –
- Mules before the industrial age were vital to the United States and utilized for heavy work.
- Mules during the Westward Expansion days, transported families and their possessions through the Western Plains.
- The U.S. Cavalry and their role in using mules.
- Harvey Riley, author of The Mule, published in 1867 – an excellent source of the mule and its history in the U.S. Army.
- Soldier, Jimmy Wright was saved by his mule during a horrific battle; his mule dragged him to safety.
Learn more on Mule Talk podcast.
For more training info: www.LuckyThreeRanch.Com and click on the Training tab.
Mule Talk is an Every Cowgirl’s Dream production – www.EveryCowgirlsDream.Com

MULE CROSSING: Fine-Tuning the Rider
TRAINING MULES & DONKEYS
CHAPTER 27
Fine-Tuning the Rider
By Meredith Hodges
No training series would be complete without examining the principles and philosophy behind the training program. My philosophy is based on the principle that I am not, in fact, “training” donkeys and mules. Rather, I am cultivating relationships with them by assigning meaning to my body language that they can understand while I learn what they are trying to indicate to me with their body language.
In the same way that my own level of understanding changes and grows over time, I believe that my animals’ understanding grows, too. In the beginning, the emotional needs of a young mule are different from those of an older animal. The young mule needs to overcome many instincts that would protect him in the wild, but are inappropriate in a domestic situation. In a domestic situation, the focus must be on developing friendship and confidence in the young mule, while establishing my own  dominance in a non-threatening manner. This is accomplished through the use of a great deal of positive reinforcement early on, including gentle touches, a reassuring voice and lots of rewards for good behavior. Expressions of disapproval should be kept to a minimum and the negative reinforcement for bad behavior should be clear, concise and limited.
As your young mule grows and matures, he will realize that you do not wish to harm him. Next, he will develop a rather pushy attitude in an attempt to assert his own dominance (much like teenagers do with their parents), because he is now confident that this behavior is acceptable. When this occurs, reevaluate your reward system and save excessive praise for the new exercises as he learns them. Allow the learned behavior to be treated as the norm, and praise it more passively, yet still in an appreciative manner. This is the concept, from an emotional standpoint, of the delicate balance of give and take in a relationship. As in any good relationship, you must remain polite and considerate of your mule or donkey. After all, “You can catch more flies with sugar than you can with vinegar.”
Many details of both mule and trainer must also be considered from a physical standpoint. In the beginning, unless you are a professional trainer with years of proper schooling, you are not likely to be the most balanced and coordinated of riders, and you may lack absolute control over your body language. By the same token, the untrained mule will be lacking in the muscular coordination and strength it takes to respond to your request to perform certain movements. For these reasons, you must modify your approaches to fit each new situation, and then modify again to perfect it, keeping in mind that your main goal is to establish a good relationship with your mule and not just to train him. It is up to you, the trainer, to decide the cause of any resistance from your mule, and to modify techniques that will temper that resistance, whether it is mental or physical.
Here is an example: I had a three-year-old mule that was learning to lunge without the benefit of the round pen. The problem was that he refused to go around me more than a couple of times without running off. I first needed to assess the situation by brainstorming all the probable reasons why he might keep doing such an annoying thing. Is he frightened? Is he bored? Is he  mischievous? Has he been calm and accepting of most things until now? And, most important, is my own body language causing this to occur? Once I was willing to spend more time with regard to balance on the lead rope exercises and proceeded to the round pen to learn to balance on the circle, I soon discovered that developing good balance and posture was critical to a mule’s training. The reason my mule was pulling on the lunge line so hard was because he just could not balance his own body on a circle. Once I reviewed the leading exercises with him—keeping balance, posture and coordination in mind—and then went to the round pen to learn to balance on the circle, I noticed there was a lot less resistance to everything he was doing. I introduced the lunge line in the round pen and taught him how to circle with slack in the line. After that, lunging in the open arena on the lunge line was much easier and he did maintain the slack in the line while circling me.
Like humans, all animals are unique, and, like humans, each learns in his own way. Learn to be fair and flexible in your approach to problems. It is best to have a definite program that evolves in a logical and sequential manner that addresses your mule’s needs physically, mentally and emotionally. Be firm in your own convictions, but be sensitive to situations that can change, and be willing to make those changes as the occasion arises. This is what learning is all about for both you and your mule.
Just as mental changes occur, so do physical changes. As your mule’s muscles develop and coordination improves, you will need to do less and less to cause certain movements. For example, in the case of the leg-yield, you may have to turn your mule’s head a little too far in the opposite direction to get him to step sideways and forward. You will need to guide him more strongly with the reins and kick harder. As he becomes stronger and more coordinated, and begins to understand your aids, you can then start to straighten his body more toward the correct bend and stay quieter with your aids. Granted, you began by doing things the “wrong” way by over-bending your mule and by over-using your aids, yet you put your mule “on the road” to the right way. You assimilated an action in response to your leg that can now be perfected over time. In essence, you have simply told your mule, “First you must learn to move away from my leg, and then you can learn to do it gracefully.”
The same concept works in the case of the trainer or the rider. Sometimes you must do things that are not quite right in the  beginning to get your own body to assimilate correctness. In the beginning, a rider cannot “feel” the hind legs coming under his seat, so he needs to learn by watching the front legs moving forward along with his hands. With practice, the rider will develop the “feel” and will no longer need to watch the front legs moving forward. Remember, we all perceive things a little differently, and our perception depends on how we are introduced to something and on whether or not we can understand or perform a task.
It is nearly impossible for the inexperienced horseman to perceive and control unused seat bones as a viable means of controlling the mule. Reins and legs are much more prevalent. In order to help such a rider perceive their seat bones more clearly, it sometimes helps to start by involving the whole lower body. Earlier in this book, I suggested that, to begin facilitating this action, you pedal forward in conjunction with the front legs. Connecting this action with the front legs of the mule allows you to “see” something concrete with which you can coordinate, plus the pedaling encourages necessary independent movement in the seat bones from side to side and forward. When you begin to “feel” this sensation, you can begin to understand that when the foreleg comes back, the corresponding hind leg is coming forward under your seat bone. When you understand this, both mentally and physically, you can begin to pedal backward, which will cause you to be in even closer in synchronization with your mule’s body. As your leg muscles become more stable, actual movement in your own body becomes less, more emphasis is directed toward your center of gravity and more responsibility is placed on your seat bones. Using this approach, your muscles are put into active use and coordinated with your mule’s body through gymnastic exercises, which will eventually lead to correct position and effective cueing.
 Achieving balance and harmony with your mule requires more than just balancing and conditioning your mule’s body. As you begin to finish-train your mule, you should shift your awareness more toward your own body. Your mule should already be moving forward fairly steadily and in a longer frame, and basically be obedient to your aids. The objective of finish-training is to build the muscles in your own body, which will cause your aids to become more effective and clearly defined. This involves shedding old habits and building new ones, which takes a lot of time and should not be approached with any impatience. Remember: there are no shortcuts. In order to stabilize your hands and upper body, you need to establish a firm base in your seat and legs. Ideally, you should be able to drop a plumb line from your ear to your shoulder, down through your hips, through your heels and to the ground. To maintain this plumb line, work to make your joints and muscles in your body more supple and flexible by using them correctly. Always look where you are going to keep your head in line with the rest of your body.
As you ride your mule through the walking exercise, try to stay soft, relaxed and forward in your inner thighs and seat bones. Get the sensation that your legs are cut off at the knees, and let your seat bones walk along with your mule, lightly and in rhythm with him behind his front legs. If he slows down, just bend your knees and bump him alternately with your legs below the knees, while you keep your seat and upper legs stable and moving forward. When collecting the walk on the short side, just bend both knees at the same time, bumping your mule simultaneously on both sides, while you squeeze the reins at the same time. Your legs should always have contact with your mule’s body in a light “hugging” fashion and real pressure should only come during the cues.
In order to help you stay over the middle of your mule’s back on the large circle, keep your eyes up and looking straight ahead. Shift your weight slightly to the outside stirrup, and feel it pull your inside leg snugly against your mule. Be sure that your outside leg stays in close to your mule’s barrel as you do this. On straight lines, keep your legs even, but on the arc, and look a little to the outside of the circle. This will bring your inside seat bone slightly forward, allowing your legs to be in the correct position for the circle. Note: This technique is particularly helpful during canter transitions.
Most people feel that they do not balance on the reins as much as they actually do. If you balance on the reins at all, your mule will be unable to achieve proper hindquarter engagement and ultimate balance. To help shift the weight from the hands and  upper body to the seat and legs, you can do a simple exercise: Put your mule on the rail at an active working walk. On the long side, drop your reins on his neck and feel your lower body connect with his body as you move along. You will need to tip your pelvis forward and stretch your abdominal muscles with each step in order to maintain your shoulder to hip plumb line. If your lower leg remains in the correct position, your thigh muscles will be stretched on the front of your leg from your hip to your knee. There is also a slight side-to-side motion as your mule moves forward that will cause your seat bones to move independently and alternately forward. There is no doubt that you can probably do this fairly easily right from the start, but to maintain this rhythm and body position without thinking about it takes time and repetition.
When you are fairly comfortable at the walk, you can add some variation at the trot. Begin at the posting trot on the rail. When your mule is going around in a fairly steady fashion, drop your reins on his neck and continue to post. As you post down the long side, keep your upper body erect and your pelvis rocking forward from your knee. Your knee should be bent so that your legs are positioned on the barrel of your mule. Raise your arms out in front of you, parallel to your shoulders. If your mule drifts away from the rail, you need to post with a little more weight in your outside stirrup. As you go around corners, be sure to turn your eyes a little to the outside of the circle to help maintain your position. As you approach the short side of the arena, bring your arms back, straight out from your shoulders, and keep your upper body erect. As you go through the corners, just rotate your arms and upper body slightly toward the outside of your circle. When you come to the next long side, once again bring your arms in front of and parallel to your shoulders, and repeat the exercise.
Notice the different pressure on your seat bones as you change your arm position. When your arms are forward it will somewhat lighten your seat, while having your arms to the side will tend to exert a little more pressure. Consequently, you can send your mule more forward with your seat as you go down the long sides. On the short sides, you can shorten that stride with a little added pressure from the seat bones. When you wish to halt, put your arms behind you at the small of your back to support an erect upper body, and let your weight drop down through your seat bones and legs to total relaxation and an entire halting of movement. Remember to use your verbal commands—especially in the beginning—to clarify your aids to your mule. If your mule doesn’t stop, just reach down and give a gentle tug on the reins until he stops. Before long, he will begin to make the connection between your seat and your command to “Whoa,” and your seat will take precedence over your reins.
 When you and your mule have become adept at the walk and the trot, add the canter. At the canter, however, keep your arms out to the side and rotate them in small backward circles in rhythm with the canter. Be sure to sit back and allow only your pelvis, your seat and your thighs to stretch forward with the canter stride. Keep your upper body erect and your lower leg stable from the knee down. Once your mule has learned to differentiate seat and leg aids in each gait and through the transitions on the large circle, you can begin to work on directional changes through the cones.
As you practice these exercises, you will soon discover how even the slightest shift of balance can affect your mule’s performance. By riding without your reins and making the necessary adjustments in your body, you will begin to condition your own muscles to work in harmony with those of your mule. As your muscles get stronger and more responsive, you will cultivate more harmony and balance with your mule. As you learn to ride more “by the seat of your pants,” you will encounter less resistance in your mule, because most resistance is initiated by “bad hands” due to an unstable seat. As you learn to vary the pressure in your seat accordingly, you will also encounter less resistance in your mule through his back. Having a secure seat will help to stabilize your hands and make rein cues much more clear to your mule. The stability in your lower leg will also give him a clearer path to follow between your aids.
To learn more about Meredith Hodges and her comprehensive all-breed equine training program, visit LuckyThreeRanch.com, MEREDITH HODGES PUBLIC FIGURE Facebook page, or call 1-800-816-7566. Check out her children’s website at JasperTheMule.com. Also, find Meredith on Pinterest, Instagram, MeWe, YouTube and Twitter.
Covered in TRAINING MULES & DONKEY: A LOGICAL APPROACH TO TRAINING, TRAINING WITHOUT RESISTANCE, EQUUS REVISITED and A GUIDE TO RAISING & SHOWING MULES at www.luckythreeranchstore.com.
© 2024 Lucky Three Ranch, Inc. All rights reserved.

MULE TALK! PODCAST: Making History With Mules Parts 1 & 2
Making History With Mules –
- Mules and donkeys are mentioned in the Bible.
- The highest intelligence residing in animals is that of the mule.
- Learn how mules played a significant part in Greek and Roman transportation.
- HAI-BAR, a volunteer organization established to protect animals that had thrived in the Holy Land during the Old Testament years – but are now dangerously close to extinction.
- Unique personality traits of the mule come from the ass.
- George Washington – the first organized mule breeder in America.
- Hear how the Erie Canal was built by mules.
- Hear about the borax mule team from Death Valley hauling over the mountains to the Mojave Desert and more!
Learn more on Mule Talk podcast.
For more training info: www.LuckyThreeRanch.Com and click on the Training tab.
Mule Talk is an Every Cowgirl’s Dream production – www.EveryCowgirlsDream.Com

MULE TALK! PODCAST: Standing Still While Mounting
Standing Still While Mounting –
- It starts with good nutrition and being fed on schedule to reduce anxiety.
- Ground training is essential using a logical approach.
- Begin mounting in the round pen first – using a mounting block.
- Desensitize your mule with gentle strokes to the body to learn his sensitive areas.
- Start with a mounting block to eliminate pulling on the saddle.
- Have an assistant work with you for safety reasons.
- Sit quietly for a minute before walking on after mounting.
- Train your mule to understand the command “WHOA.”
- Train your mule to understand the command “STAND” when you are ready to mount him.
- Use the reward system to let him know he is doing good.
- Balance your weight when stepping up into the saddle and stepping down.
- English riders – remove both feet from stirrups when dismounting.
- Western riders position your foot in the left stirrup to eliminate getting hung up.
- Ride in a saddle that is comfortable for your mule and a proper fit for you the rider. This will eliminate potential hazards.
Learn more on Mule Talk podcast.
For more training info: www.LuckyThreeRanch.Com and click on the Training tab.
Mule Talk is an Every Cowgirl’s Dream production – www.EveryCowgirlsDream.Com

MULE TALK! PODCAST: Do Mules Need to Be Shod?
Do Mules Need to Be Shod? –
- Take into consideration where you will ride your mule.
- Terrain – rocky – mud – sand – grass – mountain trails – prairie
- Mules inherit their hooves through their genes.
- Climate and weather greatly affect the condition of your mule’s feet.
- Hoof products – are often overused.
- Stress rings and what they mean.
- Your mule’s diet is important to producing healthy hooves.
Learn more on Mule Talk podcast.
For more training info: www.LuckyThreeRanch.Com and click on the Training tab.
Mule Talk is an Every Cowgirl’s Dream production – www.EveryCowgirlsDream.Com
MULE CROSSING: Learning to Stand Still for Mounting
By Meredith Hodges
Equines need clear and consistent handling practices. Teaching an equine to stand still should not just be trained as a singular task. In order to change behaviors such that they become repeated as new habitual behaviors, one needs to be logical, sequential and consistent in our own behaviors. New behaviors need to be strung together in a logical, progressive sequence and then practiced EXACTLY the same way ALL the time.
 Training begins with nutrition and the way your equine is fed. An equine that is fed at a specific time each day is far less stressed than those with inconsistent feeding times and will learn easier. What you feed and how is critical. The equine should ALWAYS be asked to stand still with a verbal WHOA and required to remain back when you open a door, or a gate, until they are asked to WALK ON.
The Lucky Three equines are ALL trained to come when they are called, stand back to wait their turn when coming through the gates and turn around to have their halters put on easily upon request. When these habits are asked consistently, the same way every time, they become HABITUAL behavior. Be cognizant that your own body language and movements are consistent as well. If you ask your equine to WHOA and you keep moving, your example is at odds with what you are asking them to do.
 The Lucky Three mules willingly come off the grass pasture at any time of the day when they are beckoned. This is the result of routine management, humane training practices, with a prompt and generous reward system. Not one of our equines is herd-bound as we do not play favorites, we reward everyone for good behavior and we do not ask more than they are physically able to give. We have slowly built deep friendships with them that exceed their relationships with their equine buddies!
Training consists of a logical and sequential way to approach physical conditioning so that we build their bodies with postural balance and core strength in mind. This assures that their physical foundation is adequate to support all the tasks that we might ask from them.
 We begin training with Leading Exercises in our postural aid we call the Elbow Pull executed in the Hourglass Pattern. The pattern has designated places where they are asked to halt, square up and are given a crimped oats reward. We wait until they finish chewing the oats before we ask for another movement. This will alleviate any anxiety and is their first real introduction to learning how to stand absolutely still upon request. They are grateful for this personal consideration which greatly improves their mental attitude. Each animal is continually assessed throughout training and the approach is modified according to their individual needs. Being fair, respectful, clear and consistent in handling practices with a carefully planned REWARD system –without bribery or indiscriminant treats – will enhance the pleasure and safety that you will experience during interaction with your equine! Anxiety and resistance is always kept to the bare minimum!
 The next introduction to standing still will take place during their Ground Driving exercises. At first, they will again be driven through the Hourglass Pattern in the Elbow Pull postural aid with the verbal command to WHOA for all the designated halts and squaring up. You will put the lines across their rump, walk to the front, and give them their crimped oats reward. Then resume your position behind them and stand absolutely still while they chew their oats. Only allow them to go forward when you give the verbal command to WALK ON.
As they become stronger in their core strength and are able to hold their good equine posture, you can add obstacles to the lessons. First teach them to go straight through the obstacles  with periodic halts, again squaring them up, rewarding and waiting for them to finish chewing before giving the command to WALK ON. Then, repeat the obstacle lessons with strategic halts in the middle of the obstacles while asking them to stand absolutely still. You will eventually be able to phase out the Elbow Pull postural aid.
The next lessons will take place at the Work Station. Go through your usual grooming and saddling routine. Tack up as illustrated in Training Mules and Donkeys DVD #2. Check your animal’s girth to make sure it’s snug enough. You should barely be able to slide your hand between your equine’s side and the girth. Be careful of getting the girth too tight!
 Ask your equine to stand quietly while you grasp the saddle at the horn 9Or mane at the withers) and cantle. Put your foot in the stirrup and boost yourself to a standing position at his side. Carefully, lean over his back, talking and petting him until he gets used to your new position. Be sure to reward him from his back on each side.
 Slowly get down, go to the other side and repeat the exercise. Initially, you may mount your mule, or donkey, at the work station. First mount horses in the Round Pen where there is no ceiling overhead. Your goal is to get your equine to be at ease with you putting your foot in the stirrup, and lifting yourself over his back. Get him used to weight in the stirrups, the feel of the saddle and some weight on his back.
 When he’s calm with this exercise, go to the Round Pen. I prefer to do this preliminary work in an English saddle. It is lighter, easier to handle and less intimidating to the animal.
However, you may prefer to use a Western saddle the first few times you mount in  the Round Pen. The stirrups are larger, it’s more stable and the saddle horn might come in handy. Choose the saddle in which you feel most secure.
It’s best to have someone helping you for the next stage in saddle training, so ask a friend to act as your assistant. Have your assistant stand quietly at the mule’s head, but not actually hold him—you have control with your reins.
 Your assistant will stand by for safety only and will give the illusion to your animal that he is still just to be lunged, only now with a rider.
Ask your equine to stand quietly with soothing verbal communication. Grasp the saddle at the horn 9or mane at the withers) and cantle, and then boost yourself into a standing position at his side with your foot in the stirrup.
If he spooks, or bolts, just let go of the saddle, but maintain your hold on the left  rein so you don’t lose him. Have your assistant allow him slack with the line she (or he) is holding. Quietly, and firmly, ask him to “Whoa,” get organized and try it again.
Hang off the saddle on the near side and run your hands all over the far side of his  body. Do this on both sides. Add swinging your leg over his back. Stay low with your upper body, leaning forward on both sides. Make him pay attention to you by offering the oats reward from each side.
When you mount, drag your right leg firmly against his body. Move your leg gently up his hip, over his rump and down the other side to the stirrup. Don’t plop down like a sack of potatoes! Settle slowly and quietly into the saddle. Dismount on the opposite side from which you mounted each time.
 Rock your weight from side to side and let him feel how the saddle moves on his back. Continually reassure him during this procedure by firmly, but gently, touching him all over his body (See IMPRINTING BEYOND BIRTH under TRAINING/MULE CROSSING on my website at www.luckythreeranch.com). Lean forward and ask him to take oats from your hand on both sides to make sure he is aware of where you are on his back. The more movement he can tolerate while standing still and the calmer he is taking the oats from your hand, the better he will do later.
 Do only as much of this in any one lesson as he can easily tolerate. Always try to end your lessons on a positive note, and do not get in too much of a hurry—that’s usually where the trouble begins.
Then it is time to get him used to the mounting block in the Round Pen. Do things exactly the same way you have done, in the same order, complete with offering the oats reward from his back on both sides. When he finally stands absolutely still, reward him lavishly and then put him away. With each new lesson review the previous lesson and add a little more to it each time as you are able.
 In order to keep your equine calm, and for the sake of safety, to avoid getting your foot caught in a stirrup and run the risk of having your mule drag you, each time you dismount always take both of your feet out of the stirrups.
With one foot still in the stirrup, you’d be in an awkward position. If your equine becomes frightened and shies away, your foot could get stuck in the stirrup and you’d be in big trouble. Practicing good technique will keep you and your equine safe and comfortable during all lessons.
 By the time your equine is ready for the open arena or the trail, he will clearly know the meaning of WHOA and will learn to be patient and wait for your command to WALK ON. You will be able to halt him at any time with confidence about his absolute obedience. Too many of us get in a hurry to just get on and go.
When you take the time to go through this process, however slow it might seem, it can save you a lot of potential harm that could result in some pretty extraordinary doctor bills and vet bills for you and your equine. Speeding up, slowing down, halting and backing becomes a representation of your ultimate mutual cooperation with each other!
To learn more about Meredith Hodges and her comprehensive all-breed equine training program, visit LuckyThreeRanch.com, MEREDITH HODGES PUBLIC FIGURE Facebook page, or call 1-800-816-7566. Check out her children’s website at JasperTheMule.com. Also, find Meredith on Pinterest, Instagram, MeWe, YouTube and Twitter.
Covered in TRAINING MULES & DONKEY: A LOGICAL APPROACH TO TRAINING, TRAINING WITHOUT RESISTANCE and EQUUS REVISITED at www.luckythreeranchstore.com.
© 2024 Lucky Three Ranch, Inc. All Rights Reserved.

MULE TALK! PODCAST: So You Think You Want a Mule?
So You Think You Want a Mule? –
- Where to buy a mule for you?
- What kind of experience do you have as a rider?
- What are your character traits?
- Learn how to select the right mule for you.
- Talk to experienced mule people to assist you.
- Learn how to evaluate the animal you are looking at.
- Have a vet and farrier do exams on the mule.
- The option of asking for a trial period with the mule.
- Drawing up a contract when hiring a trainer.
Learn more on Mule Talk podcast.
For more training info: www.LuckyThreeRanch.Com and click on the Training tab.
Mule Talk is an Every Cowgirl’s Dream production – www.EveryCowgirlsDream.Com

MULE TALK! PODCAST: Disaster and the Effects of Training
Disaster and the Effects of Training –
- When disaster strikes, do you have a plan?
- Will your mules respond to your leadership skills?
- Will you be anxious or calm in your thinking?
- Is your barn safe for unpredictable weather conditions?
- What is your commitment level regarding bringing your mules into safety?
- Meredith gives us solutions regarding safety for your mules in your barn and paddock construction.
Learn more on Mule Talk podcast.
MULE CROSSING: So You Think You Want a Mule?
By Meredith Hodges
It was bad enough before computers and cell phones when people thought they wanted a horse and could realistically have one. They thought if they had a little patch of grass and a fence around it, it would be enough to keep a horse. They never thought about shelter, feed (they could just eat the grass!), vet and farrier care, and about a dozen other things that it takes to maintain an equine.
Those who indulged themselves and bought a horse under those conditions soon found out that keeping an equine was a bit more than they bargained for! If they got the equine for FREE, that was even better…NOT! If they got them cheap, it was GREAT…NOT! If they got them cheap from the Kill Pens and rescued them, Oh, how compassionate they thought they were being! If they didn’t have a small patch of grass, but really wanted a horse, a Boarding Stable was the perfect option provided that the price was right! They would have the privilege of riding with their friends! Boarding Stables with limited exposure to their owners is not good for mules or donkeys, and are even worse for Boarding Stable employees that need to deal with them on a daily basis. Monitoring their feed in a healthy way at a Boarding Stable is next to impossible because they want to feed ALL the equines the same way, no matter what you write for them on a stable sign.

 Cindy and I talked about the “Good Old Days” when we used to live on a ranch, had horses and could be gone all day riding with our friends! Today, our lives are so easy and require no experience to have the knowledge that you can now hold in your hand! The value of EXPERIENCE is diminished until you get hurt! There were so many things that we learned by having the full responsibility of cleaning pens, feeding, grooming, tacking up our own horses and then riding in so many different situations. One really LEARNED how to make decisions and analyze the knowledge that we gleaned. We soon learned the approaches and things that we could do SAFELY, and that kept our experiences happy and joyful! We KNEW it would cost a minimum of $5000.00/year to maintain and train our equines! Our relationships with our equines were good and they were able to teach us WELL!
When one grows up with all things done FOR them, one loses the benefits of all those lessons that Cindy and I were able to learn. Our lives were truly filed with the love and joy we got from being with our equines, and even more, the challenges that were put before us to be BETTER. That enhanced everything we did with our animals! It made us more curious and willing to ask questions of all kinds of people that knew more than we did…and we learned so much MORE! We learned about who to trust and who we should consider suspect. We heard all about the Horse Traders and discovered the differences between them, and the differences between honest people that were also selling equines.

If you do get an animal that you are not compatible with and you want to sell him to someone else, be careful about how you do that. It is good to advertise, but know what you are talking about. If you get in a situation where you can not longer afford to take care of the animal(s) you have, be careful what you do, or it can break your heart! The first thing to do is to ask around with people you know and see if anyone can take your animal. If not, then advertise in equine publications, or on the internet, and see if there is any interest there.
 If the last resort is putting them in an auction…BEWARE! You might get stopped with your truck and trailer in the parking lot and a dealer that offers to take them off your hands right there! If you are tight for cash and looking for a convenient fix to your problem, you might think this is a great deal, but this is what KILLER BUYERS do!!!
When you are looking for an equine, don’t be afraid to talk to a lot of people, starting with people that you know are good horsemen. If they don’t have anything for sale, ask for credible references. You can usually find a lot of knowledgeable people at shows, fairs and exhibitions, but beware of what they tell you and remember that they want to SELL the animal and they know nothing about your riding ability and in most cases, they don’t care.
We learned to watch the animals at the auctions and the way they were being presented. Don’t be afraid to ask WHY they are being sold! Were they truly calm and well-trained, or were they drugged and would be quite different when they were taken home? It wasn’t hard after a while, to tell the difference among who the really good trainers were and those who “faked it” for a sale. It was even important to know the difference among trainers in case you would need help after purchasing your equine. Is the seller a true MULE PERSON?
It is important to know what kind of person YOU are (and be honest…quick temper?) before you decide what kind of equine you want to have. Research all it takes to maintain the different kinds of equines (small, large, active, docile, etc.) and whether their conformation is going to be sound enough for what you want to do with them. Ask a professional if your assumptions (and that IS what they are when you are ignorant about equines…assumptions!) are correct and sound, and will they work the way you would like them to work. Is this going to be the horse, or mule, for YOU!
The nice thing about buying a mule is that THEY will decide whether or not they like YOU! If they are not attracted to you…forget that mule! If you do find a mule that seems to be attracted to you and comes right up to you…he might be THE ONE! Then it is time to get a vet to help with a pre-purchase exam to make sure he is sound. Lots can be hidden with drugs, so take your time with this and give any drugs time to wear off. Have your vet and farrier do exams on the hooves to make sure the equine has not been “nerved.” When an equine has been “nerved,” their unsoundness can be hidden for months and years.

When you do think you have found that ideal mule, don’t be averse to asking the seller for a trial period, usually for a month to make sure things were not overlooked. This should be clearly stated in a contract between the buyer and the seller with stipulations about how things will be handled with the animal to keep him safe. You must assure the buyer that your facility would not be injurious to the animal and that he will be properly maintained. It is helpful to include acceptable surprise visits by the seller if he has any concerns at all.
If you hire a trainer and show your mule, be sure to have a clear contract with that trainer about expectations. Be sure to have a legal Power of Attorney drawn up in case of accidents that will clearly state how the animal is to be handled should something happen to you. The trainer should always be paid up in full and the animal should never be used for collateral for non-payment. As a rule, I only allow supervised youth riders on my mules for specific youth classes at shows. It is not a good idea to let anyone else ride your mule. I find that their relationships are VERY specific to the people they love! HAPPY TRAILS!
If you would like to have more information about buying and selling equines, I suggest you purchase Cindy Roberts’ book, HOW TO BUY A MULE & NOT GET SCREWED. It is an excellent resource for this kind of information. And, if you want to know as much as you can about Longears, take a look at all the books and videos that I have available both in the STORE and the FREE information under TRAINING on my website at www.luckythreeranch.com
To learn more about Meredith Hodges and her comprehensive all-breed equine training program, visit LuckyThreeRanch.com, MEREDITH HODGES PUBLIC FIGURE Facebook page, or call 1-800-816-7566. Check out her children’s website at JasperTheMule.com. Also, find Meredith on Pinterest, Instagram, MeWe, YouTube and Twitter.
Covered in TRAINING MULES & DONKEY: A LOGICAL APPROACH TO TRAINING, TRAINING WITHOUT RESISTANCE, EQUINE MANAGEMENT & DONKEY TRAINING, EQUUS REVISITED and A GUIDE TO RAISING & SHOWING MULES at www.luckythreeranchstore.com.
© 2024 Lucky Three Ranch, Inc. All Rights Reserved.


MULE TALK! PODCAST: Suitability of Mules and Donkeys for Children
Suitability of Mules and Donkeys for Children
- Teach your child how to be around equines.
- When choosing an equine for your child, do not choose a donkey jack.
- Do not choose an equine that is an alpha figure in the herd or one with aggressive behavior.
- Choose a mule or donkey with a quiet disposition for your child.
- Encourage children to do tasks around the barn to learn more about their equines’ behavior traits.
- Consider giving a homeless donkey, burro or mule a chance to be in your child’s care.
- Donkeys tend to have less issues and tend to be more sedate rescue animals than mules.
Learn more on Mule Talk podcast.


MULE TALK! PODCAST: Conduct and Good Sportsmanship
Conduct and Good Sportsmanship –
- The importance of developing a bond with your animal – to gain his trust to perform in the show ring.
- Competition is fun and exciting – develop the winning attitude to compete against yourself and not others.
- A good trainer will train himself, as well as the mule with subtle direction coming from the mule.
- Develop respect for your mule.
- Yes God gave us “dominion” over the animals, but that doesn’t make us a King or a Queen over them. We are keepers of our animals.
Learn more on Mule Talk podcast.
For more training info: www.LuckyThreeRanch.Com and click on the Training tab.
Mule Talk is an Every Cowgirl’s Dream production – www.EveryCowgirlsDream.Com

CHASITY’S CHALLENGES: Introduction
CHASITY is a Large Standard, 13 year old spotted jennet that we bought in 2020 to be a companion for our Large Standard gelding donkey, Wrangler, after he lost his mule friend in March of 2020. She came to us with lots of challenging health issues, but we are no strangers to that with our past rescues. When we have a case like this, we like to share our approach and the solutions we discover while consulting with our professional team of experts. We hope these LTR website diaries can help you to find solutions to the problems that you might face with your own Longears!