
Kyle Davidson
Posts by Kyle Davidson:


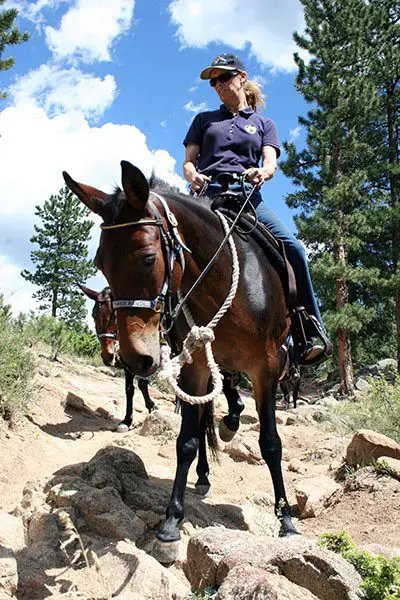
MULE CROSSING: Learning to Stand Still for Mounting
By Meredith Hodges
Equines need clear and consistent handling practices. Teaching an equine to stand still should not just be trained as a singular task. In order to change behaviors such that they become repeated as new habitual behaviors, one needs to be logical, sequential and consistent in our own behaviors. New behaviors need to be strung together in a logical, progressive sequence and then practiced EXACTLY the same way ALL the time.
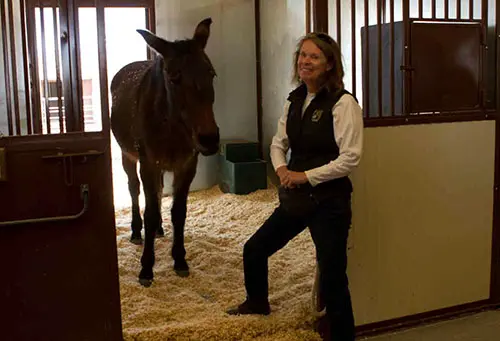 Training begins with nutrition and the way your equine is fed. An equine that is fed at a specific time each day is far less stressed than those with inconsistent feeding times and will learn easier. What you feed and how is critical. The equine should ALWAYS be asked to stand still with a verbal WHOA and required to remain back when you open a door, or a gate, until they are asked to WALK ON.
The Lucky Three equines are ALL trained to come when they are called, stand back to wait their turn when coming through the gates and turn around to have their halters put on easily upon request. When these habits are asked consistently, the same way every time, they become HABITUAL behavior. Be cognizant that your own body language and movements are consistent as well. If you ask your equine to WHOA and you keep moving, your example is at odds with what you are asking them to do.
 The Lucky Three mules willingly come off the grass pasture at any time of the day when they are beckoned. This is the result of routine management, humane training practices, with a prompt and generous reward system. Not one of our equines is herd-bound as we do not play favorites, we reward everyone for good behavior and we do not ask more than they are physically able to give. We have slowly built deep friendships with them that exceed their relationships with their equine buddies!
Training consists of a logical and sequential way to approach physical conditioning so that we build their bodies with postural balance and core strength in mind. This assures that their physical foundation is adequate to support all the tasks that we might ask from them.
 We begin training with Leading Exercises in our postural aid we call the Elbow Pull executed in the Hourglass Pattern. The pattern has designated places where they are asked to halt, square up and are given a crimped oats reward. We wait until they finish chewing the oats before we ask for another movement. This will alleviate any anxiety and is their first real introduction to learning how to stand absolutely still upon request. They are grateful for this personal consideration which greatly improves their mental attitude. Each animal is continually assessed throughout training and the approach is modified according to their individual needs. Being fair, respectful, clear and consistent in handling practices with a carefully planned REWARD system –without bribery or indiscriminant treats – will enhance the pleasure and safety that you will experience during interaction with your equine! Anxiety and resistance is always kept to the bare minimum!
 The next introduction to standing still will take place during their Ground Driving exercises. At first, they will again be driven through the Hourglass Pattern in the Elbow Pull postural aid with the verbal command to WHOA for all the designated halts and squaring up. You will put the lines across their rump, walk to the front, and give them their crimped oats reward. Then resume your position behind them and stand absolutely still while they chew their oats. Only allow them to go forward when you give the verbal command to WALK ON.
As they become stronger in their core strength and are able to hold their good equine posture, you can add obstacles to the lessons. First teach them to go straight through the obstacles  with periodic halts, again squaring them up, rewarding and waiting for them to finish chewing before giving the command to WALK ON. Then, repeat the obstacle lessons with strategic halts in the middle of the obstacles while asking them to stand absolutely still. You will eventually be able to phase out the Elbow Pull postural aid.
The next lessons will take place at the Work Station. Go through your usual grooming and saddling routine. Tack up as illustrated in Training Mules and Donkeys DVD #2. Check your animal’s girth to make sure it’s snug enough. You should barely be able to slide your hand between your equine’s side and the girth. Be careful of getting the girth too tight!
 Ask your equine to stand quietly while you grasp the saddle at the horn 9Or mane at the withers) and cantle. Put your foot in the stirrup and boost yourself to a standing position at his side. Carefully, lean over his back, talking and petting him until he gets used to your new position. Be sure to reward him from his back on each side.
 Slowly get down, go to the other side and repeat the exercise. Initially, you may mount your mule, or donkey, at the work station. First mount horses in the Round Pen where there is no ceiling overhead. Your goal is to get your equine to be at ease with you putting your foot in the stirrup, and lifting yourself over his back. Get him used to weight in the stirrups, the feel of the saddle and some weight on his back.
 When he’s calm with this exercise, go to the Round Pen. I prefer to do this preliminary work in an English saddle. It is lighter, easier to handle and less intimidating to the animal.
However, you may prefer to use a Western saddle the first few times you mount in  the Round Pen. The stirrups are larger, it’s more stable and the saddle horn might come in handy. Choose the saddle in which you feel most secure.
It’s best to have someone helping you for the next stage in saddle training, so ask a friend to act as your assistant. Have your assistant stand quietly at the mule’s head, but not actually hold him—you have control with your reins.
 Your assistant will stand by for safety only and will give the illusion to your animal that he is still just to be lunged, only now with a rider.
Ask your equine to stand quietly with soothing verbal communication. Grasp the saddle at the horn 9or mane at the withers) and cantle, and then boost yourself into a standing position at his side with your foot in the stirrup.
If he spooks, or bolts, just let go of the saddle, but maintain your hold on the left  rein so you don’t lose him. Have your assistant allow him slack with the line she (or he) is holding. Quietly, and firmly, ask him to “Whoa,” get organized and try it again.
Hang off the saddle on the near side and run your hands all over the far side of his  body. Do this on both sides. Add swinging your leg over his back. Stay low with your upper body, leaning forward on both sides. Make him pay attention to you by offering the oats reward from each side.
When you mount, drag your right leg firmly against his body. Move your leg gently up his hip, over his rump and down the other side to the stirrup. Don’t plop down like a sack of potatoes! Settle slowly and quietly into the saddle. Dismount on the opposite side from which you mounted each time.
 Rock your weight from side to side and let him feel how the saddle moves on his back. Continually reassure him during this procedure by firmly, but gently, touching him all over his body (See IMPRINTING BEYOND BIRTH under TRAINING/MULE CROSSING on my website at www.luckythreeranch.com). Lean forward and ask him to take oats from your hand on both sides to make sure he is aware of where you are on his back. The more movement he can tolerate while standing still and the calmer he is taking the oats from your hand, the better he will do later.
 Do only as much of this in any one lesson as he can easily tolerate. Always try to end your lessons on a positive note, and do not get in too much of a hurry—that’s usually where the trouble begins.
Then it is time to get him used to the mounting block in the Round Pen. Do things exactly the same way you have done, in the same order, complete with offering the oats reward from his back on both sides. When he finally stands absolutely still, reward him lavishly and then put him away. With each new lesson review the previous lesson and add a little more to it each time as you are able.
 In order to keep your equine calm, and for the sake of safety, to avoid getting your foot caught in a stirrup and run the risk of having your mule drag you, each time you dismount always take both of your feet out of the stirrups.
With one foot still in the stirrup, you’d be in an awkward position. If your equine becomes frightened and shies away, your foot could get stuck in the stirrup and you’d be in big trouble. Practicing good technique will keep you and your equine safe and comfortable during all lessons.
 By the time your equine is ready for the open arena or the trail, he will clearly know the meaning of WHOA and will learn to be patient and wait for your command to WALK ON. You will be able to halt him at any time with confidence about his absolute obedience. Too many of us get in a hurry to just get on and go.
When you take the time to go through this process, however slow it might seem, it can save you a lot of potential harm that could result in some pretty extraordinary doctor bills and vet bills for you and your equine. Speeding up, slowing down, halting and backing becomes a representation of your ultimate mutual cooperation with each other!
To learn more about Meredith Hodges and her comprehensive all-breed equine training program, visit LuckyThreeRanch.com, MEREDITH HODGES PUBLIC FIGURE Facebook page, or call 1-800-816-7566. Check out her children’s website at JasperTheMule.com. Also, find Meredith on Pinterest, Instagram, MeWe, YouTube and Twitter.
Covered in TRAINING MULES & DONKEY: A LOGICAL APPROACH TO TRAINING, TRAINING WITHOUT RESISTANCE and EQUUS REVISITED at www.luckythreeranchstore.com.
© 2024 Lucky Three Ranch, Inc. All Rights Reserved.

Making the Elbow Pull
(Page 30) Although the “Elbow Pull” is a very simple and straight forward device to help keep you equine in good posture, it is also a device that needs to be custom made to fit each individual equine. Equines that are approximately the same size in the front quarters will probably be able to use the same one. First, you need to obtain a package of 3/8″ twisted nylon rope. It is generally sold on the internet in 50′ spools, but is fairly inexpensive. Do not substitute any other kind of rope or leather reins, etc. as this will have a different weight and slippage around the bridle and will not have the same effect. Make sure that when you use the “Elbow Pull” that you place it OVER the crown piece on your bridle to prevent chafing and that you adjust it by first getting them to flex at the poll (by cupping your hand at the muzzle and rocking it forward and back or just offer some oats to get him to flex) and then push UP on his muzzle until he begins to push the nose out and hollow his back. This is not a device to “tie” their heads down. It should be adjusted just tight enough to prevent them from hollowing their neck and back, but still giving them full range of motion in every other direction (Up, down and to the sides).
You will also need two snaps that are narrow, yet fairly strong that can fit easily through the rings on your surcingle, or Western saddle. English saddle D-rings are generally too small and in this situation, we do not attach to them, but rather attach the “Elbow Pull” to itself after looping it through tied up stirrups. If you make the rope a bit longer for adjustment sake, you can loop it over the withers and attach it to the small D-rings on the opposite sides. The reason for twisted rope is so you can actually go through the D-rings and snap it into the twisted rope itself for a more exact setting. You would just untwist the rope at the setting point and snap into the middle of the rope so it won’t slide. With horses, you would just twist the rope over the back as shown so the snaps are a moot point until the horse learns to give to the “Elbow Pull” and can be hard tied.
Have the equine stand at the hitch rail with the snaffle bridle on. To get a measurement for how long a piece of rope you will need for his “Elbow Pull,” take a length of rope from the coil. From the near side (left side of your equine), feed the end of the rope from the inside to the outside of the snaffle bit ring, drape it over the poll of your equine and feed it from the outside of the snaffle bit ring to the inside on the off side (right) of your equine. Pull enough slack to go down through the front legs, behind the forearm, up and over the back such that it hangs 12 inches (or a bit more, but not less) over the spine. Then, go back to the near side on where you started and pull enough rope from the spool do the same thing on that side. When you have enough rope to loop over the spine on that side, you can cut the rope at 12 inches (or a bit more, but not less).
Once you have the proper length of rope for your equine, you will need to unravel 3″-4″ of one end of the rope and loop it through the ring on your first snap. Then you will braid the rope back into itself. First, pick the loose strand that is on top as you lay the rope across your hand, bend it around the end of the snap and feed it under a twist of the rope such that it creates a loop around the end of you snap and pull it snug. Then take the next loose strand (which would be the middle of the three strands) and feed it under the next twist down from the one you just did. Then do the same with the third loose strand under the third twist in the rope. Take all three strands in your hand, hold the rope so it doesn’t twist and pull all three strands snug. They should all line up. Next, turn the rope over so you can see where the angled lines of the twisted rope begins again and feed the first strand under the first twist, the second under the second twist and the third under the third twist. Pull all three strands snug at the same time, turn the rope over, locate the first twist in the line and repeat until you have all 3″-4″ braided into the twisted rope. You will have some loose ends sticking out and nylon rope can slip, so you now need to take a lighter and burn all these ends until they are melted together and will not slip. Be sure that you burn them so they are smooth and without bumps or it will be difficult to feed the ends through the D-rings. Do the same with your second snap on the other end of the rope. Now, you have your own custom made “Elbow Pull!” If this is confusing, you can purchase our EQUUS REVISITED DVD which has a SPECIAL FEATURE that will show you how to do this at www.luckythreeranchstore.com

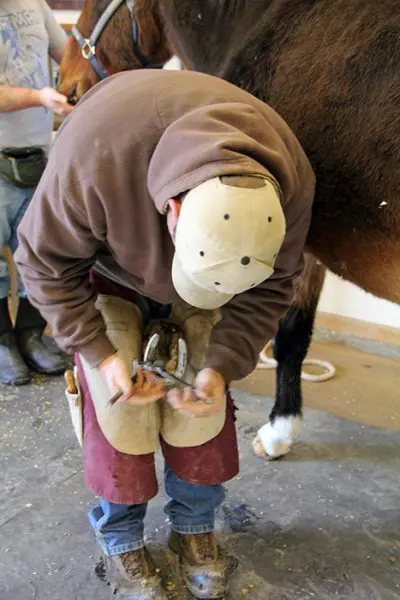
MULE CROSSING: Do Mules Need to Be Shod?
By Meredith Hodges

Do mules need to be shod? Those who are familiar with mules might be tempted to say, “No,” but the answer is a little more complicated than you might think. Although the mule generally has a tougher and more durable foot than the horse, all mules do not have the same feet, nor do all mules apply the same kind of stress to those feet. Therefore, each individual animal has to be considered when answering the question, “To shoe or not to shoe?”
It is commonly known that, when it comes to horses and mules, light-colored hooves are softer and more likely to break down under stress than are the darker, black hooves. Even though the black hoof is naturally harder than the light-colored hoof, if it does not contain sufficient moisture, it can become brittle and can chip away as destructively as can the lighter hoof. Whichever breed of equine you own and whatever the color of their feet, remember that good hoof care is essential for all domesticated equines.
 For better or worse, an equine inherits his hooves through his genes. If your mule has inherited good feet—black, oily-looking, and with good shape—then you are fortunate and hoof care and maintenance should be relatively simple. If he has inherited a softer or misshapen foot, you will need to discuss more specialized care with your farrier.
Climate and weather greatly affect the condition of your mule’s feet. Damp weather and muddy footing will tend to soften the walls of any hoof, and perpetual exposure to mud and dampness can cause deterioration of his feet. With the light-colored hoof, which tends to soften more easily, this could spell disaster. It is wise, therefore, during damp weather or if you live in a damp climate, to provide a clean, dry place for your mule to stand. Conversely, extremely hot and dry weather can cause your mule’s feet to become dry and brittle, and they may start to crack due to contraction and expansion of the hoof. For this type of dry weather or climate, you may want to overflow your water tanks regularly so your mule has a place to “cool his feet.” If it is excessively dry, you may even need to manually  lubricate your mule’s hooves as needed with one of the commercial products available. But before you use an artificial hoof lubricant, first check with your farrier to make sure that it is actually needed. Many people use hoof products too frequently, which can cause hooves to become too soft. When this begins to happen, you will see horizontal rings appear around the hoof wall, and sometimes, vertical lines. Try not to let the hoof get to this point by using lubricants sparingly, but if you see that these rings are beginning to appear, immediately discontinue use of the lubricant and allow the hoof to harden. Then check with your vet to make sure it is not a founder condition. It does not take much to adequately soften the hooves of an animal with rock-hard feet. During the really dry seasons, lubricant application once a week is usually sufficient.
 Assuming that your mule has a normal set of dark, healthy hooves, he will probably not need to be shod, as long as he is used strictly for pleasure or only sporadically. However, if you are going to use your mule on excessively rocky or hard ground, you might want to look into getting shoes for him. Mules that repetitively participate in more stressful and demanding activities (such as parades, showing and endurance events) should be shod to protect their feet and to keep them healthy. Prevention of bruising or cracking and maintenance of good foot and leg posture is critical to the equine athlete.
The pack and pleasure mule that is not used much or is used on softer terrain and in places where he does not require shoes must still be trimmed for balance regularly to assure that his feet are evenly worn and that he is not putting undue stress on any joints, muscles or tendons. Failure to have your mule’s hooves regularly trimmed in order to maintain their balance and shape can result in an imbalance in your mule’s feet, which will then cause an imbalance throughout his entire body, inhibiting his performance. However, if trimming is done consistently, the risk of imbalance, accident or injury will be greatly reduced.
 I believe that horses and mules, doing what they would naturally do alone—on terrain that is neither hard nor rocky—do not need to be shod. But mules that are asked to repetitively perform with a human on-board in varying surface situations should be fitted with the proper kind of shoes to help protect them from the additional weight and other demands that will be put upon their bodies. For example, my trail mules wear regular shoes on all four feet when they are being regularly used for trail riding and a variety of other activities, lessening the potential for injury. Then, when there is an occasional misstep on hard ground or rocks or when we trail-ride in the more challenging mountains, the shoes help to absorb some of the shock that would otherwise be absorbed by the hoof itself. It is my experience that young mules (and horses from two to four years of age) bear most of their weight on their front legs until their bodies are carefully and properly conditioned, and this is when you will see the most wear and tear on their feet. Because of this, my young mules that are just beginning saddle training wear regular shoes on the fronts only until their bodies are balanced and their activities clearly defined. Our broodstock, youngsters (under three
 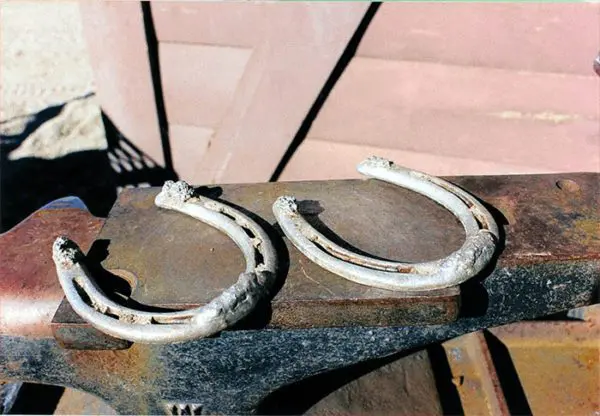 years of age) and equines that are not used under demanding conditions can go barefooted year-round, but they all still get regular trims every six to eight weeks.
All my other stock is shod for the specific purpose for which they are used: The Reining mules wear slider plates during the competition season, and the jumpers are fitted with either regular shoes, a tap and die shoe with studs or a borium shoe for non-skid, depending upon the terrain they will be negotiating. If I were to ask one of my mules to race, I would fit him with the lighter-weight racing plates. Each equine athlete is given a set of shoes particularly designed for the best performance in his event, just as is the case with the human athlete. In the winter, if my mules have the need to wear shoes, I add rim pads to their shoes to help prevent “snowballing.”
 Granted, there are a lot of mules that may not need to be shod, but there are also many that do need shoes, so each individual mule’s feet must be evaluated on a case-by-case basis. Because of this fact, the generalizations that “mules don’t need to be shod” and “all equines should go barefoot” are not always correct. You must take into consideration how your particular mule’s genetics affect his hooves, what he will be used for and how harsh the demands put on him will be on his feet. These important factors will determine whether or not he needs shoes, and if he does need shoes, what kind of shoes will best suit him. And don’t forget to check your mule’s shoes on a regular basis to make sure that all is well and that his shoes are staying on tight, but most of all, that he is comfortable and happy.
To learn more about Meredith Hodges and her comprehensive all-breed equine training program, visit LuckyThreeRanch.com, MEREDITH HODGES PUBLIC FIGURE Facebook page, or call 1-800-816-7566. Check out her children’s website at JasperTheMule.com. Also, find Meredith on Pinterest, Instagram, MeWe, YouTube and Twitter.
Covered in TRAINING MULES & DONKEY: A LOGICAL APPROACH TO TRAINING, TRAINING WITHOUT RESISTANCE, EQUUS REVISITED and A GUIDE TO RAISING & SHOWING MULES at www.luckythreeranchstore.com.
© 2014, 2016, 2019, 2024 Lucky Three Ranch, Inc. All Rights Reserved.

MULE TALK! PODCAST: So You Think You Want a Mule?
So You Think You Want a Mule? –
- Where to buy a mule for you?
- What kind of experience do you have as a rider?
- What are your character traits?
- Learn how to select the right mule for you.
- Talk to experienced mule people to assist you.
- Learn how to evaluate the animal you are looking at.
- Have a vet and farrier do exams on the mule.
- The option of asking for a trial period with the mule.
- Drawing up a contract when hiring a trainer.
Learn more on Mule Talk podcast.
For more training info: www.LuckyThreeRanch.Com and click on the Training tab.
Mule Talk is an Every Cowgirl’s Dream production – www.EveryCowgirlsDream.Com

Driving Should Not Be Rushed
(Page 28) Before we begin, you must understand something very important: Driving a horse or mule is very different than riding. It is critically important to pay attention to detail. It’s much more difficult to learn the basics, let alone the finer points. Here’s an analogy: Just because you can drive a pickup truck, doesn’t mean you can fly an airplane. And if you want to fly a plane, you need more than just one lesson to become a pilot. The point is this—driving is fun, and it certainly looks easy, but of all the equine activities, it is the most potentially dangerous for you, for others and for your equine. If you get into trouble while riding, you might get thrown off. If you get into trouble while driving, you could end up with a runaway animal and a careening vehicle that’s crashing into everything in its path. Driving can be the most dangerous of equine activities, so be sure to spend plenty of time on prep work for both muscle conditioning and accustoming your equine to the elements of driving before actually hitching them to a vehicle.
For safety, this should take two years with multiple groundwork tasks. These exercises should not be rushed. If it can be avoided, you should NEVER drive on roads that are busy with traffic regardless of how bomb-proof your equine is. There are drivers who don’t pay attention and they are who you need to worry about. Learn more about DRIVING in the various sections under TRAINING and in the management and training products in the STORE on my website at www.luckythreeranch.com, particularly under TRAINING/TRAINING TIPS (#109 -#120).When these exercises are completed, you can safely move on to his athletic endeavors whether it be riding or driving. Whether riding or driving, the prep work is the same. The animal that is properly prepared will have far less issues with his physical mobility (less accidents and power vet bills!). The steps to training your equine to drive are simple and there are some stages where it is advisable to use an assistant, but you can learn to do this yourself.
I like to encourage people to do most of the training themselves because the equine bonds deepest with the person who trains them. You can find all kinds of helpful information about preparing your equine with postural balance and core muscles strength on my website at www.luckythreeranch.com in the various sections under TRAINING, especially under TRAINING/TRAINING TIPS #109 – #120 and at TRAINING/VIDEO ON DEMAND. You can purchase my books and videos in the STORE and I am always happy to send you a lot more detailed information if you email me at meredith@luckythreeranch.com.
DRIVING YOUR DONKEY (Page 29) Driving is loads of fun, but can be very dangerous if your equine is not prepared, and if harness and equipment is not selected and adjusted properly. Make sure the harness fits snugly and correctly so it can function as it should. Pay special attention to the weight and size of the vehicle, and to the lengths of the shafts on single hitch carts. Select the vehicle that pulls easily and is proportionate to your equine’s size. Make sure that your equine is physically prepared over a long period of time with the right kinds of groundwork exercises that will build core strength in good equine posture to avoid inadvertently straining muscles and or pulling tendons while in harness. This will greatly affect his mental attitude toward driving and keep it positive. If the equine experiences any kind of pain or distraction, he could bolt and run. Driving him in the future would be much more risky once he has been frightened. Keep driving contained to enclosed areas for the first two years of your equine’s driving experience to promote control, good communication, steadiness and safety. If you do drive on roads, always try to avoid driving along asphalt roads with heavy traffic to prevent unnecessary and potentially devastating accidents. Dirt roads are preferable. Know and obey the general driving rules of the road! Learn more about our comprehensive equine training approach in the various sections under TRAINING on my website at www.luckythreeranch.com.
MULE CROSSING: Learning to Stand Still for Mounting
Equines need clear and consistent handling practices. Teaching an equine to stand still should not just be trained as a singular task. In order to change behaviors such that they become repeated as new habitual behaviors, one needs to be logical, sequential and consistent in our own behaviors. New behaviors need to be strung together in a logical, progressive sequence and then practiced EXACTLY the same way ALL the time. Training begins with nutrition and the way your equine is fed. An equine that is fed at a specific time each day is far less stressed than those with inconsistent feeding times and will learn easier. What you feed and how is critical. The equine should ALWAYS be asked to stand still with a verbal WHOA and required to remain back when you open a door, or a gate, until they are asked to WALK ON. Read more at https://www.luckythreeranch.com/mule-crossing-learning-to-stand-still-formounting/


Profound Effects of Leading Exercises
(Page 47) Leading exercises can have a profound effect on both yours and your equine’s body that will make training go much easier. Good posture is not something that living creatures are born with; it must be taught. Balanced core strength around the skeletal frame and internal organs can only be attained by moving consistently in good posture during leading training in our hourglass pattern (you will change leading sides with every new arc in the pattern). It is not the same as developing bulk muscle. Leading with the rope in your right hand does not promote good posture as it will drop your right shoulder. As you lead with your right hand, it will subtlely move the animal’s head from left to right as you walk, putting him out of balance with every step you take and will strengthen muscles asymmetrically. To develop core muscle strength correctly, stand in good posture, hold the lead in your LEFT hand so you do not interfere with his head and neck, keep his head at your shoulder, look where you are going, point in the direction of travel with your right hand (use it to keep him in line when needed) and match the steps of his front legs (Photo #1). Always walk straight lines and gradual arcs to keep his body erect as he bends through his rib cage instead of leaning into turns like a motorcycle (Photo #2). To center his balance and command his attention at every halt, always square him up so he places equal weight over all four feet (Photo #3), and always make sure he backs slowly and straight…one step at a time (Photo #4). These are the subtle exercises that will develop strength and balance in his core muscles, improve his attentiveness and will allow internal organs to function properly. This is similar to what Pilates does for humans. These leading exercises can be done with our “Elbow Pull” to rehabilitate older equines that are more permanently stuck in bad posture as shown here. Always lead your equine this way from the time you fetch him from the pen until the time you put him away. Over time, good posture will become his normal way of moving. Learn much more detail in the “Training Tips” and “MULE CROSSING” articles under TRAINING on my website at www.luckythreeranch.com, or still more in my Equus Revisited manual/DVD combo that can be purchased from our STORE.

LTR Training Tip#33: Plan Every Move for Good Posture
By planning every move and being consistent, you can reinforce your equine’s good posture—until it’s a natural state for them.

MULE TALK! PODCAST: Rock and Roll: Diary of a Rescue: Part 2
Rock and Roll: Diary of a Rescue: Part 2 –
- Hear the amazing story of Rock and Roll – the rescued draft mule team, the discovery of their injuries, and the dedicated team of professionals working hard to give longevity to their lives. There were comebacks and setbacks; this incredible story will touch your heart and soul.
- This episode explains in detail about Roll since the passing of his half-brother, Rock. They spent many years together hitched and pulling a wagon.
Learn more on Mule Talk podcast.
For more training info: www.LuckyThreeRanch.Com and click on the Training tab.
Mule Talk is an Every Cowgirl’s Dream production – www.EveryCowgirlsDream.Com

Winter Fun With Your Equine
(Pg.6, 12-21-16) Colder temperatures and a little snow needn’t interfere with your equine activities. Your equine companion will appreciate the companionship and the creativity of the lessons no matter how simple the interaction. To keep things safe, be sure to dress warmly and avoid slipping by wearing the right boots and by keeping your equine barefoot. Use Borium shoes only if needed when riding or driving your equine and try to avoid confrontations with him that could produce resistance. The simplest of lessons like leading and lunging can afford safe and satisfying experiences between you, and will help to clarify the communication between you and keep your equine physically fit. Postural balance and core strength exercises are very passive and easy to execute in winter, but they make an incredible difference in your equine’s health and longevity. So don’t spend the winter just sitting around. Go out and have some winter fun with your equine partner! He will truly appreciate the extra time with you and you’ll both be all the healthier for it! Learn more about training for core strength and good equine posture in my comprehensive management and training program at https://www.luckythreeranch.com/mule-crossingdo- mules-need-to-be-shod/.

LTR Training Tip #31: Proprioception
Equines are not born with an awareness of their own bodies, or proprioception, so they must be taught how to orient themselves.

MULE CROSSING: Do Mules Need to be Shod?
Do mules need to be shod? Those who are familiar with mules might be tempted to say, “No,” but the answer is a little more complicated than you might think. Although the mule generally has a tougher and more durable foot than the horse, all mules do not have the same feet, nor do all mules apply the same kind of stress to those feet. Therefore, each individual animal has to be considered when answering the question, “To shoe or not to shoe?” Read more at https://www.luckythreeranch.com/mulecrossing- do-mules-need-to-be-shod/
Waiting Patiently: Rimes’ Search for a Forever Home
The following is from All About Equine Animal Rescue:

|
|


|

|

|

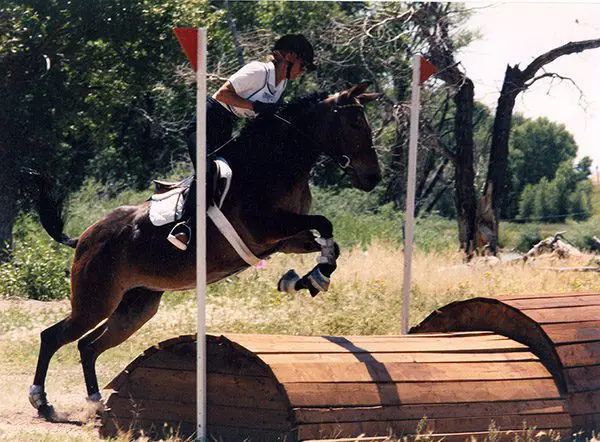
Donkeys Can Jump
(Page 74) When one thinks of mules and donkeys, one usually doesn’t think about them being able to jump. Contrary to popular belief, not only can Longears JUMP, but they can jump from a standstill where a horse cannot. Given their jumping ability, it is important to have adequate fencing for your Longears. The fencing must be strong enough to withstand their strength, high enough to discourage jumping attempts and a hot wire to make sure! What they can’t jump, they with either dig underneath or climb over the top! In order to keep them in, what is most important is that your Longears WANTS to stay home, or you might find yourself retrieving him from the neighbor’s yard! Learn more about my special management and training practices for the ultimate in safety and enjoyment with your Longears, and even with your horses and ponies – and learn how to keep them HOME at www.luckythreeranch.com.

MULE CROSSING: Jumping Mules
In 1986, when I first began using my mules in Dressage, you would never have convinced me that I would follow it up with jumping. I was fearful of jumping because of a few bad experiences I had with horses. However, once I took the time to learn to ride and train properly with Dressage and experienced the overall stability of a mule, my fear disappeared. Read more at https://www.luckythreeranch.com/mule-crossing-jumping-mules/

MULE TALK! PODCAST: Rock and Roll: Diary of a Rescue, Part 1
Rock and Roll: Diary of a Rescue, Part 1 – Draft Mule Team Rock and Roll were rescued and in their journey were turned over to Meredith Hodges of the Lucky Three Ranch.
- Learn the details involved when dealing with rescue animals.
- Surrounding yourself with a professional support team for treatment of rescues.
- It’s more than just farrier work and supplementing a feeding program.
- Taking X-Rays when needed.
- Keeping records and documenting your work.
- This and more on Mule Talk!
Learn more on Mule Talk podcast.
For more training info: www.LuckyThreeRanch.Com and click on the Training tab.
Mule Talk is an Every Cowgirl’s Dream production – www.EveryCowgirlsDream.Com


Training in a Logical Sequence
(Page 69) When equine training is done in a logical and sequential way with each new stage building on the one before, it can be non-abusive, fun and easy for you and your equines! Most resistance comes when you, your equine or both of you are overwhelmed with the task at hand. Training should not just be learning to do “things.” Just as a baby learns to crawl, before he walks, walks before he runs and develops his coordination before he can play sports, your equine needs to build his body slowly and methodically if he is to perform tasks easily. Much of the time, we think we are doing this, but we forget that we need to prepare his body to carry a rider first! The equine is naturally built to carry weight BELOW the spine and not necessarily on the top of the spine. This is why it is so important to develop the core muscles and elements that support the spine FIRST through careful, specific and meticulous leading exercises done in our “Elbow Pull” through the Hourglass Pattern. This will encourage good posture and symmetrically balanced body movement.
When this has been adequately developed, the next two stages are to facilitate coordination through the negotiation of different obstacles, first by rhythmically walking straight through (Stage #1) and then by breaking them down into much smaller steps with long pauses between steps (Stage #2). All this will take place before doing any lunging in the Round Pen to solidify his good equine posture. This will keep the equine from compromising his balance by leaning like a motorcycle in the Round Pen. He will learn to lunge on a lunge line in the confined space of the Round Pen and learn the cue to keep him on the circle BEFORE he is asked to lunge on the lunge line in more open spaces. He will learn the effects of communication through the long lines (rein cues) in the Round Pen before he is asked to respond to these cues during Ground Driving in the open arena.
By the time he has gone through all these logical and sequential steps, when he is finally mounted, the only thing left for him to learn is to move away from the pressure of your legs on his sides. Get healthy and find JOY all at the same time with your equines using our comprehensive training program. Learn the details of this sequential and logical approach to training for yourself AND your equine in the various sections under TRAINING on my website. If you cannot find the answers you are seeking, email me at meredith@luckythreeranch.com and I will answer your questions promptly!