

MULE CROSSING: Organizing a Show
 By Meredith Hodges
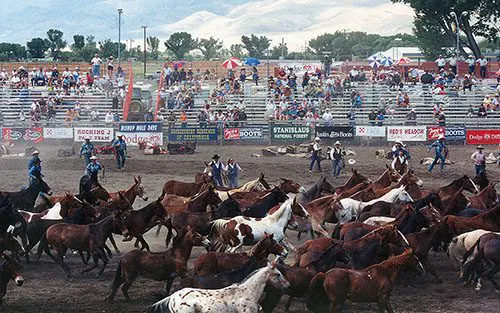
Organizing an equine show is certainly no easy task, and it is certain that there will be problems to deal with along the way, but these problems do not need to be monumental if the people who are organizing the show clearly know the parameters of their particular jobs. It is also important that exhibitors know these duties, so that they can contact the proper person if a problem arises.
Organization of a show begins with the show management committee who is responsible for the detailing of the show. Of this committee, there is usually a designated chairman in charge, or show manager. The duty of the show manager is to assign specific duties and delegate authority to others connected with the show. He is the coordinator of the show and will only make decisions that cannot be made by other designated show officials. It is his duty to see that other show officials are doing a thorough job with their duties. The show manager may elect to have an assistant to help him with his many different duties.
 The show secretary is responsible for taking minutes of all show committee meetings and often acts as liaison to the show manager. It is the secretary’s duty to see to it that mailing lists are complete and potential exhibitors are notified of the impending show and are kept up to date. The secretary checks the public relations work done on the show by the public relations person, and in some cases, assumes this duty himself. The secretary records entries and receives funds sent in by exhibitors. Any program changes, protests, etc. are recorded by the secretary. The secretary is responsible for recording show results and mailing them to appropriate recipients, and to see that the results are released to the public in a timely fashion. The treasurer is responsible for handling and depositing funds used for the show and often aids the secretary in his duties. It is the treasurer’s duty to see to it that all expenses for the show are accounted for and paid and that a detailed report of such is given to the secretary.
 Judges are selected by the show committee and are paid for their expert opinion. Judges should be briefed by the show secretary as to the duties they will be expected to perform which sometimes may include designing courses for the competitions. A set of rules should be sent to the judge well in advance of the competition to allow for any questions that might need to be answered. The judge should not be asked to interpret the rules. Rules should be made clear enough that he can make his decisions easily, which are in turn deemed final. Judges are given the power to combine, or split classes where appropriate. The judge should not socialize with exhibitors until the competition is over to preserve his objectivity and integrity. When time permits, the judge should give reasons for his decisions to give credence to his choices and to help exhibitors learn. The judge should be knowledgeable, congenial and professional about his duties.
 The ring steward, or judge’s aid, has many varied duties. First and foremost, it is his duty to see to it that exhibitors adhere to the rules of the competition. It is his duty to interpret the use of the rules and not the duty of the judge. The ring steward is responsible for listening to and reporting complaints or protests. Although he has no authority in connection with the management or the judging of a competition, he should point out in a diplomatic manner any instance where rules are not being adhered to and report any violations to officials.
 He needs to be available to judges, officials and exhibitors at all times. He is to supervise and record any timeouts for tack changes or equipment breakage, and to measure animals where required. He is to conduct the breaking of ties in classes and to deliver the judge’s decisions to reporting officials. The ring steward is responsible for all medication forms, reports, and testing, with the aid of the secretary and the veterinarian. He is responsible for the accuracy of competition lists of entries and their class placements as reported by the judge and is to see to it that completed lists are given to the show secretary. The ring steward should protect the interests of the exhibitors as well as the integrity of the show. The ring steward should see that the competition moves along in a timely fashion. He, with his various duties, is a key entity for the success of the show.
 Scorekeepers and timers are used to record scores and times for specific classes and should be equipped with the proper tools to facilitate their jobs. Flags, stopwatches, time sheets, calculators, and writing utensils are necessary items. Scorekeepers should be prepared to keep times and scores updated continually so that championship classes can be announced quickly and easily.
The announcer is a very important component of any show. He must be able to speak clearly and audibly, to know the general rules and regulations for the show and should be creative enough to keep the spectators engaged throughout the entire show. He needs to be able to spot exhibitors and know their names from the exhibitor numbers displayed on their backs or on their animals. The announcer needs to be able to accurately pronounce the winners of each class as per the judge’s sheet  provided by the Ring Steward. It really helps if he has that “announcer’s voice” and is an animated character!
To assist on the arena floor during class changes, there should be a ground crew available. It is the duty of the ground crew to see to it that the arena is in good repair, dragged and fluffed when necessary, and that the obstacles for specific classes are placed and removed when needed. In over-fences classes, the ground crew may be asked to reset jumps. In gymkhana classes, they are required to reset poles, flags, barrels, etc. It is the responsibility of the ground crew to see to it that obstacles and such are stored properly after the competition and that donated articles are returned to their owners. The ground crew can also be asked to assist in the stabling area hauling manure, delivering bedding, finding stall assignments, or any other related duties. Keeping warm-up arenas ready and working are also the responsibility of the ground crew. There may be a stable manager, but he is usually responsible for receiving stabling forms and arranging stabling assignments, bedding requests and other related clerical duties. The stable manager also oversees the maintenance and work of the ground crew in the stable area.
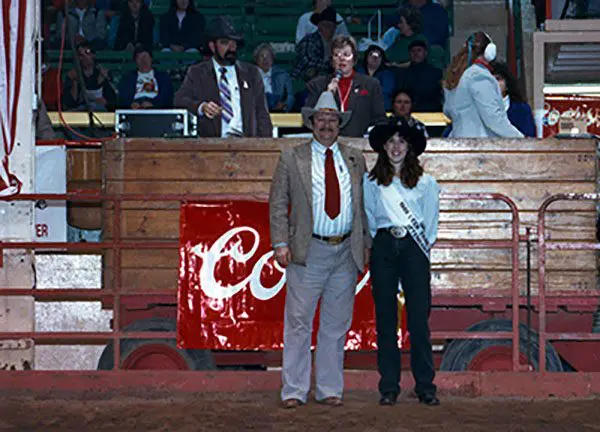
 Parking Attendants and Stable Managers should be used when necessary to assist exhibitors in loading and unloading, and in the parking of their trucks and trailers. They can make the difference when it comes to traffic congestion at the show. Parking attendants may also be requested to take note of the owner’s vehicles, so that they may be notified quickly in the event of an emergency with their vehicles. This can help prevent theft or vandalism. The Stable Manager sees that each animal is efficiently unloaded from the trailer and is escorted to his respective stall. If the show is providing hay, he will make sure each exhibitor has as much hay as they need and that any other needs are provided. Newt Elsdon was the model Stable Manager and Show Committee member for the Bishop Mule Days Celebration for many years.
 Last, but certainly not least, are the show veterinarian and farrier whose expertise are to be used for emergency show situations. An exhibitor should not expect to use their services for regular maintenance at the show unless pre-arranged. Veterinarians and farriers should be booked well in advance of the show to allow for their busy schedules. Alternates should also be booked and at the show, their areas should be clearly marked and they should be easy to locate.
Organizing a show is a tremendous job, but when duties are outlined clearly, things will run as smoothly as can be expected for any such event. There are probably some things I have forgotten to mention–there is so much to consider, but I hope I have outlined a general idea of what duties to expect from what show committee members. Our mule and donkey shows are constantly improving thanks to conscientious and enthusiastic organizers in our show committees. Hats off to you all!
To learn more about Meredith Hodges and her comprehensive all-breed equine training program, visit LuckyThreeRanch.com, MEREDITH HODGES PUBLIC FIGURE Facebook page, or call 1-800-816-7566. Check out her children’s website at JasperTheMule.com. Also, find Meredith on Pinterest, Instagram, MeWe, YouTube and Twitter.
Covered in TRAINING MULES & DONKEY: A LOGICAL APPROACH TO TRAINING, TRAINING WITHOUT RESISTANCE, EQUUS REVISITED and A GUIDE TO RAISING & SHOWING MULES at www.luckythreeranchstore.com.
© 1993, 2016, 2024 Lucky Three Ranch, Inc. All Rights Reserved.


 By Meredith Hodges
 The gift we have found with Longears is one that needs to be shared with others that they might also experience the joy and pleasure of these animals. In this hustle-and-bustle world, it is easy to miss out on the things that are really important like love, sharing and simple pleasures derived from personal growth. Mule and donkey shows are the vehicle we can use to bring these things to light and revitalize the appreciation of Longears. The show ring is a place where mules and donkeys can exhibit the results of experiments in a new realm of performance. Challenges are made and met with both humor and enthusiasm.
 transportation, inopportune geographical locations and the fear of politics. We must remember, however, that this intimidation was born of the horse show formats. There are literally millions of horses being shown all over the world and out of necessity the shows were divided and specialized according to ability and breeding. This is the only fair way to progress and still accommodate the growing numbers of equines and their owners. In the midst of this overwhelming competitive spirit, we sometimes lose sight of the true benefits of showing. Showing should be an opportunity to test your equestrian skills and to share new ideas and concepts with others. It should be fun and enlightening.
 Because mule and donkey showing is relatively new, there is much to be gained by participation. Those who feel that their animal is not of show quality can still attend shows and learn a lot about Showmanship, grooming and training skills. This development of new skills can make all the difference between show quality or not, particularly in performance events. Newcomers to showing also give the audience something extra-special. Their enthusiasm is often contagious and the audience is subtly invited to virtually join in the show. This is something that they too could manage and enjoy. Those who feel they just cannot get in enough training time can still participate in today’s donkey and mule shows as the class roster will usually include a lot of fun classes. If they do not, it is a relatively simple matter to contact show representatives and request these classes for your area. There are enough mule and donkey clubs today to sponsor all kinds of shows and one need only contact any one of then to acquire any information needed.
 Time and money are a great hindrance to showing today. Economic problems are quite prevalent these days, but as they say…”where there’s a will, there’s a way!” With careful planning and setting of priorities, one can determine the number of shows to attend in a season. Those of us who sponsor and work on shows are sensitive to the needs of our exhibitors and are willing to help in every way we possibly can. Most donkey and mule shows are not all that expensive and can be managed fairly easily. At most of the larger shows, those who wish can tie up to their trailers and save the stall fees. This is true in a lot of regions. Entering fewer classes will also save money and still provide you with the important learning and social benefits of showing. There are so many different sizes, colors, and abilities in mules and donkeys that we really need as many to participate as possibly can to properly represent our longears breeds.
 ast, but certainly not least, a word about politics. In the mule and donkey industry, we are promoting donkeys and mules. As individual animals meet new challenges and succeed, we should all feel a little warmth and joy for that individual who has obviously worked long and hard, and who stands as a representative of his breed. We can all be proud of his contribution to a greater cause. When in competition, compete against yourself and learn to derive joy and pleasure from your own improvements. There is a lot that showing has to offer besides ribbons and trophies. Showing gives you the opportunity to test your skills and to measure successes. It affords one the opportunity to assess different skills, make personal choices and to expand social interaction and education among those of similar interests. But most of all, showing gives each of us the opportunity to do our part in support of our beloved donkeys and mules!


 Why does Dressage training lend itself so well to training mules? In order to answer this question, we need to have a clear understanding of what Dressage really means and how it pertains to the mule’s mental and physical development in relationship to our own expectations. When most of us think of Dressage, we picture in our minds those elegant Lipizzaner stallions of the Spanish Riding School in Vienna, Austria.
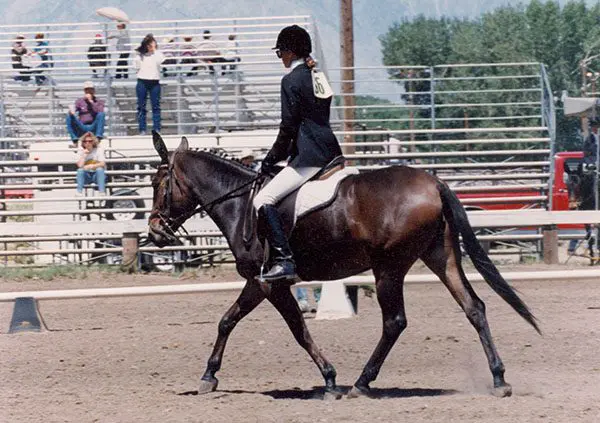 I have found that my mules will exhibit resistant behavior when they are confused or frightened, but never out of “stubbornness.” Often, we take it for granted that, since a young mule can walk, trot, canter, back up, etc. by himself, he should be able to do all these things with us astride. What many people don’t realize is that mules are born with as diverse postures as humans, and there are few mules that will exhibit good equine posture without being constantly reminded. People compensate continually for deficiencies in their own body structure, and posture will vary from person to person and situation to situation. For example, a straight-backed chair will cause most of us to sit up straight, which is healthy for the spine and neck. On the other hand, the sinking comfort of a plush couch will produce a collapsed posture, which can eventually produce sore back and neck muscles. In a similar way, a mule will have to sacrifice his good posture to accommodate an unbalanced and inexperienced rider.
 By taking the time to condition and strengthen their muscles, we allow our mules to engage in physical exercise that is not taxing and painful, thus, keeping their mental attitude fresh and happy. By conditioning your mule in a carefully sequenced pattern of exercises, you will more often avoid the possibility of throwing him off balance and into the confusion and fear that will lead to resistance and disobedience. With your own posture in mind, you can develop the rider and mule as one unit. The process is slow but thorough, and mutually satisfying.
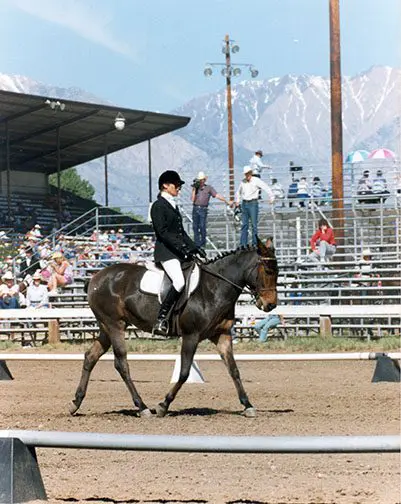 Equipment use plays an important part in the breaking saddle used, but many trainers today will agree that the less complicated equipment is used in the beginning, the better. The Western saddle may certainly be used for breaking but, from the mule’s standpoint, the Western saddle is heavier and there is quite a lot of leather between you and your mule, which can cause a certain amount of interference in communication. If the mule cannot “feel” his rider well, often times a leg or rein aid can come as a surprise and produce a response that is predisposed to resistance. For this reason, I prefer to start training in an all-purpose—or Dressage—saddle. However, I would recommend training in a Western saddle for the less-experienced rider, or if you are training a more easily excitable animal.
 As in any exercise program, it is not advisable to drill and repeat every day. With a mule, as with any athlete, muscles need to be exercised and then allowed rest for a day or two between workouts to avoid serious injury. In between Dressage days, you can take your mule for a simple trail ride or just let him rest. The time-off and a variety of activities will keep him fresh and attentive. Three times a week is usually sufficient, with Dressage training for his proper development and conditioning, two days of simple hacking or trail riding and two days of rest. This also takes the pressure off of you. If you’re not into riding on a particular day, you won’t feel like you have to because your mule will retain his learning without the added stress of drilling day after day. Try to think of your mule’s training in terms of yourself: Would you care to be drilled to exhaustion day after day? How would you feel mentally and physically if you were? Dressage—whether it is basic or the most advanced—is a French word for training. It is thoughtful, considerate and kind, and will produce a mule that is mentally and physically capable of doing anything you might like to do with a relaxed and willing attitude. It may take a little longer, but the result speaks for itself.
 There are so many equine-related products on the market today that it is often difficult to decide which ones you really need and which ones you don’t. For instance, the subject of Splint Boots and Leg Wraps can be very confusing. How do you know when to use them? What types of Leg Wraps or Splint Boots are best? Do they really help? In what ways do they help? What kind of material should they be made from? And the list of questions goes on.
 are also used for support during training. These types of wraps are commonly used during Dressage training and typically only cover the Cannon Bones and not the fetlocks and pasterns. If you use Polo Wraps, or quilted cotton pads and wraps, learn to wrap them correctly to avoid pressure points that could cause circulation problems. Begin the wrap by placing the quilted pad or cotton pad in place around the Cannon Bone. Start the wrap at the center of the Cannon Bone, measure the tension on the wrap to make sure it does not interfere with circulation, that it is just snug and wrap down to the Fetlock joint. Then wrap upwards to just below the knee and Velcro the wrap in place. To keep the wrap from sliding down, use Duct tape just below the knee with one rotation of a tighter wrap to keep it in place. Consult with a professional to learn the proper wrapping technique. It is usually a hands-on lesson with a lot of practice! When they have lost their elasticity, it is time to throw them out.
 After his basic training, when your equine is participating in more stressful activities such as Jumping, Endurance, Reining and Racing (or in the case of an injury), it may become necessary to use a more supportive boot to lightly support already conditioned muscles and tendons. Support boots are designed to provide even support over the entire area that they cover. Be careful that they are neither too tight, nor too loose. You don’t want the boots so tight that they cut off the blood supply to the covered area, or not flexible enough to allow the joints to move freely. However, you don’t want them so loose that they ride down the legs.
 lameness if damaged, even by a small, seemingly insignificant cut or bump. If a hoof is unusually dry, severe cracks can occur. It is advisable to routinely use a hoof dressing in addition to the “Bell Boots’ to prevent traumatic cracking during repeated concussion.
 You might be asking yourself, “How can I tell a minimal support boot from a fully-functional medical support boot?” This can be quite confusing considering all the different kinds of leg wraps and splint boots that are out there. Some even look identical, but are not. Off-brand Splint Boots look a lot like Pro Choice Splint Boots, but they are made from inferior-quality materials that do not afford the degree of support and flexibility needed for successful therapy. Although these off-brands are designed for support and do cover the joints, they should be considered as more of a protective boot than a Therapeutic Boot. Splint Boots are strictly for the protection of the Cannon Bones because they do not cover the joints and offer very little support.


 By Meredith Hodges
 Mules can be lovely, obedient and secure Side Saddle mounts when they are brought along correctly as has been exhibited nationally by Crystal Elzer and her mule, Final Legacy. I also fondly remember Ann Hathaway and her Dressage mule, Baby Huey, exhibiting Side Saddle in the Bishop Mule Days parade years ago. I judged the A.D.M.S. Nationals in Austin, Minnesota, and again, I witnessed a sprinkle of elegant Side Saddle riders on mules. In the state of Colorado, there was a surge of Longears Side Saddle riders beginning in 1983. The Side Saddle class for mules at the National Western Stock Show in Denver, Colorado previously had no less than 10 entries in the Side Saddle Class since its beginning in 1983 when an entire mule division was brought back after a long absence from the show.
 Generally speaking, people are quite impressed with the ladies who ride aside, and a common question often arises, “You sure look elegant, but how on earth can you stay on that way?!”
 My daughter, Dena and I truly enjoyed riding aside both in shows and in parades. Dena was thrilled to be able to finally best seasoned Side Saddle rider, Crystal Elzer in the Bishop Mule Days Side Saddle class. Crystal was a practiced Side Saddle competitor from California at Bishop Mule Days that had bested her for the previous three years.
 The training of your equine for Side Saddle should be accomplished fairly easily if your animal has a good foundation to start, and those trained in Dressage will convert the most easily. The absence of the leg on the right side gives problems most often during the left lead canter and during the leg yield left. Though many ladies will use a whip as a substitute for the right leg, it is not necessary. The animal at the higher levels of training (1st Level Dressage and above) have learned to follow your seat, and will do quite nicely staying under your seat as you move through the patterns. If your animal needs additional support, it can come through supportive indications through the reins. To achieve the left and right lead canter, for example, a slight push with your seat and a squeeze/release on the indicating directional rein will tell your animal the correct lead to take. It’s that simple!
 There are quite a few existing Side Saddle organizations today that are available to those of you who might be interested in taking lessons and participating in shows and award programs. You can check your local area for one near you or you can contact the International Side Saddle Organization, 75 Lamington Rd., Branchburg, New Jersey, 08876-3314, (706) 871-ISSO (4776),
  If you think you might be interested in learning to ride aside, contact one of these organizations to find out what people you should contact in your area to help you and others that share your interest. The feeling of elegance and accomplishment is unmatched. Our world could use a little more whimsy and romance to help the modern woman to enjoy her dignity and elegance in this fast-paced world. Hats off to the lovely ladies who ride aside!


 In order to perform the shoulder-in properly, it is important to understand its purpose. The shoulder-in causes the equine to engage his hindquarters so that they carry the bulk of his weight, giving him more freedom and suppleness in his shoulders and front quarters. A strong base must be established to carry this weight forward while the shoulders remain light and free to proceed forward while tracking laterally.
 Begin by walking your equine around the perimeter of the arena. When you reach the corner before the long side, make a ten-meter (30-foot) circle. As you close your circle at the start of the long side of the arena, maintain the bend that you had for the circle, using steady pressure on your inside rein. At the same time, nudge your equine with alternate leg pressure in synchronization with his hind legs as they each go forward. Squeeze your outside rein at the same time that you squeeze with your outside leg, and then release the outside rein. Ride the hindquarters straight forward from your seat and legs, as you offset the shoulders with your hands. Be careful that your inside rein is not so tight that your animal bends only his neck to the inside. As you squeeze with the outside aids, feel your equine rock his balance back to the hindquarters, giving you the sensation of pedaling backward on a bicycle. Simultaneously, you should feel the front quarters begin to lighten and become supple.
 Take your time and don’t try too hard. Be content at first with two or three steps of shoulder-in and then straighten him down the long side of the arena. After a few accurate steps of shoulder-in, as he straightens his body, you will feel him surge forward with more energy. Collect and slow your equine’s gait through the short side of the arena and then repeat the exercise on the next long side. As your equine begins to understand the concept of rocking his balance to the hindquarters, the surge of energy that you feel when he straightens will become more and more powerful.
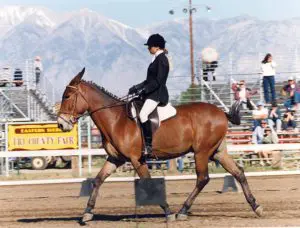 down the long sides. To add variation, ask him to lengthen across the diagonals (from corner to corner) as well. Your equine’s first impulse will probably be to shift his weight to the forehand and just speed up. For this reason, do not push him too hard too soon. At first, just ask for a little more energy—be aware that your rhythm and cadence will not be lost as his stride increases. He will just be spending more time in suspension. Keep the forehand light and free while you ride the hindquarters. Let your hand open slightly with the foreleg going forward on the same side, and close as the leg comes back. This will help you to determine how far you can let that stride go before the balance begins to shift forward. It will also allow you to check the balance with your hands before it begins to shift. If he has too much difficulty, you should go back and practice lengthening over ground rails again to gain more strength and coordination.
 As your equine gains strength in the hindquarters and is better able to carry your weight, his lengthened gaits will continue to improve until, perhaps a year or so later, he will be able to fully extend his stride at the walk, trot and canter. I caution you, however, that if your animal begins to rush, ask for less.