

MULE CROSSING: Donkey Training, Part 7
By Meredith Hodges
If your donkey has any problems with the trot after the previously described exercises, it will probably be in the hourglass pattern while under saddle. If he has difficulty maintaining the trot through the turns and serpentines through the middle, and continues to bulge either one way or the other, you can try one more thing to help him. Have your assistant ride a seasoned animal through the pattern ahead of you while you follow a few strides behind. Don’t ride too close, or too far away. Your donkey should be more than willing to follow. After all, doing things with friends is always more appealing.
When his trot work is going well, it is time for your donkey to learn to canter. Begin with a complete review in the round pen—lunging at the walk and trot, ground-driving at the walk and trot, turns at the walk and trot, and riding  at the walk and trot. Then dismount and try lunging, first at the trot, then ask him to “Canter.” Use the same cues you did at the walk and trot. Give the verbal command first, then shuffle your feet while raising both of your arms, one pointing in the direction in which you wish to travel, and the other one raised behind you, with the whip in-hand. If he does not comply, then lightly tap the whip to his gaskins once just above the hock, then tap it harder on the fence behind him. He should begin to canter. Even if he canters only two steps, stop him, reward him and then try again. Don’t keep asking for more right away, because he will only get frustrated and stop. If you are patient and consistent, he will canter farther each time. Once he canters fairly well while lunging, you can skip ground-driving and go straight to riding him at the canter. Have your assistant stand in the center of the round pen with the lunge whip and “lunge” him while you ride and cue from his back. Sit very quietly and with a very loose rein, allowing him to canter until you say “Whoa.” Make sure you and your assistant are exactly in unison with your verbal commands, since you do not want to confuse the donkey. If, after a few sessions, he positively refuses to canter, fear not. You can try something else first, and come back to cantering later.
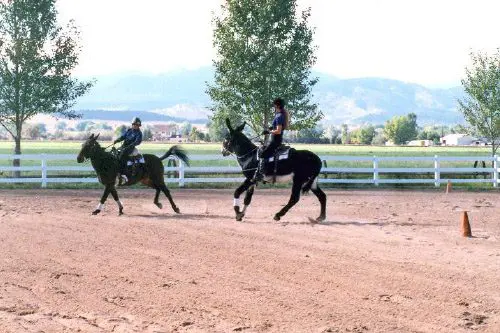
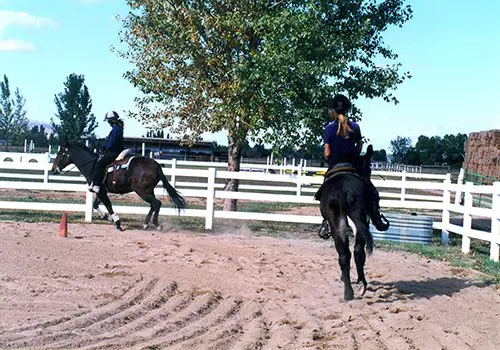 If your donkey hasn’t cantered in the round pen, go back to his lesson at the trot and allow him to succeed and be rewarded. Then take him into the large arena and allow him to follow an experienced animal through the hourglass pattern and along the perimeter of the arena at the walk and trot. Afterwards, go to the perimeter of the arena and have your assistant begin to canter out of a short side and down the long side. Encourage your donkey to follow. If he does not want to canter, slow him down through the short side and encourage him again on the next long side. If he wants to canter but is cutting the corner, let him. It is more important at this stage to get the canter than it is to stay on the rail. Be sure to call out your verbal commands repetitively as he learns to canter. You will say “Canter-Gee” for right and “Canter-Haw” for left. These are really important commands, as donkeys are more responsive to verbal commands than they are to your legs and reins. Let him canter for as long as he will, then stop and reward him. He will go longer periods of time as he gains strength and coordination. Make your circles as large as possible, at least fifty feet in diameter.
 When he is cantering—or loping—easily around the arena, you can begin to facilitate control at the canter by varying your exercises. Have him trot the short sides and canter the long sides of the perimeter of the arena. Be sure he is picking up the proper lead in each direction (more on leads in discs #5 and #6 of my DVD training series, Training Mules and Donkeys). Pick up the lead in the corner each time to help him. Then you can trot the hourglass to the corner of the short side, pick up the canter and canter a circle, half of the arena, come back where you started, trot, and resume the pattern. Just be sure your circles are large enough to encourage good balance. You can ask him to trot along the rail, do a turn on the haunches and canter away on the correct lead. This will help him to learn to canter without the use of a corner. Take him out into the open on the obstacle course and let him canter for some longer distances, both in a straight line and in very large circles. If he breaks to the trot at any time during any of the aforementioned exercises, do not let him continue on at a fast trot. Slow him to the walk, then halt, regroup and begin again. You want to always maintain control.
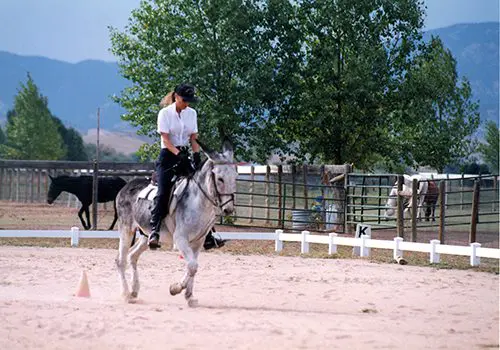
As your donkey canters more and more, he will become better balanced and better coordinated. He will become stronger and be able to carry the canter for longer periods of time, so don’t get in a hurry. He will DO as he is ABLE. This is the nature of the donkey. When he is cantering easily and is obedient through his transitions from walk to trot to canter and from canter to trot to walk, you can begin to teach him to change leads and negotiate smaller circles. Begin in the large arena and review his previous lessons, ending with turns on the haunches along the rail. Designate a circle in the middle of your arena, and, starting along the rail, pick up a canter, make a full circle, ride along the rail a short distance, then ask him to stop, do a turn on the haunches into the rail and resume the canter on a circle the opposite direction and repeat. This will help him to be more prompt into the canter.
Next, you will circle at one end of the arena, taking up half of the space. After about two or three circles, straighten your donkey as he rounds toward the middle of the arena. Ask him to trot through the center on a straight line, then pick up the opposite lead and circle once or twice in the other half of the arena. Ask him to “Canter-Gee,” “Canter-Gee,” “Canter-Gee,” and “Trot-Trot.” “Trot-Trot,” and “Canter-Haw,” “Canter-Haw,” and so on. If he misses the change of lead, just stop him and start again, only this time, bring him to a walk in the middle, then pick up the trot and canter as you round the new bend. If he gets strong and tries to rush, you may even have to stop him in the middle, walk, then trot, then canter on the new bend. Remember, you do not want to teach your donkey to run through any of your cues! That’s a really tough habit to break. Don’t canter for too long and be sure to reward him after every lead change at the end of at least one circle following the change. Neither do you want him to change leads and stop.
 The most important thing is to reinforce the verbal commands. Donkeys can be very dead-mouthed and very dead-sided, but they have the most acute hearing you’ll ever perceive and they rarely miss a verbal command. If your donkey is well schooled in his verbal commands, you will never need to set him up for his lead changes—he will always take the one you call for, even if it is a counter-canter. The same goes for every other command. If you want to stop and he is cantering, don’t forget to speak in order: “Canter, Canter, Trot, Trot, Walk and Whoa!” If you say “Canter,” then just “Whoa,” you will produce a sloppy and resistant transition, since donkeys aren’t into sliding stops, although they can do small sliding stops (Lucky Three’s Little Jack Horner was able to slide for fifteen feet). Even professional reining trainers will tell you that an equine has only so many good stops in him, and it is not advisable to do such strenuous and abrupt movements too often. So be concise with your verbal commands and try not to leave any out when “conversing” with your donkey.
While in the open, after he is getting more adept at the canter and he’s changing leads fairly easily and accurately, you can begin to teach him to change leads on a straight line. You will need a large open area, as you will be doing fairly big circles off each side of the straight line. Step One: Begin at walk, then trot (don’t forget your verbal commands!), then canter-haw, small circle, then straight for a few steps, trot-trot, then canter-gee, small circle, straighten, and repeat on the straight line. . Step Two: Ask for the new lead without the circle. If he starts rushing and ignoring your aids, just have him come down to walk, then trot, then canter again. If he doesn’t quite get it, go back to the exercise with the circles. You can add an interim step, provided he does not get too bent. You can begin on the straight line at the canter, ask for the trot and slightly bend him onto a new circle, then bend him back to the straight line once he has the lead. Be careful with this, though. If he is too committed to the circle, you can throw him off balance and defeat your purpose.
Now you can go back to the round pen and lunge at the canter. Many times, donkeys are just not comfortable with the size of a round pen canter circle. It seems to worry them because they are so sensitive to even the slightest loss of balance when trying to perform. I think you will find that your donkey, after learning to canter in a more open space, is more than willing to accommodate you in the round pen. By the same token, we have not bothered with the lunge line in the round pen and in the open for the same reason. After your donkey is sufficiently broke to saddle or harness or both, he will lunge very nicely on the lunge line.
To learn more about Meredith Hodges and her comprehensive all-breed equine training program, visit LuckyThreeRanch.com, MEREDITH HODGES PUBLIC FIGURE Facebook page, or call 1-800-816-7566. Check out her children’s website at JasperTheMule.com. Also, find Meredith on Pinterest, Instagram, MeWe, YouTube and Twitter.
Covered in TRAINING MULES & DONKEY: A LOGICAL APPROACH TO TRAINING, TRAINING WITHOUT RESISTANCE and EQUUS REVISITED at www.luckythreeranchstore.com.
© 1999, 2016, 2024 Lucky Three Ranch, Inc. All rights reserved.


 Training your donkey is not really much different than training horses and mules, although there are differences in instinct and attitude that will determine your approach in given situations. The mechanics and techniques, however, remain the same.
 When imprinting the foal, think of the kind of attitude you want to cultivate in him—do not come at him with the idea that he must accept you. This is a forceful and intrusive attitude and can foster resistance. Come at him with love, patience and kindness and these are the things he will learn. Give him respect and ask that he respect you and he will begin to learn about behavioral limitations. If he were in a herd, the adults would demand that he respect their space with well-placed discipline. You must learn to do the same without overdoing it. If he bites or kicks, a well-placed slap on the side of the mouth for biting and on the rump for kicking and a loud, “No!” will do the trick. Rewarding his good behaviors consistently will reinforce repetition of what you desire from him and will foster understanding between you and your donkey. This is the beginning of a long-lasting bond of friendship.
 Whether your donkey is a young foal or an older animal, begin with imprinting and do the steps in sequence. Learn how to properly put on the halter. Let him wear it for a while then take it off, as he could get it caught and injure himself if it is left on. When your donkey is not bothered by you putting on and taking off the halter, you can teach him to be tied. Put the halter on him and tie him to a safe post for one hour. Come by to see him every 10 or 15 minutes, untie him and ask him to “come.” If he does not take a step toward you, just retie him and leave. Come back in 10 minutes and try again. When he takes a step toward you, reward him with a treat and lots of praise. Stroke him on the neck and shoulder or on the poll between the ears, or scratch his chest or rump—whatever he finds most pleasing. Then try a few more steps. Don’t ask for any more steps each day than he is willing to give. Save them for the next time and soon he will lead easily. When he is leading easily, you can start taking walks around the farm and you can begin to introduce him to things he may find frightening. Lead him as close as he will go at your shoulder, then step toward the obstacle as close as the lead will allow and coax him to you. Offer a reward if necessary to entice him, and be sure to reward him when he comes forward. When he is confident about investigating “things” with you, you can progress to an obstacle course.
 At your first try going over logs, a bridge, tires, or other such obstacles, you may find your donkey reluctant to pick up his feet to negotiate an obstacle. He will probably try to go around it any way he can. Stand close to his head, holding him on a shorter lead, and ask him to “come.” If he moves only one foot over a log or tire or onto a bridge, stop, hold him there and give him a reward for his effort. Next, ask for the other foot and, if he is willing, let him walk over the obstacle, then reward him again. If he moves only one foot more, reward that, and proceed—slowly! You don’t want him to just run through it. You want him to come when you say “come” and to whoa when you say “whoa.” You are beginning to establish verbal communication with your donkey, so keep it simple and consistent. Do all obstacles the same way. Donkeys like to get crooked over obstacles. When he has learned to step through or over an obstacle but is not going straight, you can step directly in front of him, holding the halter on both sides, and ask for straightness as he negotiates the obstacle.
 Once he has learned to follow you over and around obstacles, he will be ready to begin the fundamentals of showmanship. Hold your lead in your left hand, keeping your right hand free and straight out in front of you. He should learn to lead with slack in the lead and to follow your shoulder. If he gets too close, you can use your right hand to push him back into position. Once you have begun showmanship training, ALWAYS lead him this way. Teach him to stand squarely on all fours every time he stops. You are not just teaching him to set up, but to carry his body in a balanced fashion so he will develop good posture and balance. When you want to teach him to trot on the lead, give the verbal command to “trot” and slowly move your own legs into a very slow trot. If he is difficult, do not go to the whip. Try to find something toward which he wants to trot. Above all, don’t get discouraged if he won’t trot the first few times, just slow back down and do something he already knows, then quit for the day and try again the next. Eventually, he WILL get it!
 Do the same exercises (outlined in DVD #1 of my


