

Kyle Davidson
Posts by Kyle Davidson:

Take Off the Elbow Pull
(Page 32) Many fans ask me what happens when you finally take off the “Elbow Pull?” Will the good posture go away? We use the “Elbow Pull” (photo #1) on equines that are two years and older during initial postural leading exercises first on the flat ground, then leading over and through obstacles (photo #5), during round pen lunging (photo #6) and ground driving (photo #7), and then for a year under saddle (photo #8). This helps their good equine posture to become natural and habitual through routine and consistent practice over a long period of time. Shown here is Lucky Three My April at twenty years old both with (photo #2), and without (photo #3), the “Elbow Pull” after only two weeks of tune-up work. Since she was young, April has had the benefit of leading and groundwork training for core strength in good posture prior to use with the “Elbow Pull” in the round pen. Also shown is Lucky Three Roll after only two years of rehab from a “collapsed posture” (photo #4). Lucky Three Roll was 18 years old when I got him, fully foundered with ring bone and side bones in three feet. The postural training rendered him sound enough at walk and trot to be lightly ridden until 2016. In early 2016, He got White Line Disease and it was his good postural balance that saved him. It allowed him to disperse his weight better over the other three feet and allowed his left hind foot to grow back. He became sound enough once again to be ridden for another full year and a half until he passed away in 2019 at the age of 27 years. Understand that the “Elbow Pull” is not designed to be used by itself as a simple restraint, but rather as an integral part of my postural training program. The restraint is NOT in the rider’s hands and is fully manipulated by the equine himself. It’s all about the equine’s self-carriage in good posture, unobstructed by human interaction. Learn much more under TRAINING on my website at www.luckythreeranch.com.
A bill that could stop a global animal crisis
The following is from the American Wild Horse Conservation:
![]()
Across the world, millions of donkeys are being killed each year to fuel a booming trade in ejiao — a gelatin made from donkey hides that is used in cosmetics and traditional medicine.
Demand for this product has exploded in recent years, driving a global trade that has devastated donkey populations and caused immense suffering. Donkeys are often stolen, transported long distances without food or water, and killed under inhumane conditions before their hides are processed.
The United States currently plays a role in this market as one of the largest importers of products containing ejiao. But Congress has a chance to change that.
The bipartisan Ejiao Act (H.R. 5544) would prohibit the transport, sale, and purchase in the United States of ejiao products and donkey hides used to produce them.
| TAKE ACTION |
Donkeys are vital partners for communities around the world — transporting food, water, and children to school.
They deserve protection from a global trade that treats them as disposable. Please take a moment to urge your lawmakers to support the Ejiao Act today.
Thank you for your support,
American Wild Horse Conservation
Two futures for America’s wild horses
The following is from the American Wild Horse Conservation:
![]()
Right now, America’s wild horses are facing two very different futures:
Future #1: The status quo.
Helicopter roundups continue to chase horses from our public lands, breaking apart families and sending animals into government holding facilities. Taxpayers spend $144 million every year on this cycle — and once captured, a single horse can cost up to $50,000 to house over their lifetime.
Or…
Future #2: A humane, science-based solution.
Fertility control using the reversible vaccine PZP prevents pregnancies while allowing horses to remain wild and free on the range with their families.
PZP is widely tested, scientifically-backed, and already proving effective. At American Wild Horse Conservation, we manage the largest wild horse fertility control program in the country, demonstrating that this approach can work at scale.
And it’s far more cost-effective:
- Lifetime government holding: up to $50,000 per horse
- Humane fertility control: about $3,500 for lifetime protection
Congress has already allocated $11 million for humane fertility control in the FY26 appropriations bill.
| TAKE ACTION |
Because the future of America’s wild horses depends on the choice we make today.
Thank you for standing with us.
— AWHC Team

MULE CROSSING: Selecting a Trainer
 By Meredith Hodges
We have our animals professionally trained primarily to allow them to perform to the best of their ability, but once we have decided to put them into training we are faced with the dilemma of selecting a trainer. With mules, selection of the trainer is of the utmost importance due to his psychological makeup. Remember that your mule cannot learn from someone he doesn’t like, and mules do have their preferences!
So, where do you begin looking for a trainer? The best place to begin would probably be at a mule show – study the animals and see who is winning the performance classes. Talk with those owners if they do not do the training themselves. They will probably be able to put you in touch with someone who does. Other good sources for trainers are the various equine publications that are popular in your area. Trainers, as in any business, will usually post ads. If no trainers are listed as such, study the ranch ads and contact the ranch owners – they should be able to help.
 Once you have accumulated a few names, call and make appointments to visit the various trainers. The interview with the trainer is as important to you as it is to him. You will have an opportunity to discuss finance, goals and general care. An appointment will also give you the chance to see his facility and allow you to draw your own conclusions before you make a commitment. There are many good horse trainers available today, but they are not necessarily qualified to train mules. The mule trainer must be a person of extraordinary patience and be well versed in technique… and just as a precaution, you might ask if he’s ever trained a donkey. The mule trainer must know how to appeal to the donkey half of the mule as well as the horse half of the mule to be successful.
When you visit the trainer’s facility, there are several ways to get the information you require. First, pay attention to the general condition of the facility. Is it clean, free of debris with safe fencing? Check to see that water and mineral salt blocks are available to the stock. Does the trainer have a good working area available to him? In bad weather, an indoor arena is essential. If he does not have access to an indoor arena, he may not be able to work your mule as often as needed for a good sound training program. Next, check the general condition of his stock. Are they well fed? Are there any obtrusive scars or bruises on the animals, and what is the condition of their feet? Are they properly trimmed or shod? The condition of a trainer’s animals can tell you a lot about the trainer.
 As a consideration to yourself and your mule, do not be afraid to ask the trainer if he will ride for you. You might want to mention the fact that you wish to see him ride at the time you make your appointment. The trainer can then be sure to allot the time necessary to ride for you. As he rides, watch the way he handles the animals. Are his hands light, yet firm? Does he ask for collection and cause the animal to travel smoothly and fluidly? Do his animals move away from leg pressure? Do the animals bend through their circles? Vertical flexion, impulsion, and lateral bend are all the elements of proper shape and any truly good trainer will know and practice these techniques. Beware of the person who claims to be a trainer, but only “rides” your animal. He could conceivably do immeasurable damage.
After touring the facility and watching the trainer at work, it is time for discussion. You have had a chance to determine the overall character of the trainer. If he is the least bit short-tempered or gruff, he is not trainer for your mule. If he seems patient and even-tempered, it is now time to discuss your goals and the way they will be financed. Be realistic about your expectations. An animal can be taught the basics in 60-90 days, but unless you are an experienced rider, the training cannot be maintained. Remember, training is primarily teaching the animal to respond to cues in a habitual manner and it takes time to build good habits. If you haven’t the finances for any more than 60-90 days and you are not experienced, ask the trainer if he would be willing to spend time in the last month, or so, teaching you how to ride your mule correctly. Any good trainer would insist that you do!
When you discuss your goals with the trainer, be concise and to the point. Ask him to clarify terms so that you understand exactly what he will be doing with your mule. Ask the trainer for a copy of the contract to take home with you and to study. To avoid any misunderstandings, ask the trainer about terms concerning the veterinarian, the horseshoer, hauling expenses, and any showing that you wish him to do. To clarify these responsibilities in advance will help to assure a good rapport with your prospective trainer.
If you are still unsure about a trainer after visiting his facility and talking with him, ask for references. While at home, you can check these references and go over the contract to see if he will, in fact, fit your needs.
Following these guidelines will enable you to locate the right trainer for your mule. Granted, it takes a little time to visit and discuss these things, but it is time well spent. The right trainer can produce a happy, healthy and well-mannered mule… but more than that, he can produce a satisfied owner!
To learn more about Meredith Hodges and her comprehensive all-breed equine training program, visit LuckyThreeRanch.com, MEREDITH HODGES PUBLIC FIGURE Facebook page, or call 1-800-816-7566. Check out her children’s website at JasperTheMule.com. Also, find Meredith on Pinterest, Instagram, MeWe, YouTube and Twitter.
Covered in TRAINING MULES & DONKEY: A LOGICAL APPROACH TO TRAINING, TRAINING WITHOUT RESISTANCE and EQUUS REVISITED at www.luckythreeranchstore.com.
© 1986, 1991, 2015, 2016, 2024 Lucky Three Ranch, Inc. All Rights Reserved.
Protecting Wild Horses for Generations to Come
The following is from the American Wild Horse Conservation:
![]()
We’re officially a month into the Year of the Horse, and at American Wild Horse Conservation, it’s already a powerful reminder of why this work matters so much.
America’s wild horses and burros embody freedom, resilience, and the spirit of the West. Yet protecting them requires constant vigilance, defending their right to live free on public lands, advocating for humane policies, and safeguarding the landscapes they call home.
The Year of the Horse is a time to celebrate these incredible animals. It’s also a time to ask an important question: How will we ensure wild horses remain protected for generations to come?
One meaningful way supporters choose to make a lasting impact is through a legacy gift.
By including American Wild Horse Conservation in your will or estate plans, you help ensure that the fight to protect wild horses continues long into the future. These gifts cost nothing today but provide powerful support for advocacy, habitat protection, and humane conservation efforts for years to come.
| CREATE MY FREE WILL AND LEGACY |
We’ve made it easier to take this step. Through our free partner FreeWill, you can create or update your will online in about 20 minutes.
You can also use this beneficiaries tool to review and update beneficiary designations on accounts like retirement plans and life insurance policies, another simple way many supporters choose to create a legacy for the causes they care about.
As we celebrate the Year of the Horse, we invite you to consider your role in protecting these iconic animals.
With gratitude,
American Wild Horse Conservation
MULE TALK! PODCAST: Selecting a Trainer
Selecting a Trainer –
- Where do you begin to look for a qualified trainer for your mule?
- Learn the smart way to interview a candidate to be your trainer.
- Viewing the training facility and having a conversation with the trainer.
- Take the time to read the contract and ask for clarification where needed.
- If you are unsure about the trainer, ask for references.
- After hiring a trainer, it is critical that you continually visit with your mule so he doesn’t feel as though he were stranded.
- Stay involved in the training process and work with your trainer.
- This and more on Mule Talk!
And follow along. Read the transcript.
Learn more on Mule Talk podcast.
For more training info: www.LuckyThreeRanch.Com and click on the Training tab.
Mule Talk is an Every Cowgirl’s Dream production – www.EveryCowgirlsDream.Com

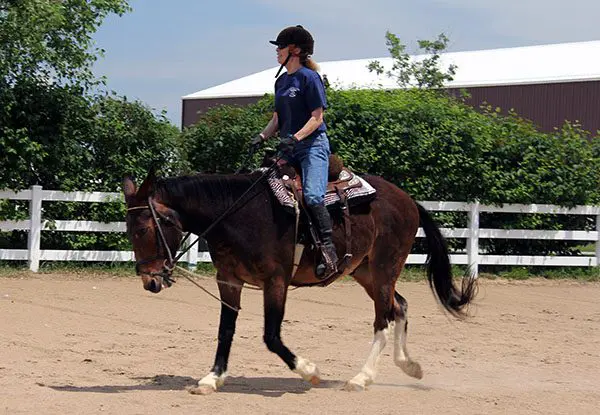
What is Good Equine Posture?
(Page 38) What is good equine posture and what does it look like? Good equine posture will be the same in principle for every equine. He should stand squarely at the halt with equal weight over all four feet directly underneath his body in a balanced position and his head should be raised in a natural position for his breed or type (neither too high nor too low). Each equine will be different in their individual makeup and their ability to stand correctly in good posture. When the base stance is square and balanced, the head, neck and tail will denote their breed, or type. When in motion, the equine in good posture will be balanced and symmetrical in his movement, stay erect with equal weight over all four feet and bend through the rib cage during arcs and side passes. The same animal can exhibit both good and bad posture depending on how repetitive and intensive his postural training has been. The most common indication of bad posture is a dropped hip and cocked foot when at rest. When in motion, an animal with bad posture will lean like a motorcycle during the side pass and around turns. Like a human being, the equine can practice good posture through constant repetition and with enough supportive exercise, good postural balance will become his habitual and rhythmic way of going. However, if he is allowed to “slouch” through too much inactivity, or only balanced in good posture once in a while, his development will be asymmetrical and compromised throughout his body and his habitual movement will be erratic.
Check out more about postural development in our EQUUS REVISITED manual/DVD combo at www.luckythreeranch.com in the STORE. Look in the various sections under TRAINING for much more helpful information or email me at meredith@luckythreeranch.com for even more details.

How to Make the Elbow Pull
(Page 31) Although the “Elbow Pull” is a very simple and straight forward device to help keep you equine in good posture, it is also a device that needs to be custom made to fit each individual equine. Equines that are approximately the same size in the front quarters will probably be able to use the same one. First, you need to obtain a package of 3/8″ twisted nylon rope. It is generally sold on the internet in 50′ spools, but is fairly inexpensive. Do not substitute any other kind of rope or leather reins, etc. as this will have a different weight and slippage around the bridle and will not have the same effect. Make sure that when you use the “Elbow Pull” that you place it OVER the crown piece on your bridle to prevent chafing and that you adjust it by first getting them to flex at the poll (by cupping your hand at the muzzle and rocking it forward and back or just offer some oats to get him to flex) and then push UP on his muzzle until he begins to push the nose out and hollow his back. This is not a device to “tie” their heads down. It should be adjusted just tight enough to prevent them from hollowing their neck and back, but still giving them full range of motion in every other direction (Up, down and to the sides).
You will also need two snaps that are narrow, yet fairly strong that can fit easily through the rings on your surcingle, or Western saddle. English saddle D-rings are generally too small and in this situation, we do not attach to them, but rather attach the “Elbow Pull” to itself after looping it through tied up stirrups. If you make the rope a bit longer for adjustment sake, you can loop it over the withers and attach it to the small D-rings on the opposite sides. The reason for twisted rope is so you can actually go through the D-rings and snap it into the twisted rope itself for a more exact setting. You would just untwist the rope at the setting point and snap into the middle of the rope so it won’t slide. With horses, you would just twist the rope over the back as shown so the snaps are a moot point until the horse learns to give to the “Elbow Pull” and can be hard tied.
Have the equine stand at the hitch rail with the snaffle bridle on. To get a measurement for how long a piece of rope you will need for his “Elbow Pull,” take a length of rope from the coil. From the near side (left side of your equine), feed the end of the rope from the inside to the outside of the snaffle bit ring, drape it over the poll of your equine and feed it from the outside of the snaffle bit ring to the inside on the off side (right) of your equine. Pull enough slack to go down through the front legs, behind the forearm, up and over the back such that it hangs 12 inches (or a bit more, but not less) over the spine. Then, go back to the near side on where you started and pull enough rope from the spool do the same thing on that side. When you have enough rope to loop over the spine on that side, you can cut the rope at 12 inches (or a bit more, but not less).
Once you have the proper length of rope for your equine, you will need to unravel 3″-4″ of one end of the rope and loop it through the ring on your first snap. Then you will braid the rope back into itself. First, pick the loose strand that is on top as you lay the rope across your hand, bend it around the end of the snap and feed it under a twist of the rope such that it creates a loop around the end of you snap and pull it snug. Then take the next loose strand (which would be the middle of the three strands) and feed it under the next twist down from the one you just did. Then do the same with the third loose strand under the third twist in the rope. Take all three strands in your hand, hold the rope so it doesn’t twist and pull all three strands snug. They should all line up.
Next, turn the rope over so you can see where the angled lines of the twisted rope begins again and feed the first strand under the first twist, the second under the second twist and the third under the third twist. Pull all three strands snug at the same time, turn the rope over, locate the first twist in the line and repeat until you have all 3″-4″ braided into the twisted rope. You will have some loose ends sticking out and nylon rope can slip, so you now need to take a lighter and burn all these ends until they are melted together and will not slip. Be sure that you burn them so they are smooth and without bumps or it will be difficult to feed the ends through the D-rings. Do the same with your second snap on the other end of the rope. Now, you have your own custom made “Elbow Pull!” If this is confusing, you can purchase our EQUUS REVISITED DVD which has a SPECIAL FEATURE that will show you how to do this at www.luckythreeranchstore.com


MULE TALK! PODCAST: Donkey Training, Part 3
Donkey Training, Part 3 –
-
When your donkey is doing well with the trot, time to learn to canter.
-
Use verbal commands with your donkey.
-
Training your donkey to move laterally.
-
Using the hourglass pattern in your training to improve posture and overall balance.
-
Using your elbow pull as a training aid.
-
Training your donkey at Cavalletti.
-
Training your donkey for jumping. And more!
And follow along. Read the transcript.
Learn more on Mule Talk podcast.
For more training info: www.LuckyThreeRanch.Com and click on the Training tab.
Mule Talk is an Every Cowgirl’s Dream production – www.EveryCowgirlsDream.Com
Nevada wild horse roundups began Sunday
The following is from the American Wild Horse Conservation:
![]()
Over the weekend, the Bureau of Land Management (BLM) quietly launched four wild horse roundups across Nevada — with just five days’ notice to the public. More than 2,500 wild horses and burros are now being targeted for removal from their homes on our public lands.
And because these operations are being conducted using bait-and-trap methods, the public is not allowed to observe them.
No observers.
No transparency.
No accountability.
| PROTECT WILD HERDS |
This is the plan the BLM began yesterday:
- Spring Mountains: 425 wild horses + 425 burros planned to be captured
- Pancake Complex: 300 horses to be removed
- Caliente Complex: 350 horses to be removed
- Antelope & Triple B Complex: 1,000 horses to be targeted
That’s 2,500 wild horses and burros being removed from Nevada’s public lands — largely out of the public eye.
These captures come after two “emergency” roundups were already carried out earlier this year, with the agency still refusing to release a full 2026 roundup schedule for public review.
In fact, American Wild Horse Conservation recently sent a formal letter to the Bureau of Land Management requesting that the agency immediately release its roundup schedule so the public can understand what is being planned for our federally protected wild horses.
But instead of transparency, the agency is moving forward with removals without a clear plan — and without allowing the public to witness what’s happening on the ground.
Wild horses belong on our public lands, and the public deserves transparency when the government removes them. That’s why this March, we’re mobilizing advocates across the country for a Month of Action to protect America’s wild horses and burros.
| TAKE ACTION |
We will continue monitoring these operations closely and will keep you updated as more information becomes available.
Thank you for standing up for America’s wild horses and burros,
AWHC Team

MULE TALK! PODCAST: Donkey Training, Part 2
Donkey Training, Part 2 –
- Repeat the previous lesson – BUT DO NOT DRILL YOUR DONKEY.
- Training your donkey to trot with a rider.
- Execute pattern training with your donkey to strengthen his body.
- Your assistant will only help you when needed while training your donkey.
- Training turns on the forehand with your donkey.
- Going straight on the rail.
- Be patient and understanding – your donkey will give what he is able to do.
- Training turn on the haunches with your donkey – and more!
Prefer to follow along? Read the transcript.
Learn more on Mule Talk podcast.
For more training info: www.LuckyThreeRanch.Com and click on the Training tab.
Mule Talk is an Every Cowgirl’s Dream production – www.EveryCowgirlsDream.Com
Ends TOMORROW: Carry the spirit of the wild horse with you
The following is from the American Wild Horse Conservation:
![]()
|

MULE CROSSING: Donkey Training, Part 3
By Meredith Hodges
Prior to each training session with your donkey, review all that he has previously learned: Always lead him to and from the work station in a showmanship manner, holding the lead in your left hand with your right arm extended forward; groom him and clean his feet; review the turn on the forehand and turn on the hindquarters in the round pen; and send him forward to the rail in the round pen at the walk. You may have discovered that you need to follow him more closely than you would a horse or mule. Staying in the middle of the round pen while you lunge your donkey may not be practical to keep him moving. Just stay behind him and to the side while driving him forward with your lunge whip, touching him with it only when absolutely necessary. Match your steps with his steps—walk only as fast as HE chooses. If you get in a hurry, he will stop. Be sure to give the command to “whoa” each time you want him to stop, and then reward him.
 Now that he is moving out well at the walk, you can teach him a reverse. As he is walking forward easily around the round pen, turn away from him, completely around, until you are in front of him. Step toward him, lay the whip ahead of him and give the command to “reverse.” Be aware of his space. Do not rush at him, or he may turn improperly. You want him to turn into the rail and resume the opposite direction. Give him plenty of time to make the turn and ask him to “walk on.” If he has difficulty, take a few steps forward and, with the whip, tap him gently on the shoulder to encourage him to turn. There is a purpose to turning away from him to turn him rather than just running ahead of him. By turning back the opposite way that he is traveling, you are establishing a new direction of travel, as well as giving him time to see that there will be a change in his movement. Most donkeys learn this very quickly.
So far, your donkey has worked only in his halter. This is the point at which mules and donkeys may differ. Your donkey has learned the walk and the reverse. Now he needs to learn the command to “trot.” Some donkeys will take exception to this command if they do not see a purpose in it. It is at this point that you should introduce the saddle, and/or driving harness (if he is too small to ride). You should also introduce him to the bridle at the same time. Let him see the harness (or saddle), then slowly put it on him. Most donkeys will let you do this quite easily.
Once he is tacked up, send him, at the walk, to the rail of the round pen again. Then give the command to “trot” and move toward his hindquarters with the whip, shuffling your feet in the dirt to make some noise. If he trots at this point, do not strike him with the whip or he will stop. If he isn’t trotting, you may strike him with the whip once at the gaskin, above the hock. Then keep shuffling your feet and move forward as he does, maintaining the same distance between the two of you. Move your arms up and down in big motions to encourage him forward. If needed, you can strike the fence behind him. If you invade his space, he will stop. If he trots, even a few steps, stop him with the command to “whoa” and reward him for his compliance. Do this one more time to clarify that you DO want him to trot. Then end the lesson here. He will be better at the next session, and at each new session, he will offer more steps of trot. Each time he trots, ask him to go only as far as he is comfortable, as long as it is just a little farther than the time before, and ask him to trot only twice in each direction. Donkeys don’t appreciate too much repetition.
 After his first lesson of trot, you can begin to integrate rein cues. During the second trot lesson, you will review all that he has learned up to the trot. Before you go to his trot lesson, you can attach your drivelines and ground-drive him through the walk and reverse while on the lines. He should have no trouble with you at his rear, since you have been lunging him from a close proximity from the beginning. Use your whip as you did for the turn on the haunches—at the shoulder for his turns, and at the gaskin to encourage him forward—but just touch him with it to remind him, don’t strike him. You want his movements to be smooth and correct, not abrupt. Pull as lightly as you can with a squeeze/release on the lines to encourage the turns, and make him move off more from your body language and the whip than you do with the lines. If he does well, stop, remove the lines, and send him back to the rail for his trot work—twice in each direction. (This means twice with trotting steps, not twice around the pen.) Then stop, reward him and tell him school’s out until the next time. Whether you come back tomorrow or a week later, rest assured that your donkey will be right where you left him in his training. They have an incredible memory!
At the next lesson with your donkey, review all you did before and add turning through the middle of the pen, and turning both into the rail and away from the rail on the drivelines using your body language and your whip cues (as lightly as possible). Be clear with your verbal commands. For instance, tell him to “walk on,” and repeat the words as he walks on. When you wish to turn, give the command to “whoa,” then “gee” for a right turn, and “walk on” to continue forward. When you wish to turn left, ask him to “whoa” then use the command “haw” for the left turn, and “walk on” to continue forward. Be very careful not to pull too hard on the reins, as this will cause an over-reaction. After his ground-driving lesson, take off the drive lines and resume his lesson on lunging at the trot. Remember not to overdo any one stage of training. Two times seems to be the magic number, then go on to the next step. In other words, lunge at the walk twice each way, ground drive straight twice each way, ground drive reverse twice each way, ground drive turns twice each way, and lunge at the trot twice each way. This will keep him from becoming bored and resistant.
 When he ground drives fairly well at the walk, you can mount him if he is a large enough donkey to ride. Mount him from both sides and dismount a few times at first. When he seems calm, you can stay aboard. Take a treat in your hand and encourage him to bend his head and neck around to each side to take the treat from your hand. At the same time, give short, light tugs on the rein on that side. This will encourage lightness in the bridle later on. Now he is ready to move with you aboard. It is best to use an assistant at this stage.
Have your assistant lead your donkey forwards a few steps with you aboard. Both of you should give the command to “walk on” as you squeeze with your legs once or twice, then the assistant can lead your donkey off. Have a riding crop in your hand to use if he does not comply. This will take the place of the lunge whip. Use it only if you have to and tap him only once lightly for every command you give. After just a few steps, say “whoa” and reward him, even if it is just two  steps. You can continue this lesson until he has completed one rotation of the round pen in each direction. Then stop him with “whoa” and ask him to go back a step or two. Give light pulls on both reins in a squeeze/release fashion to start, then, as he begins to move his feet backwards, alternate your pressure on the reins with the front foot that is forward. If he does not wish to back, your assistant can help with pressure to his chest as you did on the lead. Always end your riding or ground-driving lesson with a back, and don’t pull so hard on the reins that he resists by jutting his head out. Encourage him to stay light in the bridle. Then finish your lesson with lunging at the trot.
Donkeys learn a little differently than do mules or horses. Their responses are initially much slower but if you are clear with your intent, they learn completely. In halter training, your donkey learned to walk when you pull and to move away when you apply pressure to a certain area of his body. In the round pen, he learned to walk away from you and to walk and turn on the drivelines. He learned to walk with you on his back (with someone leading him to help reinforce the cues you were giving him). You and your assistant must be in tune with each other so as not to confuse your donkey. He will learn that the verbal command comes first, the legs come second (when you ride), and the crop (or whip) comes last. As he learns, he will begin to respond more closely to the initial verbal command. Ground driving is the same, with the reins in place of the legs. At first, you may need to use the voice, reins and whip, but as he learns, you will find him reacting sooner and sooner, until he is actually complying on the verbal command alone. Yes, donkeys are that smart!
You may have been having trouble with the trot on the lead up to this point, but now your donkey should be ready to do that as well. After your trotting lesson in the round pen, leave the area in a showmanship fashion, with the lead in your left hand and a treat in your extended right hand. Give the command to “trot” and slowly move into a trot yourself. If he still does not wish to trot, have your assistant move up from behind, just as you did when you were lunging him at the trot in the round pen, and he should comply. Take a few steps of trot, then ask him to “whoa,” give him his treat and “walk on.” It won’t take but a few lessons before he begins to understand the verbal commands. You just need to take it slowly enough and be consistent enough so that he has the opportunity to understand. Don’t get in a hurry, or you will find yourself in a sea of confusion!
To learn more about Meredith Hodges and her comprehensive all-breed equine training program, visit LuckyThreeRanch.com, MEREDITH HODGES PUBLIC FIGURE Facebook page, or call 1-800-816-7566. Check out her children’s website at JasperTheMule.com. Also, find Meredith on Pinterest, Instagram, MeWe, YouTube and Twitter.
Covered in TRAINING MULES & DONKEY: A LOGICAL APPROACH TO TRAINING, TRAINING WITHOUT RESISTANCE and EQUUS REVISITED at www.luckythreeranchstore.com.
© 1999, 2016, 2024 Lucky Three Ranch, Inc. All rights reserved.

MULE TALK! PODCAST: Donkey Training, Part 1
Donkey Training, Part 1 –
-
Begin with imprinting the foal.
-
Introducing the halter to your young donkey.
-
Leading your donkey.
-
Never be in a hurry when training your donkey.
-
Lead your donkey around your workstation.
-
Begin training in round pen.
-
Using the lunge line in your training session.
-
Do not drill your donkey OR mule.
-
Line driving your donkey and more!
Want to follow along? Read the transcript.
Learn more on Mule Talk podcast.
For more training info: www.LuckyThreeRanch.Com and click on the Training tab.
Mule Talk is an Every Cowgirl’s Dream production – www.EveryCowgirlsDream.Com

MULE TALK! PODCAST: What Are Mules Good For Besides Packing and Farming?
What Are Mules Good For Besides Packing and Farming? –
- Mules have versatility to do many different things.
- Packers use mules in the mountains.
- Hunters in heavy snow – praise the value of their mules.
- After the industrial revolution, mules are used for carrying supplies into remote areas.
- Hurricane Helene victims are being assisted by pack mules and their handlers bringing essential provisions to their families.
- The Mountain Mule Packer Ranch partnered with the Cajun Navy (civilian volunteers) to deliver insulin to a family.
- Learn how mules are doing their part in helping people during this disastrous situation in North Carolina due to Hurricane Helene.
Follow along. Read the transcript.
Learn more on Mule Talk podcast.
For more training info: www.LuckyThreeRanch.Com and click on the Training tab.
Mule Talk is an Every Cowgirl’s Dream production – www.EveryCowgirlsDream.Com
Chilly Pepper – More help needed. RIP my beautiful girl…
The following is from Chilly Pepper – Miracle Mustang:


Heartbreak and the gift of peace.
Wendy was a wild mustang who came to Chilly Pepper after being horribly abused. She was used for the “sport of tripping”, where the whole purpose is to rope their legs and cause them to crash to the ground. She was also used for other horrible “fun”. I have literally worked with/been around thousands of horses over the last 20 years, and she was by far the most traumatized.
| She was the most terrified horse I have ever seen, and it was so beautiful to see her settle in. I posted about how exciting it was when she started coming closer. She was in perfect health, and ran and played and just “got to be a horse”. Wendy was happy. |
Yesterday she came in and laid down where I would see her. She never does that. Wendy had one of the most prolific prolapses I have ever seen. It was the size of a watermelon, and I knew instantly she could not survive. She was in major pain and I called Doc immediately. I knew I should have just put her down, but I couldn’t. When I got closer she jumped up in a burst of adrenalin and ran back to the others.
| The first day that Manny wasn’t here to help, and I needed to round up all the wilds and bring them in. The only folks I trust that actually know how to do it right were either in Idaho or gone for the day. There were 9 wild horses on about 15 open acres, and 2 of them are blind. So I needed someone that actually had the skill and knowledge to get them safely gathered without stressing Wendy out even more and not getting the blind ones injured. |
Doc showed up, and I could breathe. He and I have worked together for 10 years with the wilds and knowing I can trust him to “git ‘er done” the right and safe way was huge. We rounded them up, sorted the others out and he was able to end her suffering. On the outside, she looked perfect. She had been eating, drinking and acting normal. There was fresh manure. Whatever happened had been festering inside, and then came out in a horrible rush. However, what ever ruptured was badly infected and it appears it could have been colon cancer???? At this point all that matters is she is no longer suffering, although once again my heart is broken.
| Our vet bill is now sitting at $2300 with Grandma Gracie’s meds, and Doc never said anything, just dropped everything to come out and end her pain. |
| I need to get this paid asap, as we have an appointment on Monday to geld Dakota. I am just grateful that Doc is so amazing and always puts the good of the animals before anything else. |
I also need funds to get her buried today. She was covered last night, and her friends stood by and said their goodbyes. It is always hard to know they are out there, but it helped a little bit to see her band surrounding her and getting to come to terms with the loss.
Rescue is hard and sometimes it is just too much. Having to do a fundraiser at a time like this is really hard. The trailer now needs new wiring as only one brake works and the other does randomly, and that is after spending almost $700 to get the bearings and brakes done. The truck goes in on Monday and it is leaking oil.
I am sorry if this is a bit discombobulated. It is a really hard day and I just feel broken.
Please help and share far and wide.
| THANK YOU, MY CHILLY PEPPER FAMILY, FOR ALWAYS BEING THERE! YOU ROCK!!! |
| You can donate to Goldendale Veterinary – 509-773-0369 You can donate to Zimmerman Vet – 775-623-0981 |
|
|
|
|
|
|
|
|
|
|
|
|
|
|

MULE CROSSING: Donkey Training, Part 4
By Meredith Hodges
 You have, thus far, begun to teach your donkey several things: how to begin to execute the turn on the forehand and turn on the haunches, how to walk forward in a round pen from the lunge whip without a saddle or harness (then with the saddle and harness), on the drivelines, and while being ridden. He has also begun to learn how to “trot on” from the lunge whip while tacked up, and how to walk and trot on the lead with an assistant aiding from behind. Do not be alarmed if your donkey’s movements are not perfect. Each time you work with him, he will get better at each of these things, especially if, at the start of each lesson, you review before adding anything new.
At the next lesson, if he is large enough, he will learn to trot with a rider onboard. If he is too small to ride, skip this lesson under saddle and do it with the drivelines. As always, begin with a complete review. After he has done his turns on the forehand and haunches, walked both on the lunge and with the drivelines, done right and left turns both on the drivelines and with a rider, and trotted with tack, he is ready to trot with a rider. Before you begin, here is a little exercise you can use to help your donkey stay light in the bridle. When you have mounted, take a treat in your right hand and your right rein in your left hand, and ask him to bring his head around to your knee and take the treat from your hand. Then take the treat in your left hand and the left rein in your right hand, and ask him to bend his head around to your opposite knee and take the treat from your hand. (Don’t pull—just vibrate the rein as his head comes around, and don’t try to hold him there. He will be very light in the bridle later on, once his neck muscles are stretched and flexible.) Now you will school the trot: Do it just as you did the walk. First ask your donkey to walk while your assistant, with the lunge whip, acts as a backup. You will give the command to walk, squeeze and release your legs and use your riding crop, if necessary.
 Your assistant will come into play only if your donkey does not respond to your cues first. When he is in a good free walk on a loose rein, give the command to “trot.” Use your voice, then your legs and then go to your crop, if necessary. If this doesn’t work, your assistant can step in behind and encourage him with the lunge whip with one smart strike to the gaskin above the hocks, while shuffling his or her feet to create some noise. This should work, but you, as the rider, must sit absolutely still, maintain a very loose rein and allow the donkey to comply on his own. (Do not keep thumping his sides with your legs, nor keep hitting with the crop.) If all this fails to make him move on, just stop, pet him (no treat this time) and wait until he sighs or resumes chewing, then start over again. He is just trying to figure out what you are asking. This is not disobedience. It is important to note that you should not move from one attempt to the next without letting him chew. This is the way your donkey tells you that he is relaxed and ready to listen. If he just won’t do it, then go back to the lunging and have him trot without the rider once more, then try again at the next lesson. Each donkey is a different individual and will learn at his own pace.
As a trainer, I do not ask for perfection on the movements previously described, just cooperation and a reasonable effort. Repetition, over time, will take care of the rest. It is more important that you and your donkey have fun together and learn together in a way that is pleasing to you both. Your donkey may get bored with the round pen if you are there often. Varying the routine and place of training can alleviate this. He should be doing well with the walk at this point and be ready to move into an open arena for further lessons.
 Set four cones in the four corners of your arena, with ample space for him to walk around the outside of them. Then set two cones in the center of the arena, creating a gate through which the two of you will pass. This will outline an hourglass pattern for you and your donkey to follow, as he perfects the verbal commands to “walk on,” “haw,” “gee” and “whoa.” “Trot” will come later.
First, lead your donkey (fully tacked up with either saddle and bridle or harness) around the perimeter and let him inspect the new area in which you will work. Remember to use your showmanship techniques. Then find a spot in the arena and review the turns on the forehand and haunches. Next, attach your drivelines and, with the assistant leading him, ground-drive him through the hourglass pattern. As you drive him, talk constantly, telling him what he is doing: “Walk on, walk on, good boy, walk on, haw, haw, haw, walk on, walk on, haw, haw, haw, walk on, walk on, good boy, walk on, gee, gee, walk on, walk on, walk on, haw, haw, haw,” etc. This is how you will reinforce the meaning of the verbal commands to your donkey for a good, solid foundation, and you will not have to repeat yourself as often later on. First, loop the pattern one way, then cross a nice straight diagonal and loop the other way. Have your assistant try to do as little as possible and let you actually drive him from behind. As you make each turn, give the command, pull/release the rein VERY lightly, and tap him VERY lightly with your driving whip on the opposite side, whether he needs it or not.
When he is executing the pattern without any deviations, you can eliminate the assistant and ask your donkey to respond to your cues alone. Use your verbal commands, reins and whip to help keep him straight. If he tries to deviate from the pattern, either stop him and resume, or just pull the rein in the direction he is to travel and help him get back on track with the driving whip. Use your whip lightly, but definitely on one side or the other to “push” him in the right direction. Use your whip directly over the croup for forward. Do NOT let him circle and come back to the track. He needs to learn to go in the direction in which you are pulling, and if you allow him to go in the opposite direction and circle back, you will find that he will be doing it a lot more than you would like. It’s better to stop a bad habit before it has a chance to become habit at all. To prevent a memorized response, stop him and ask him to back at different points on the pattern every so often to vary the pattern. Donkeys have terrific memories and if you stop him in the same place all the time that is where he will ALWAYS stop, no matter what you are trying to do. Do this pattern this way for a couple of sessions, and when he is going easily you can add circles at the cones to create a more interesting workout.
 When he is steering well, it is once again time for your assistant to aid you in getting your donkey to go straight along the rail of the arena. Have your assistant walk along the rail, between it and the donkey, with the lead line held loosely in her hand, allowing you to drive the donkey from behind. If you tryto do this without the assistant, you will find that your donkey remembers the hourglass pattern and will try to go to the middle. He needs assistance in learning this deviation from what he has previously learned. When you change direction, keep your assistant between the wall and the donkey to help maintain his straightness. After about two times around in each direction, he should “get it,” and you can drive him without the assistant. Each time you change direction, do a straight crossing on the diagonal. (Short diagonals and half-turns will be taught later in this series.) Donkeys like to bend in half far too much, so you want to discourage this in the beginning and opt for straightness.
The next step for the larger donkey is to be ridden at the walk through the hourglass pattern, both with the assistant and without, as outlined in the ground driving lesson. Do this exactly as you did before and don’t forget to repeat, repeat and repeat your verbal commands! Vary the stop and reward him with treats every time you stop to reinforce the good behavior. Be very exact and consistent with your rein and leg cues and don’t use your crop unless absolutely necessary. Rein cues should be only vibrations of the rein, legs should stay quiet while the donkey is in motion and should come into play only to urge him forward when he stops, and to support his body and keep it upright in conjunction with your rein cues through the corners.
The leg to the inside of the arc should remain at the girth and serve as a support post while the leg to the outside of the arc is at the back cinch and drives him forward into impulsion. The inside rein tells him what direction to turn while the outside rein stays steady in a straight position so he does not turn too abruptly. If you persist with continuous motion in your legs and hands, you will dull your donkey’s response and you will find that he begins to ignore you. If he does begin to make a mistake, just stop, wait until he has sighed or is chewing, then resume. Again, do not let him veer off and circle back. If he does run off to the right, for instance, you must turn him back to the left to bring him back, since that is the rein he pulled away from you. Conversely, if he runs off to the left, you would bring him back with the right rein, but you NEVER circle and come back in the direction HE has chosen. If you can manage it, it is best to just stop, regroup and go on, but sometimes they do take you well out of the desired pattern.
 During the next lesson, you can add the perimeter of the arena, just as you did on the drivelines. Have your assistant lead your donkey twice around both directions and across a straight diagonal to change direction. Then you can ride solo. The same rules apply here as they did when learning the pattern. Keep him straight, repeat commands, back up verbal commands with consistent rein and leg cues and if he pulls out to the left, bring him back with the left rein. If he starts to trot, pull straight back and give the command to “whoa.” If· he still won’t stop, keep him straight and stop him at the fence. DO NOT TURN HIM! If you start this, it will become a practically impossible habit to break.
As you have probably noticed, donkeys think a little differently than do horses and mules, and must be approached accordingly for the best and most non-resistant response, but there is no reason that you cannot accomplish this with a little patience and understanding. While you may have to teach, “Walk here, walk there, walk this way and that,” and it seems that you are progressing at a snail’s pace, remember that it takes less time for your donkey to really process what you are teaching him. So, in essence, he is learning more quickly than a mule or horse, he doesn’t need as much repetition and the training time is about the same, and, in some cases, shorter! So stop worrying and have a good time.
To learn more about Meredith Hodges and her comprehensive all-breed equine training program, visit LuckyThreeRanch.com, MEREDITH HODGES PUBLIC FIGURE Facebook page, or call 1-800-816-7566. Check out her children’s website at JasperTheMule.com. Also, find Meredith on Pinterest, Instagram, MeWe, YouTube and Twitter.
Covered in TRAINING MULES & DONKEY: A LOGICAL APPROACH TO TRAINING, TRAINING WITHOUT RESISTANCE and EQUUS REVISITED at www.luckythreeranchstore.com.
© 1999, 2016, 2024 Lucky Three Ranch, Inc. All rights reserved.

MULE CROSSING: Donkey Training, Part 5
By Meredith Hodges
 By now your donkey should be getting much better at his turns on the forehand and haunches on the lead line. He should be leading easily at the walk and trot and squaring up while stopped. He should be lunging at the walk and trot in the round pen, and ground-driving at the walk in the round pen, both straight and through turns and reverses. He should be walking and trotting with a rider in the round pen, without the assistant. He should be both ground-driving and walking with a rider through the hourglass pattern and on the perimeter of the larger arena. Now you are going to ask for a little more detailed control by asking him to walk over and through some very straight-forward obstacles.
Set up some obstacles in a confined area. Obstacles might include a tarp, four ground rails, a bridge, a straight back-through, a mailbox and a tractor tire. Your donkey should have been led through these obstacles as part of his leading training, so he should be familiar with these obstacles. Now you can begin to ask him to negotiate these obstacles more  on his own by first ground-driving him through them, then (if he is large enough) by riding him through them. Begin by reviewing his turns on the forehand and haunches. Then attach the drivelines and have your assistant lead him as you drive him from behind. Start with something simple such as ground poles, a tarp or a bridge that he can easily walk over. If he is negotiating the tarp or bridge, ask him to “whoa” when he is standing on it with all four feet, reward him and then proceed. If he is negotiating the ground poles, walk over them. Once he is on the other side, stop him immediately and reward him. Then proceed. Then have your assistant lead him to the mailbox while you ground-drive him, and have him stop parallel to it. Reward him for stopping, then have your assistant open and close the mailbox and reward him again for standing still. Then proceed. Walk him through the parallel poles and stop him. Reward him. Then ask him to back out of them. Reward him again. Then proceed to the tractor tire. Make sure your assistant walks through the tire and not around it, because the donkey will do exactly as he sees her do! Once on the other side of the tire, have your assistant stop and allow the donkey to put his two front feet in the tire and halt. Reward him. Then proceed forward and allow him to walk through the tire to the other side and halt. Reward him again. Your assistant will be giving the treats, since you will need to maintain the drivelines.
After he has negotiated all of the obstacles with the assistant leading him, it is time for him to negotiate them on his own. Have your assistant stand on the ending side of the obstacle while you ground-drive him through exactly as you did before, stopping in the appropriate places. Whenever you stop, have your assistant come to him and reward him, then have her go back to the starting position, where she will reward him again as he completes the obstacle. If you have any problems with him at all, have your assistant come back and lead him through it again, then try to ground-drive him through again on his own. Do not try to bully him into doing it. This will only cause resistance and a failure to understand how to properly negotiate the obstacle.
Once your donkey is going smoothly and obediently through the obstacles on the drivelines, you can ride him through (if he is large enough). Begin as you did with the drivelines and have your assistant lead him through first or ride  through ahead of him on a schooled animal that he likes, stopping in the appropriate places and rewarding him each step of the way. Depending on how willing your donkey is, this could be the next lesson, on the very same day. Each time you go to the obstacle course, repeat this entire process each time, first on the drivelines with the assistant, then without, ride with the assistant leading, then ride through the obstacles without her. It will not be long before he is going well, as donkeys learn things quickly and thoroughly, although they do have off days and may decide not to comply with a particular obstacle on that particular day. Tomorrow, it may be an entirely different story and he may have no trouble at all with any of them. It’s just the nature of the donkey to “change things up a little” from day to day. They like to keep us honest and on our toes. This is why I have included a separate section in my Training Mules and Donkeys series just for donkeys that is designed to be used WITH the other DVDs. Do the obstacles in a different order each time to prevent your donkey from anticipating and ignoring your cues, and be sure that you are cueing him properly for each obstacle, making your movements as light as possible.
If you encounter resistance at any obstacle, just stop, have your assistant come back and lead him through again. Then  try it again. If you encounter only mild resistance at any obstacle, try to straighten your donkey out and repeat the obstacle again without the assistant. For instance, let’s suppose your donkey goes through the parallel poles, but won’t stop for the back. Stop him as soon as you can after the poles and ask him to back. Then go forward again in a large circle and come back through again and try to stop him in the middle, between the poles, then back. Give him every opportunity you can to succeed on his own and be sure to reward him for it.
Often, a donkey will create resistance by sticking his nose out and pulling his head to one side. If this becomes a perpetual problem, you can use the elbow pull to help to keep him straight and to discourage this kind of resistance. Take a 12-foot length of 3/8″ rope with snaps on both ends. Fold it in half and drape it over his poll. Run the two ends through the snaffle bit rings from the outside toward his mouth, down between his legs and over the back on each side. Tie it off with his head pulled to a level where his poll is about six inches above his withers. This is called an “elbow pull” and instructions on how to make and adjust it are included in my Equus Revisited DVD. This will keep him from sticking his nose out and will encourage good posture as he goes through the movements. It is a better way to deal with this problem than it would be to use draw reins (as shown in photos), as draw reins need to be held and adjusted in your  hands. Draw reins can too often produce an over-reaction, even in the most experienced hands. Do not use the elbow pull in any other part of his training until he has learned to trot well, both in the round pen and in the open. This comes later than the walk work we are doing now.
To vary the routine and to keep things interesting while cultivating the best responses in your donkey, you should spend one day in the round pen, the next day in the open area doing the hourglass, and the next session on the obstacle course. Be sure to include a review of turns on the forehand and haunches, and ground-driving both straight and with turns preceding each session. And always, before you ride off and immediately after mounting, ask your donkey to bring his head to your knee on each side by offering a treat and vibrating the rein on that side. This encourages light responses in your donkey. Don’t drill your donkey every day. He only needs clear and consistent lessons to learn well, and he needs rest in between so as not to establish any soreness or side effects from using muscles he hasn’t used before. Don’t worry, he will not forget what you have taught him, and even if you have three days or three weeks between lessons, he will be right where you left him! Herein is the beauty of training a donkey or mule.
To learn more about Meredith Hodges and her comprehensive all-breed equine training program, visit LuckyThreeRanch.com, MEREDITH HODGES PUBLIC FIGURE Facebook page, or call 1-800-816-7566. Check out her children’s website at JasperTheMule.com. Also, find Meredith on Pinterest, Instagram, MeWe, YouTube and Twitter.
Covered in TRAINING MULES & DONKEY: A LOGICAL APPROACH TO TRAINING, TRAINING WITHOUT RESISTANCE and EQUUS REVISITED at www.luckythreeranchstore.com.
© 1999, 2016, 2024 Lucky Three Ranch, Inc. All rights reserved.