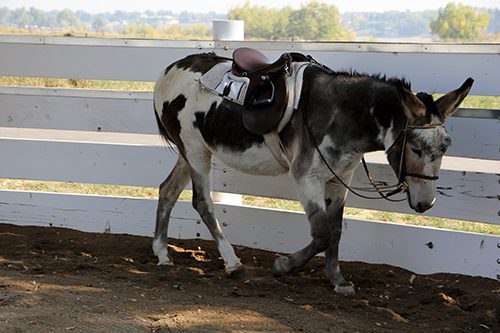
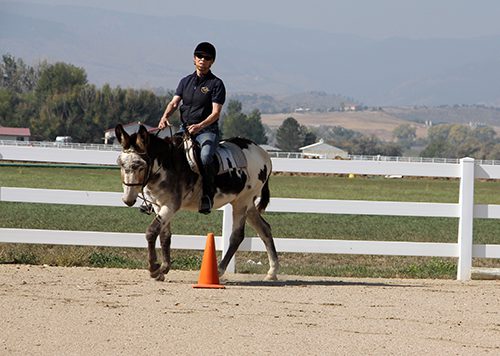
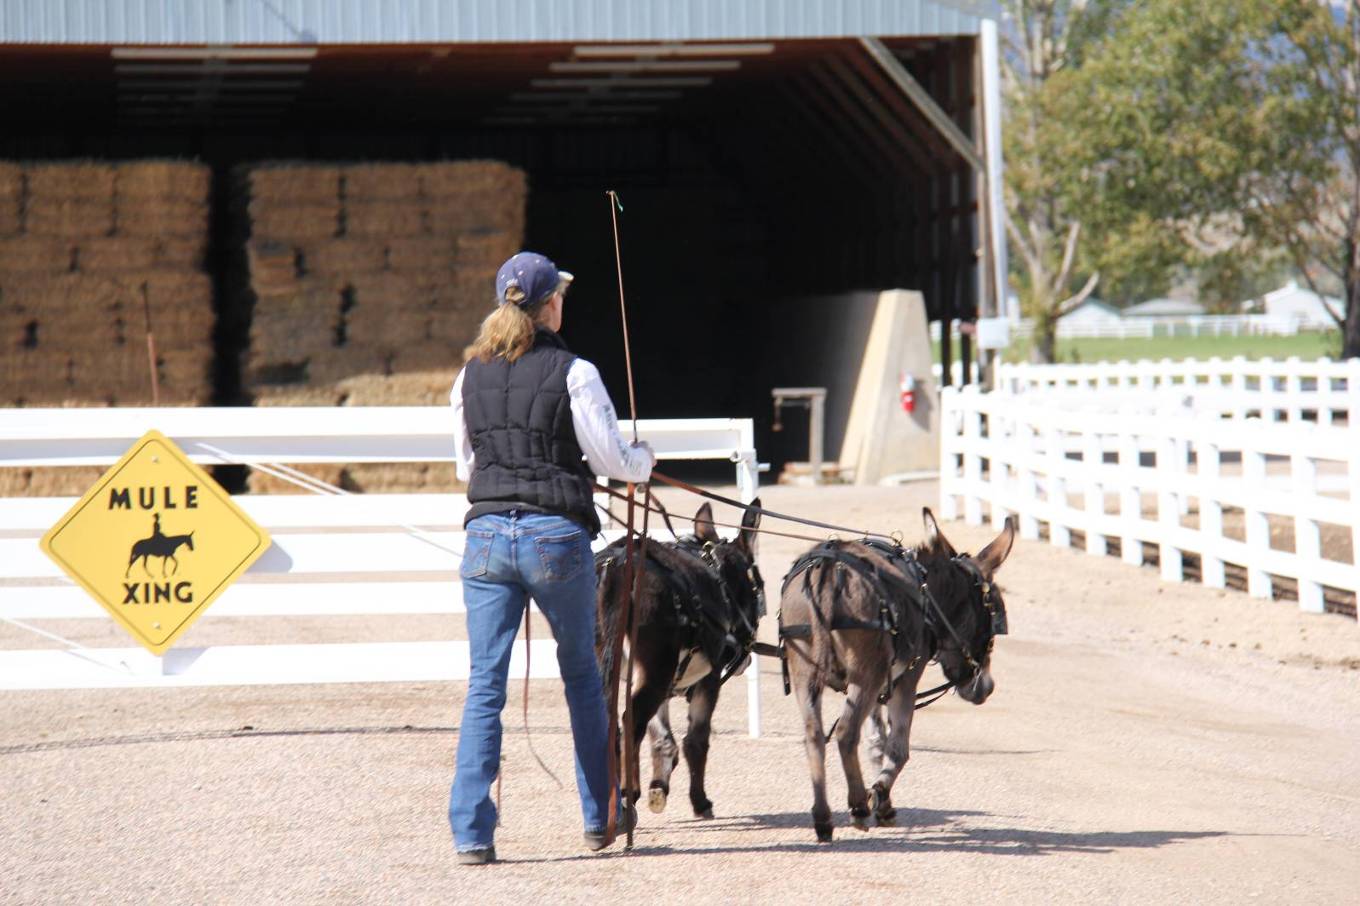
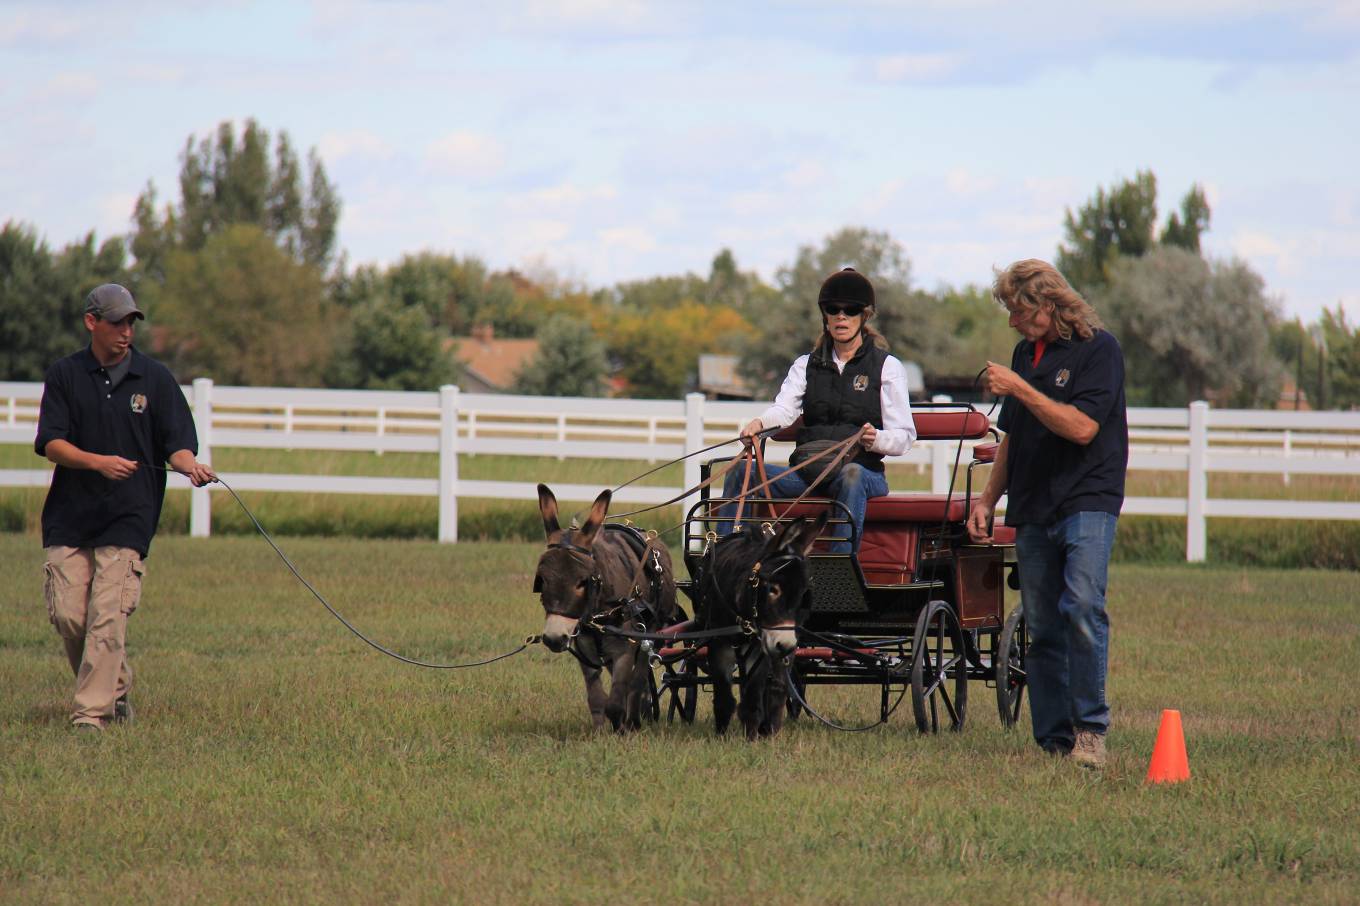
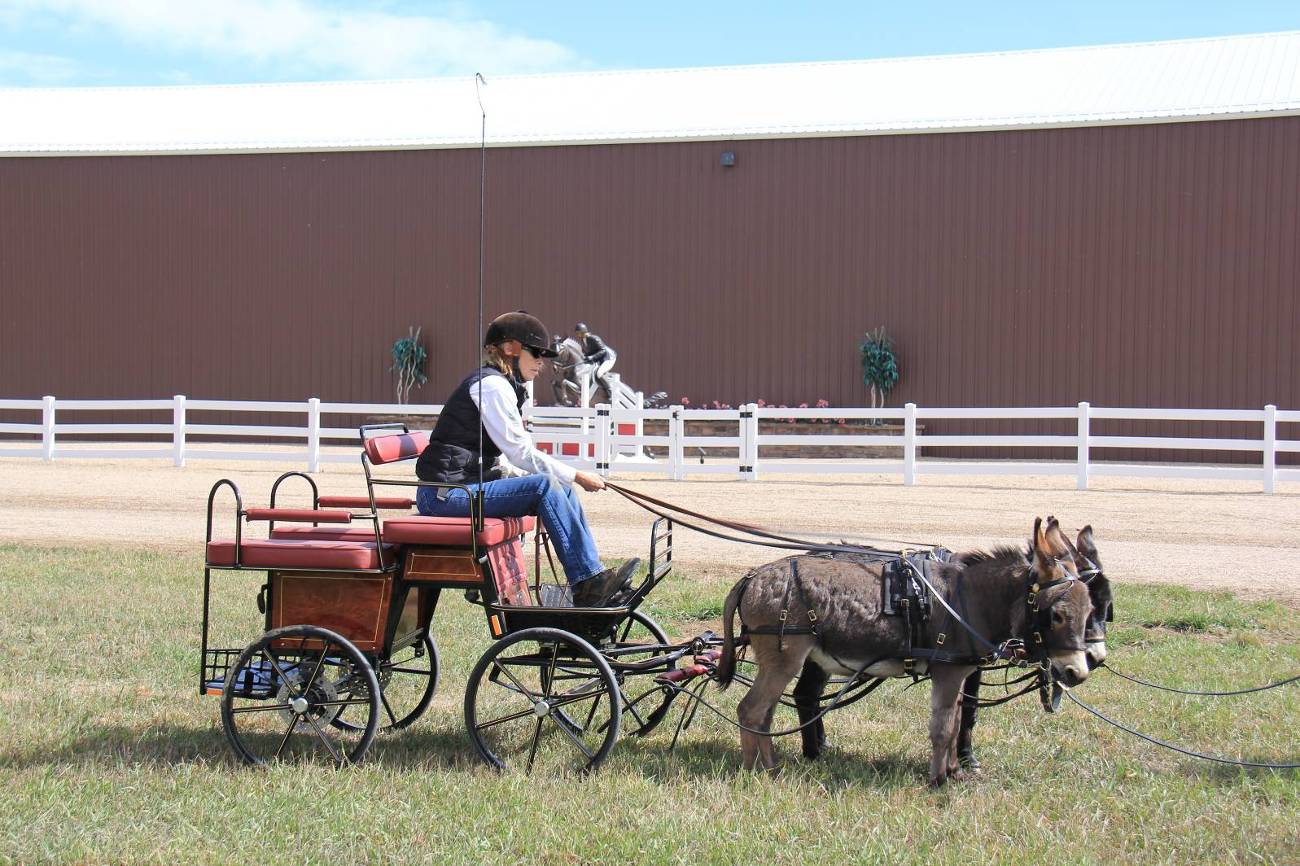
“Here we go again, Spuds, but something feels really different and strange.”
“Did you say strange, Augie? Well, I’m outta here!”
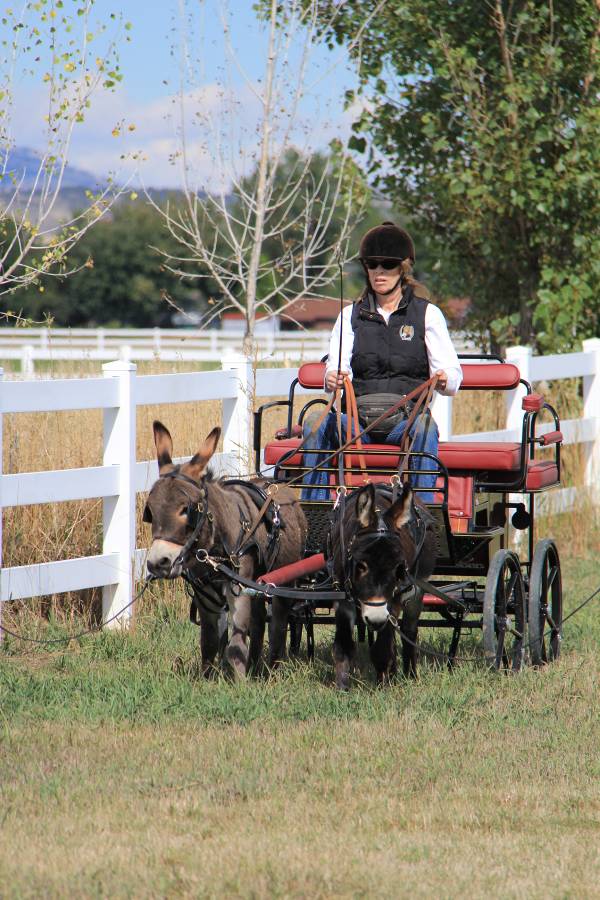
“I think she said “Whoa,” Spuds!
“Whew! I’m glad she switched the lines back BEHIND the terrets instead of in front of them!
It was putting a kink in my neck, Spuds!”
“Me, too, Augie! Besides, I like it much better when I can really FEEL her hands.”
“I’m sure glad she took the time to review ground driving before hitching us up again!”
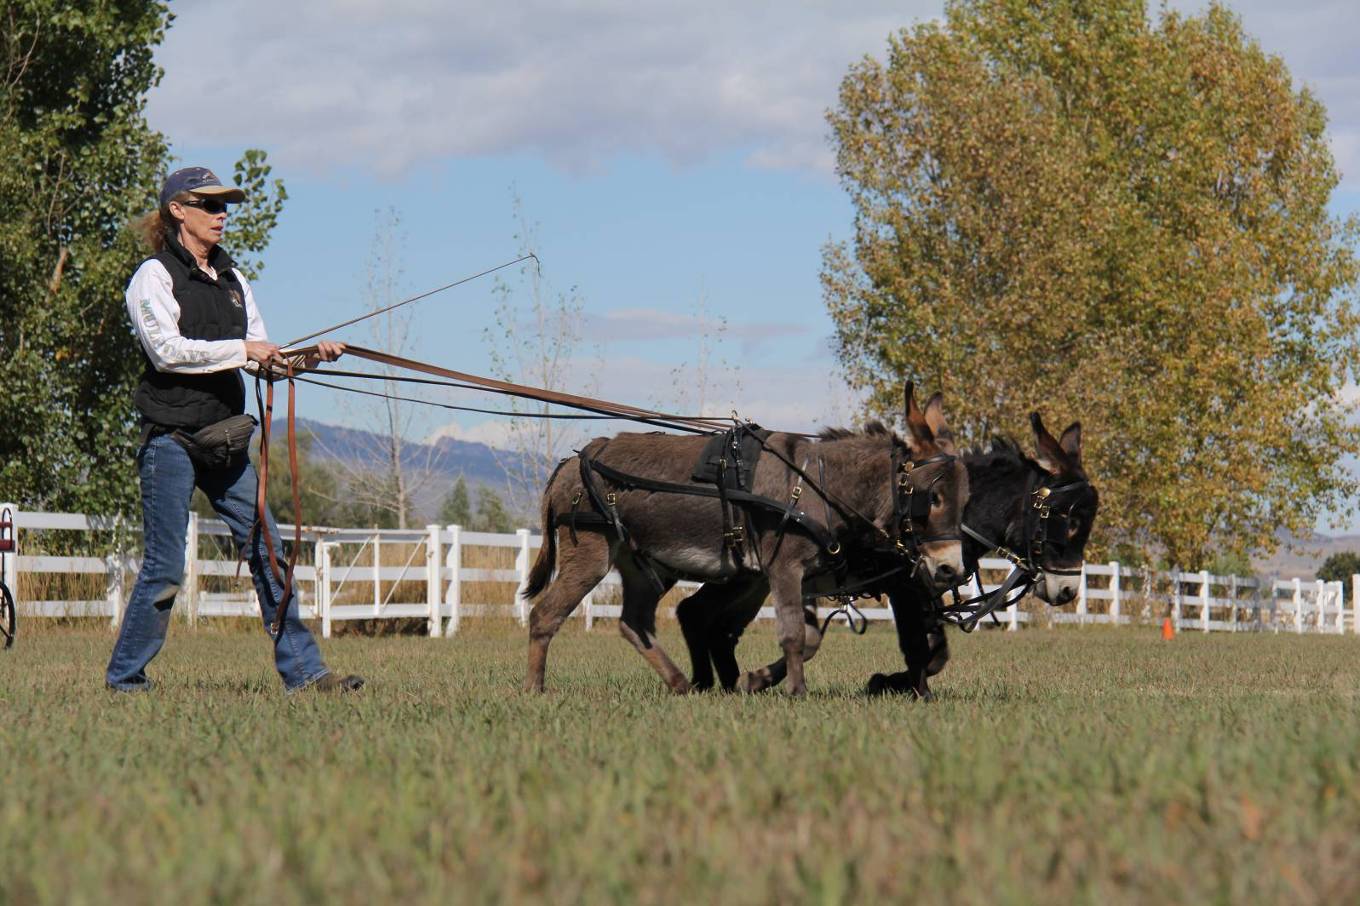
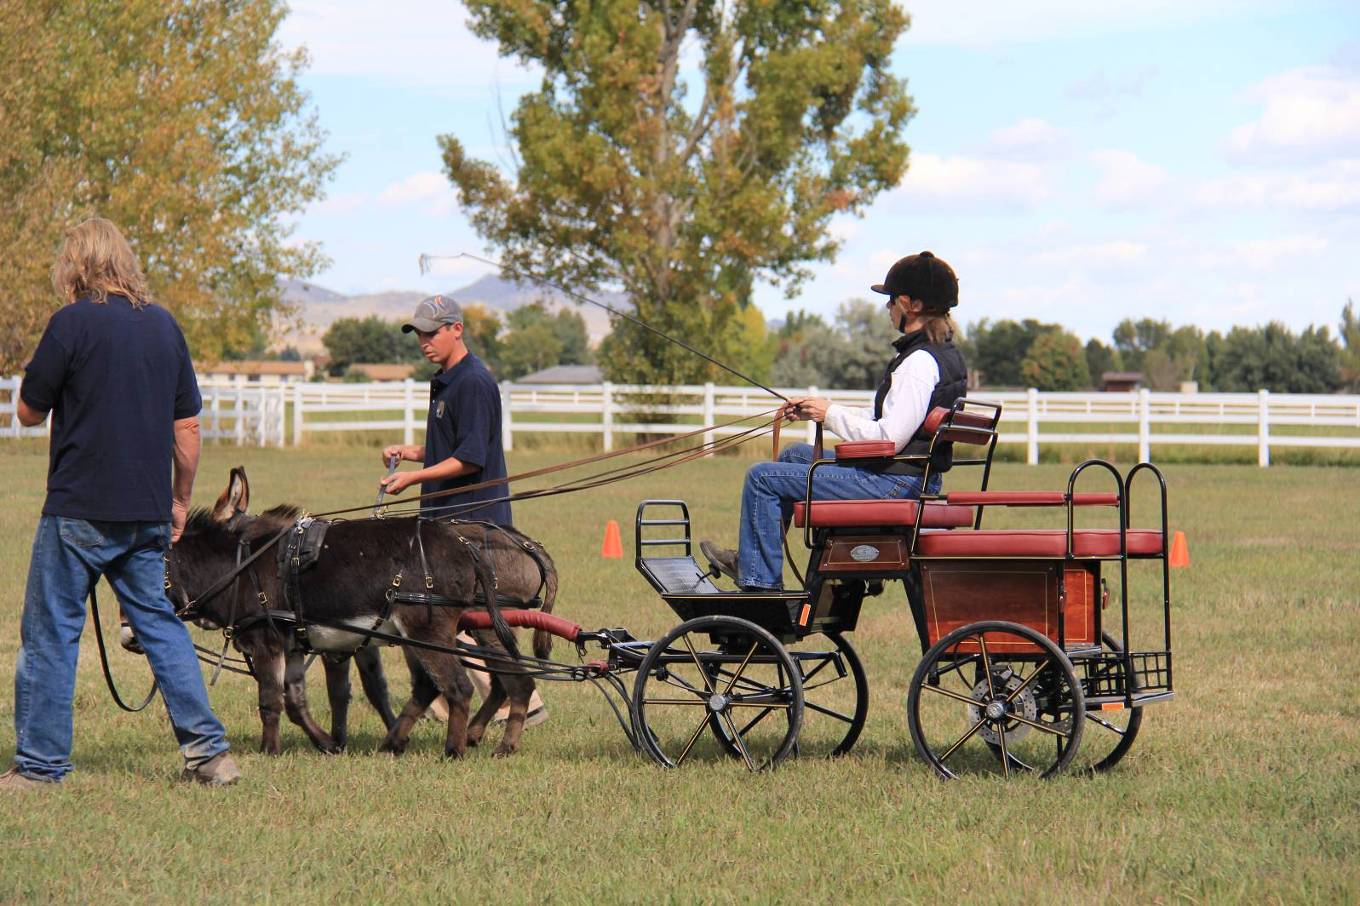
“Okay Spuds, now let’s get lined up straight for her!”
“No problem, Augie!”
“Hey Augie, I recognize this! It’s the hourglass pattern we’ve been ground driving for
the past few months!”
“Are Sean and Steve in sync with us, Spuds?” “They sure are, Augie!”
“Get ready, Spuds, we’re gonna WHOA!”
“And we’re off again, Augie!” One…two…three…four…”
“Yup Spuds, I’m really glad she decided to go ahead and cross the lines BEHIND the terrets even though she said it was ‘against the rules’!”
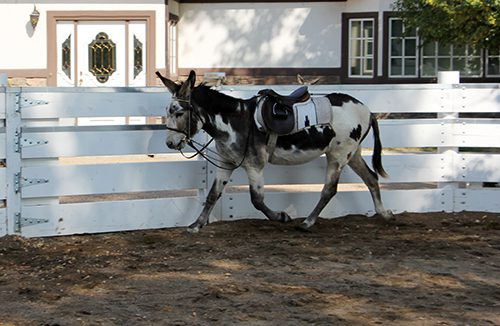
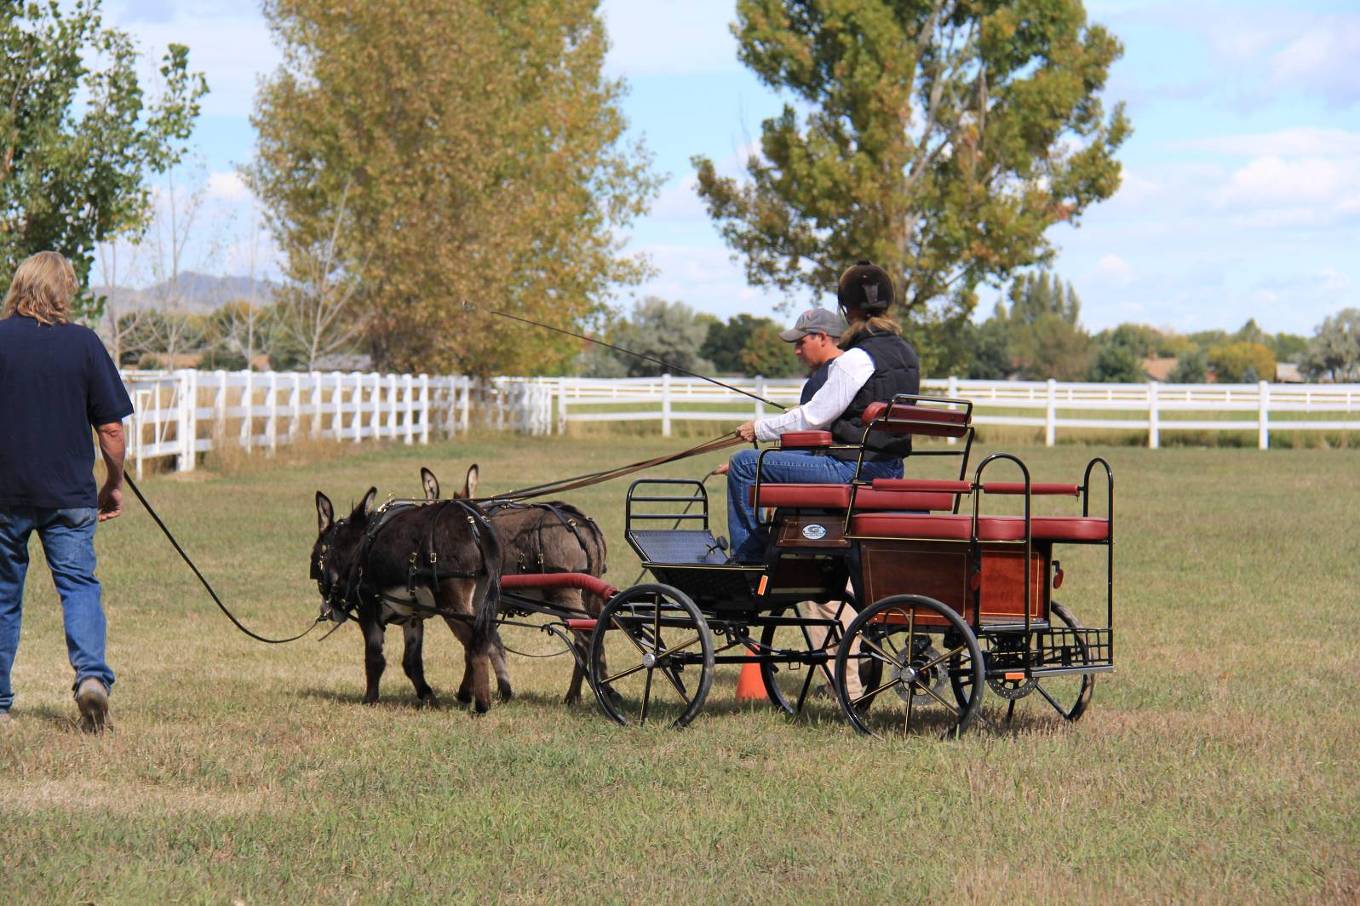
“Hmmm, this grass looks pretty tasty, Augie!”
“Whew! What a long workout for twenty minutes!…I’m tired, Augie!” “Me, too, Spuds!”
“Hey Spuds, how about next time you pull and I push like Sean and Steve are doing?!”
“Not a chance, Augie!”
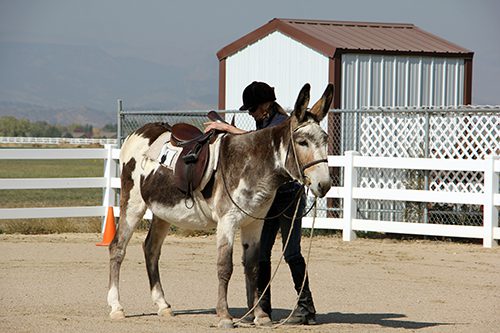
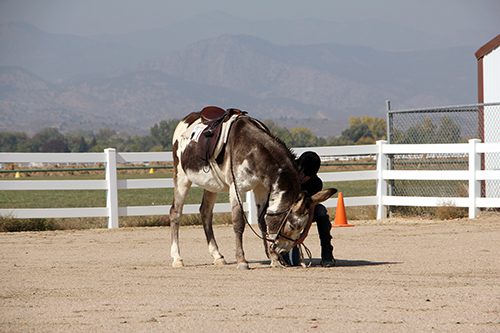
NOTE from Meredith: Equines are always honest in their reactions to training. When things go wrong, it is always the handler’s fault. Everything I have learned about driving said that when driving a team, put simply, you should thread the inside lines through the terrets of the opposite equine making the lines cross in an “X” just in front of the terrets. With my larger equines, this never really posed a problem…until I tried it with Augie and Spuds.
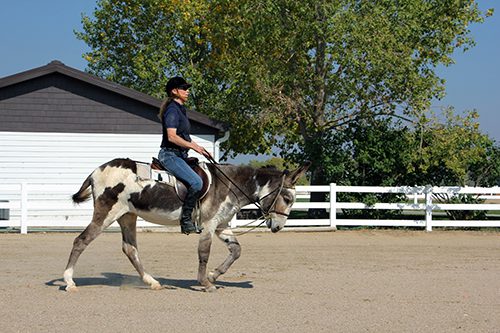
I had always ground driven Augie and Spuds single and then together as a team with their lines going directly from their mouths through their terrets on their harness saddles and to my respective hands. I could then clearly feel the connection from my hands to their lips holding all four lines. This never posed a problem until I decided that maybe I should thread the lines in the more conventional way with the lines crossed in front of and running through the opposing equine’s terrets. It worked fine until they got uneven. When I said “Whoa” and pulled back on the lines, the inside lines acted like “drawreins” with too much leverage for their short little necks. The only direct and light contact I had was on the nearside (left) and offside (right) lines of the team. When they could no longer feel the even contact on both sides of their mouths, they both bolted as shown in the picture above. I immediately changed the lines back to their original position with the lines crossing into my hands BEHIND the terrets instead of in front of the terrets. I could then feel the connection on both sides again and so could they. The result was immediate compliance! We were again “connected!”
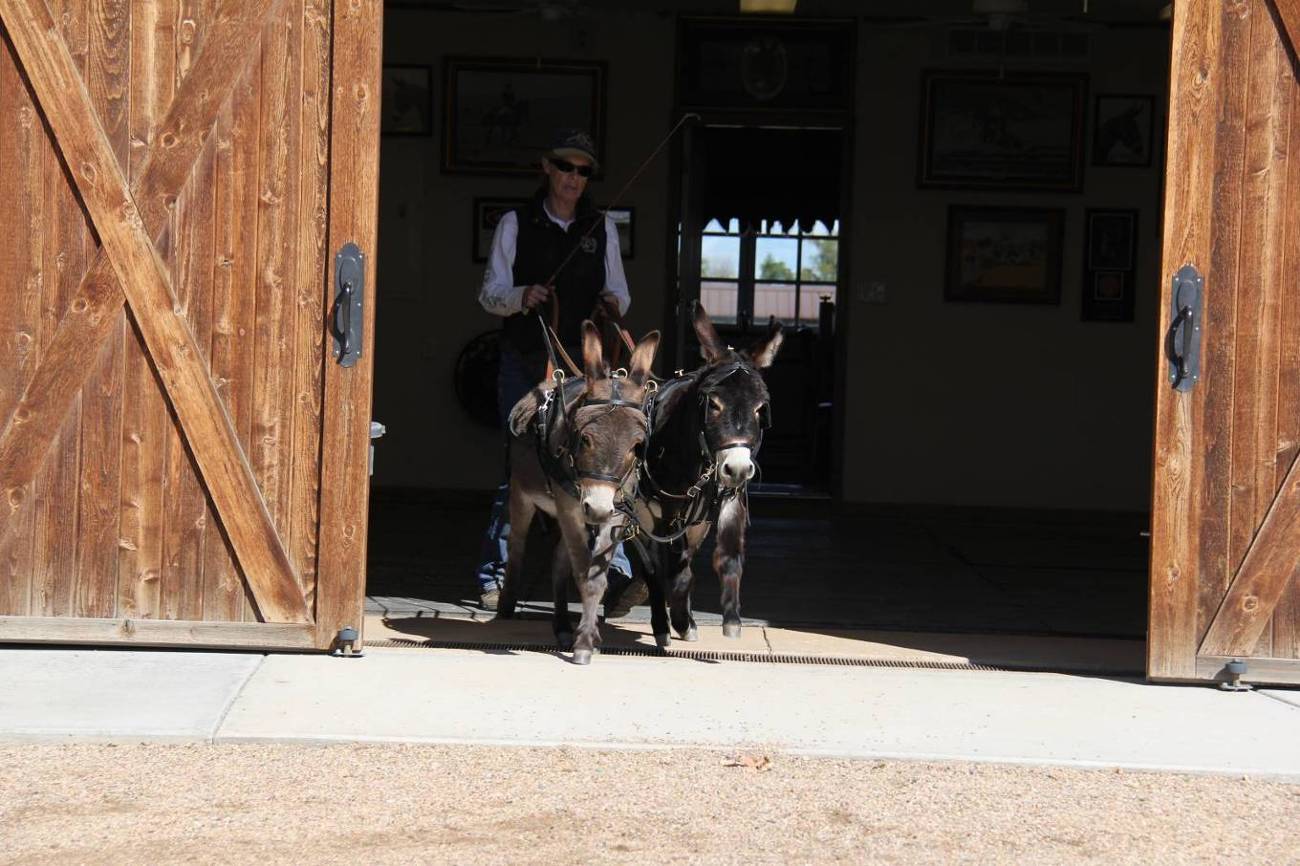
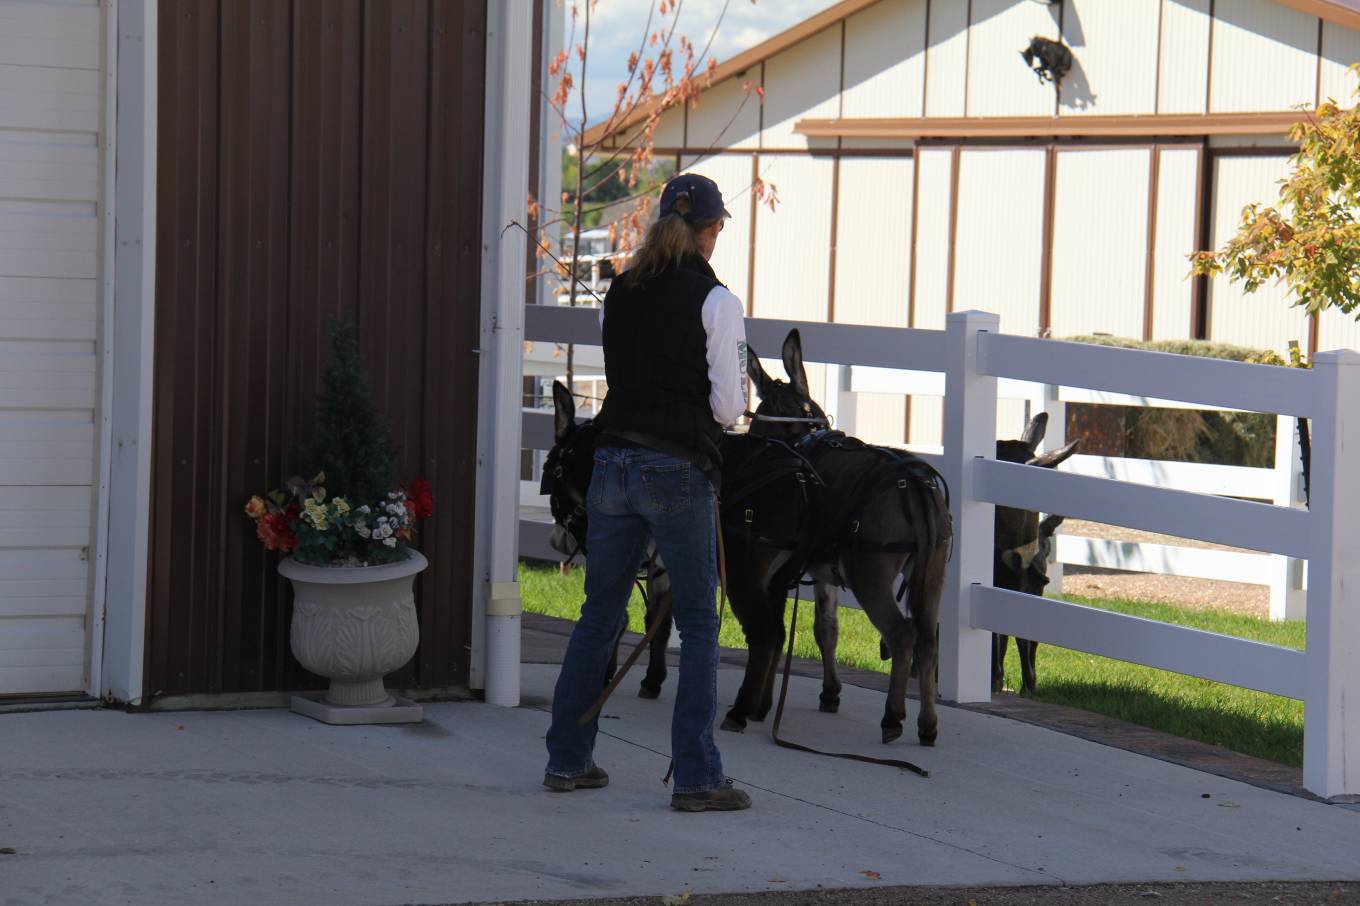
When using split lines, the draft lines go from the nearside bit ring of the near side equine and the offside bit ring of the offside equine direct to the driver. A series of holes in the coupling lines allow for adjustment. The nearside coupling line passes through the inside terret of the nearside equine and across to the bit ring of the offside equine and vice versa. To avoid any confusion for the equines, I think it is important to train with two sets of lines in the beginning, until they are clearly aware of their job and actually can feel the connection to your hands. I would not advise split lines for beginning training. The connection from your hands to their mouths is too loose and it is hard for them to understand your intent, especially in the case of miniatures since the distance from their mouth to the terrets is so short and the action on the lines can be so severe. Once proficient with four lines, they can then “graduate” to split lines for your convenience.
In Part 1 of this article, you learned how to begin your relationship with your miniature equine in a positive and natural way, and how “getting down” to their eye level so they can make eye contact with you discourages striking, jumping on you and other bad behaviors that are common when working with miniature equines. Be sure you have successfully completed the lessons in Part 1 before moving on to the lessons in Part 2 or training may not yield the desired positive results. Also, if possible, it is best to work minis in groups if they are used to being with other equines, as they perform better when they are with their “friends” and it doesn’t hurt to train their friends in the same way.
Let’s begin with something you and your mini will experience on a regular basis: a visit from the farrier. First, lead your mini to the work station (as described in Part 1). When you get to the work station, tie up your mini and sit on the floor with him (as you did in the pen). Now you will be having a “picnic” (as you did in Part 1), but this time you will be in the work station and you will have a guest…the farrier. Before the farrier attempts to pick up the first foot, ask him to sit down beside your mini in front of the shoulder on the left side and offer a handful of oats as a way of introducing himself. Next, while you sit at your mini’s head and offer the oats reward for good behavior, have the farrier begin with the near side (left) front foot and work his way around from front to back, and then from back to front on the other side (right). While the farrier is working, talk calmly and encouragingly to your mini, and as long as he is doing what is asked of him, offer rewards generously. He should yield his feet easily, but if he does not don’t offer the reward until he complies.
Don’t shove your mini when you want him to move over. Rather, give him some oats and use your index finger to tap or poke him on the side of his ribcage. If he doesn’t move over, use your whole hand to give him a slight push, always using a “push and release” movement, which is non-confrontational. You don’t want to keep steadily pushing up against him, because as soon as you give him anything to push against, he will and you could find yourself in a pushing match or, worse, a confrontation with him. As soon as he complies and moves, give him the oats reward and slide your body in next to him to help hold him in position for the farrier as he works with each foot. Don’t be afraid and always stay on the same side as the farrier. If the mini decides to make an abrupt move, he will try to slide around you because equines really don’t like stepping on, or running over, soft, squishy things like our bodies, so if your mini can get out of your way, he will. Even if he was to jump up in the air, he would more than likely jump over or around you, taking the path of least resistance. Trust your mini, stay calm and avoid becoming tense or exhibiting fear and things should go smoothly.
Once your mini is leading well, has accepted the farrier and is ready to investigate obstacles, you can begin to take him for walks and see how many different things you can investigate together. At each obstacle, be polite and tug on the lead rope only until it is taut, then wait for your mini to respond. If he balks and you need to keep hold of his lead rope because of potential danger, just let out the slack on the lead rope and allow him to take a little more time going through the obstacle. If you are negotiating something like ditches or water and your mini balks, lengthen the lead rope to get to the far side of the obstacle and hold tension on the rope until he complies and comes forward over or through the obstacle. If leading two minis and one of them balks, lengthen the balky one’s lead rope and let it lay out on the ground while you take the more compliant mini through the obstacle. Then let go of the first mini’s lead rope and pick up the lead rope of the balky one, holding the tension until he negotiates the obstacle and joins you and the first mini on the other side of the ditch or water.
This approach becomes particularly important when negotiating something like a dock or a bridge where you are not only dealing with an obstacle, but an obstacle that makes you substantially taller than you already appear to your mini. This is another instance when you can “get down” on your mini’s eye level the way you did in the pen and at the work station. Remember to do things in small steps. When you walk onto the surface of the dock or bridge or any other large, flat surface, leave enough room for your mini to come up. When you get to the end of the lead rope, take up the slack and then sit down and offer the reward. Then, once your mini has negotiated the obstacle, give him the oats reward and just have another picnic. If a companion equine is accompanying you, be sure to tie the companion animal in front of the obstacle so your mini can always see him. If you tie him behind, your mini will worry and want to go back instead of forward.
When you are ready to step down off the dock or bridge, it would be unsafe to be lower than your mini, so at this point you should stand up, go to the end of the obstacle and ask him to come forward off the raised obstacle, making sure he has plenty of room to come off the obstacle without you having to move. Stand quietly and keep the lead rope taut as you verbally encourage him and invite him to come down off the bridge. As soon as he jumps down, ask for a halt and reward him for jumping down and stopping right in front of you. (He will learn to negotiate the obstacle more slowly with practice.) Once he has finished negotiating the obstacle and halted and is chewing on his reward, you can then proceed to the next obstacle. Having definite, purposeful and timely pauses will help alleviate anxiety and resistance in your mini.
Be vigilant about when it is safe to get down to his level and when it is better to stay standing. Always opt for the low-level eye contact whenever possible and when you determine that it is safe to do so. Remember, the longer he must go without making eye contact with you, the greater the chance of resistance, but eye contact on his level will give him confidence in your judgment and will help to facilitate a real bond between you. If negotiating an obstacle such as a tractor tire or six tires, just extend the lead rope over the tire or tires, sit on that side, keep the rope taut and proceed as you did with the bridge obstacle.
Allow your mini to come forward and look at the tire, put his nose in the middle of it and, if he wants to, put his front foot up in the air to “feel” the space. If he wants to stand on the tire, that’s all right, too, but remember to keep the rope taut and don’t pull—release pressure as soon as he begins to move. Pulling is a common mistake that people often make, which can easily throw an equine off balance, creating a dangerous situation.
I call this technique “OATS.” (Observe, Approach, Touch and Sigh). It allows your mini time to observe each situation, then approach and touch the obstacle, finally giving a sigh as a signal that he is relaxed and not afraid. Always reward him for his efforts so he can begin to gain confidence and trust in you. By following the OATS technique you are turning your mini’s fear into curiosity, which will serve to keep him calm in future situations.
Part 3 of this article will cover negotiating obstacles with more finesse, lunging and groundwork in harness.
To learn more about Meredith Hodges and her comprehensive all-breed equine training program, visit LuckyThreeRanch.com or call 1-800-816-7566. Check out her children’s website at JasperTheMule.com. Also, find Meredith on Facebook, YouTube and Twitter.
Miniature horses, donkeys and mules all have one thing in common; everyone else is taller than they are! That makes eye contact with the trainer very difficult if not impossible for them. As the saying goes, the eyes are the window to the soul so it is understandable that they would become anxious if they are unable to look into a person’s eyes to decide whether they are friend or foe. I have five miniature equines: a mini horse named Mirage, a mini mule named Franklin, a mini molly mule named Francis, and two mini donkeys named Augie and Spuds. To help them all succeed and thrive, I’ve structured my training program for them based on the same one I use for all of my other equines, with one important modification. With safety always as my first priority, I work with my minis from a lower position whenever it’s safe to do so. That way, I can make eye contact with them, and I make certain they are always lavishly rewarded with an oats reward for their compliance. The results have been amazing! I’ve received total cooperation from them almost all of the time.
None of my minis were born at my ranch, so I knew that they would each first need to explore their surroundings a little at a time, and would also need ample time to get used to my staff and me. Mirage, the miniature horse, was my first mini. It wasn’t long after I acquired him that I acquired Franklin, the mini mule, who quickly became Mirage’s buddy. Since both Mirage and Franklin had previous training and because minis seem to accept training more willingly when done with a partner, we did all of Mirage’s and Franklin’s groundwork lessons together and, true to form, they learned very quickly because they were allowed to be together.
Several years later I rescued Francis, a miniature molly mule that was about as schizophrenic as they get. We penned Francis next to Mirage and Franklin for several months before I even attempted to catch her and begin her lessons alongside Mirage and Franklin. Giving her ample time to explore her own pen and to realize this was to be her sanctuary did wonders for her attitude and, after two years of very low-key training, she was able to perform calmly when we were filming the groundwork segment for the DVD, Equus Revisited.
Wherever I went during their lessons, I led all three minis together, and Francis learned to relax and comply with my wishes. I allowed her plenty of time to settle into her new surroundings before I ever asked her to come with Mirage and Franklin to the work station for grooming. The first time I was able to make real eye contact with her was during a walk we took in the hayfield in the middle of the summer. I took all three minis out to the middle of the hayfield, sat down while holding all three lead ropes and we experienced our first “picnic” together. Francis thought I was pretty scary when I first sat down, but she relaxed when she saw that it didn’t phase Mirage or Franklin. Just like human children, all equines learn better when not isolated (taken away from their equine friends) and made to feel that they’re being punished. Keeping this in mind, I lunged all three minis together in the round pen and after lunging, I tied two of them outside of the round pen while I did individual lunging and ground-driving lessons with each one individually. Because of this slow, respectful training and keeping her with her friends while she learned, Francis has made remarkable progress over the years.
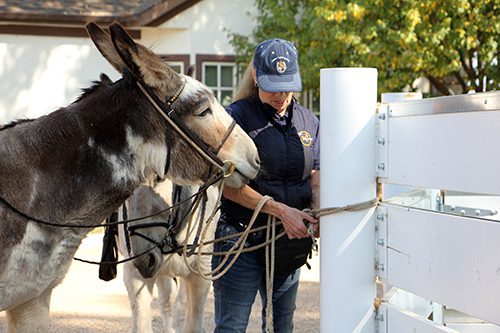
I think it is critically important that all equines have a space they can call their own—their personal oasis of comfort and privacy—so when I got my mini donkeys, Augie and Spuds, I decided that the first thing they would learn about was their living quarters or, as I like to call it, their “bedroom.”
When you go to your mini’s pen, politely stand by the gate and ask “permission” to enter by simply calling his or her name and then waiting for a response. Your mini will most likely come over to you and “invite” you in by showing curiosity and giving you a welcoming look. As you can guess, it is probably your fanny pack full of oats that is really attractive to them, but they will soon learn that you come with the oats so they will no doubt be happy to see you. This is the very first step in reward training.
Begin your relationship with your mini by having a “picnic” with him. Sit yourself down on the ground in the middle of his pen and start playing with a handful of oats while you wait for him to come to you. While you have your picnic in the pen, use just your hands for contact and make sure you have plenty of crimped oats (I use a fanny pack full of oats). Because picnics are supposed to be fun and not intimidating, allow your mini to come and go as he pleases within the confines of his pen. When he becomes confident about coming to you while you’re sitting down, reward him for coming over and interacting with you. Be prepared for the possibility of doing dozens of lessons like this—however long it takes for your mini to build trust in you and feel comfortable. As your relationship progresses, you may try picking up his feet and stroking his legs (which is a good way to prepare your mini for the farrier visits that will come later). There are no expectations and there is no pressure to do anything more…it’s just your mini and you and time for bonding.
When your mini is comfortable with you coming into his pen and interacting with him, the next step is to ask him to go into a bigger turnout area, where you should repeat the same simple lessons. Now that your mini can be loose in a larger space, ask him to come to join you for another picnic. After a few times, bring a hairbrush with you (It’s the most efficient brush to use on donkey hair).
When you sit down and he comes over for the picnic, show him the brush and let him inspect it, and then reward him for inspecting the brush. When you introduce the brush to his body, do so by first petting him, and then follow where your hand goes with the brush. This has a calming effect and also helps you to identify the more sensitive areas on his body. Always start with his neck, where there’s substantial fatty tissue and no real sensitive areas until you reach the shoulder. During this “playtime,” you can get your mini used to strange things by allowing him to wear your hat. This is an extension of the imprinting (touch) your mini should have received as a foal, only with a foreign object instead of your hands. Remember, imprinting is not just for foals at birth. It is the way you will continue to learn about how to touch your mini throughout his life and how you learn which areas are more sensitive than others. This sets the stage for how you gauge your approach when touching your mini both with your hands and with foreign objects such as grooming equipment and tack at all levels of training.
A halter doesn’t even come into play until after grooming in the pen is easily achieved and your mini will follow you to and from the pen without the halter. When it is time to introduce the halter, bring it with you into the pen for your picnic. Do the brushing and then show your mini the halter while you sit on the ground. When he sniffs the halter, he should be rewarded. Once he is unafraid of the halter, hold it on both sides of the noseband, feed your mini some oats, and then gently push the noseband of the halter over his nose and then take it off, rewarding him again. At this point you’ve got all kinds of oats in your lap and your mini’s got his head down, eating the oats, so when you put the noseband on again, just reach over his neck, grab the strap of his halter on the other side, bring it behind his ears and fasten it. If done correctly, this should not bother him. Then reward him with more oats, pet him as he complies and say, “Oh, how good is that?!” You can then take the halter off again and end the first lesson there.
Once your mini is used to having his halter put on, let him graze while supervised in a larger pasture area with his halter on while he drags the lead rope behind him. When you want him to walk away from you, simply stand up and let him go off on his own. After a few minutes, approach him again, grab the end of his lead rope and sit down again. You can give a little tug, say his name and ask him to “Come.” He should come easily when you gently tug on his lead rope. This action makes him look at you and think, “Oh, my human is sitting down again, so I’m going to come over and get more oats!” As he comes toward you, take up the slack on his approach. Once he comes to you easily, you can stand up and ask him to come while you’re standing up and reward him for it. And that’s how to teach a mini to follow you.
During your picnics, put on and take off the halter over several lessons and until he is completely calm before you try to halter your mini at the gate in preparation for leaving the pen. He must be willing to come while you are standing, and he should allow you to put on the halter at the gate using the same rewarding techniques as you use while sitting down. When he accepts the halter at the gate, the next task is to learn to properly lead through a gate and make your way to the work station for the first time. (See “Gate Training” in Part 1 of my DVD series, Equus Revisited.)
When grooming at the work station, start working your way around your animal from front to back, but ignore grooming his head for a while until he’s really comfortable with you. When you finally get to the head, you will have to change to a grooming tool called a dandy brush. First let him see and sniff the dandy brush, and then begin with the forehead. Brush upward toward his ears with the direction of the hair on his forehead and then, if he stands quietly, give him a reward. Don’t try to do his cheeks right away—give him time in the same grooming session to get used to the feel of the brush before you try to brush his cheeks, and make sure he sees the brush coming at him. Anything he sees too abruptly with his peripheral vision can potentially startle and spook him.
Breaking things down into little do-able steps seems like a long process in the beginning, but as your mini begins to understand the reasoning behind your approach, his reactions to tasks will become calmer, more automatic and more natural for him. When you allow your mini to learn to follow your lead without the halter in the beginning of each task, learning to follow you on the lead rope will be a lot easier for him, and when you finally move on to more specific tasks in training, he will oblige you much more willingly. In Part 2 of “Getting Down With Minis,” I will cover how to approach the tasks necessary for formal training.
To learn more about Meredith Hodges and her comprehensive all-breed equine training program, visit LuckyThreeRanch.com or call 1-800-816-7566. Check out her children’s website at JasperTheMule.com. Also, find Meredith on Facebook, YouTube and Twitter.
It’s summer time, and there are tons of adventures to be had for two mini donkeys on a bustling ranch like Lucky Three. Today, Spuds and Augie explore the hay field with Meredith and test their bravery against a fearsome, loud machine.
Hey, Spuds! I hear Meredith calling…what’s up?
She’s kinda silly, Augie. Who ever heard of saying “how do you do” to a swather, Augie?
Whoa….look what’s coming!!!
WOW!!! That’s super noisy and REALLY BIG!
Oh look, Spuds, it’s not so scary. This is how they make our hay!
Yeah, and look how they pick it up with this other big machine so they can put it in the barn!
What a fun adventure in the hayfield…we learned a lot today!
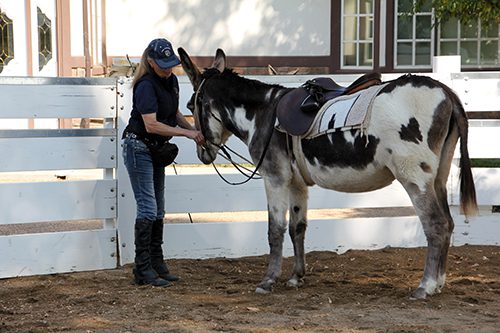
“Hey, Augie…watcha doin’?!
“I’m practicing my halter stance…you know, four-square!”
“Good idea, Augie! I guess I’ll practice my halter stance right here!”
“And I will wait for my turn at the hitch rail…I wonder what’s up today.”
“Hey Augie, you’ve got some pretty dirty feet down there!”
“Cut with the wise cracks, Spuds!”
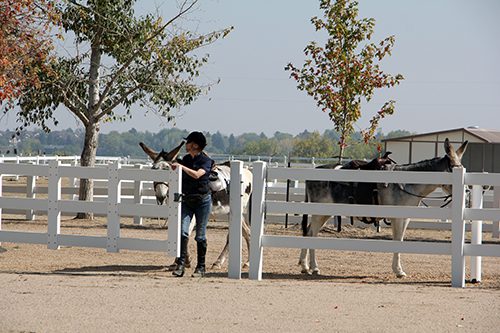
“I sure like it when they come down to our eye level, Augie.”
“Yeah, it’s not as scary as it is when all you see is their legs…whatcha doin’ back there, Dean?”
“Your turn, Spuds! This isn’t bad at all!”
“Yeah, it’s all peace, love and OATS!”
“It doesn’t get any better than this!”
“Dang, I was working on a Mohawk…it’s the IN thing with donkeys, you know!”
“Just be happy with your crew cut, Spuds. Crew cuts are always IN!”
“Oooh, here comes the baby oil again!”
“Aah, nuts! Now I can’t chew on your mane and tail…baby oil tastes just awful!”
Your equine depends upon you for his safety and well-being. The best feed in the world won’t keep him in good health if you neglect other important areas such as vaccinations and worming. It’s up to you to create a program to prevent disease and control parasites. Here are some suggestions for a general health program:
1) Cleanliness is very important. Make sure feed boxes are clean and manure is removed from stalls and paddocks. Do not feed hay or grain on the floor or anywhere it may become contaminated with manure. Similarly, small, heavily used pastures tend to build up a heavy parasite load. Pastures should be rotated and harrowed as frequently as possible to break the life cycle of the parasites.
2) Internal parasites are the most common danger to the health and well-being of your mule, and you must be prepared to wage a constant battle to control these worms. Follow your vet’s advice to set up a parasite-prevention and control program through regular worming. The drugs that are available today are very effective in removing parasites and breaking the cycle of re-infection. At Lucky Three Ranch, we worm every eight weeks in January, March, May, July and September with Ivermectin and then break the cycle and worm with Strongid in November. Don’t forget to watch out for bot eggs and remove them immediately.
3) Avoid letting your equine drink from public watering facilities. Use your own clean water buckets. Keep an eye out for anything that might injure your equine, and remove or repair it.
Proper treatment of diseases and injuries depends on two very important factors: correct diagnosis and knowledge of the proper treatment. Your job is to become familiar with equine diseases and their symptoms. In case of sickness or injury, know what to do for your animal before help arrives. Understand what simple treatments and remedies are safe to follow. Above all, know when to call a veterinarian.
4) There are many resources available to help you learn how to be better prepared including books, clinics and, especially, advice from an expert such as your own veterinarian or farrier.
Assemble your own equine first aid kit and, with the help of your veterinarian, learn the proper use of each item in the kit. Be prepared to handle the situation before the vet arrives.
When signs of infectious disease appear, isolate infected animals promptly and call your veterinarian right away.
5) Seek your vet’s recommendations for shots and immunizations, and faithfully follow an annual vaccination program. Make sure you keep good records of vaccinations and worming, and be sure to keep track of when they’re next due.
6) One of the best ways to monitor your equine’s health is by establishing a daily grooming routine. Not only will he be rewarded with a shiny coat, but you can watch for cuts and bruises and check the condition of the feet.
Basic grooming tools include a rubber currycomb to rough up the hair and bring dirt to the surface, a dandy brush to lift out the dirt, a body brush to smooth and shine, a hoof pick to clean the feet and a mane and tail comb and brush. A sweat scraper is handy to remove excess water during and after a bath, or sweat after a workout. A grooming cloth can be used to polish the coat and bring out the shine. In the springtime, a plastic multi-bristled hairbrush and shedding blade are also nice tools to have on-hand to remove dead hair, and a sponge can be used to clean muddy legs.
Begin your routine by using a hoof pick to clean the feet. Start with the near front foot, move to the near hind, then the off fore and off hind. If your young mule is skittish, work in whatever order he is comfortable. As he becomes accustomed to having his feet cleaned, you can do them in a consistent order. Clean from heel to toe and watch for infections like thrush and injuries from rocks or nails. This is also a good time to check his shoes. Mules should be shod (if working regularly on very hard surfaces), or trimmed, approximately every six to eight weeks according to use.
Next, begin to groom the body, starting on the left side at the head. Hold the currycomb in one hand, keeping the other hand on your animal to steady him. Gently curry in small circular strokes, working your way down and back, ending with the hind leg. Next brush vigorously, first with the hairbrush and then with the body brush. During springtime shedding, use your plastic bristle brush on the body to reach the dead hair in the undercoat before you use the shedding blade. Make sure that you apply only as much pressure as feels good to your equine (lighter pressure over bony areas). This should be an enjoyable experience for him.
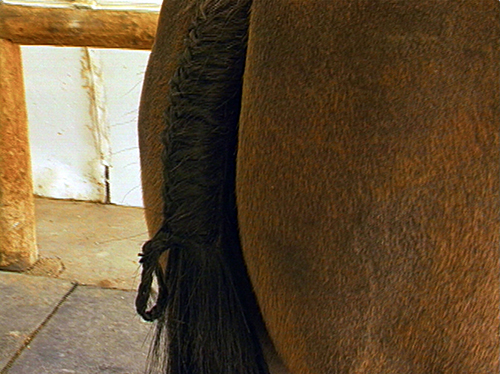
After grooming the left side, move to the right side. Brush the head with a Dandy brush and use a multi-bristled human hairbrush on the mane and tail. By adding a little Johnson’s Baby oil to the mane and tail during grooming, you can train a mane to fall to one side and keep other equines from chewing on manes and tails. Finish with a soft body brush. Finally, use the grooming cloth to wipe around the ears, face, eyes, nose, lips, sheath (if it’s a male) and the dock of the tail.
While paying this much attention to your mule’s body, you will be sure to see anything abnormal such as an abscess, a cut, mites or insects, or a sore. Early discovery and treatment keep problems small.
Besides routine grooming, your equine’s longer hairs can be trimmed as often as needed. Clip the long hairs from the head, the outsides of the ears, on the jaw and around the fetlocks for a neat and clean appearance.
Mules and donkeys like to be dusty, but they also like to be clean. Bathing every so often will make your Longears look and feel better. All equines enjoy having all that itchy sweat rinsed off after a good workout. I don’t recommend bathing too often with soap because an equine’s skin is sensitive. Soap can irritate it as well as strip away the essential oils. Most of the time, a good rinse, while scraping the excess water off with a shedding blade, will maintain a clean, healthy coat. Of course it’s essential to have a spotless animal if you’re off to a show or parade.
Once your mule has been bathed and is spotlessly clean before the show, all you need to do to prepare him for your class is a quick once-over with a vacuum. Vacuum training is like anything else—take your time, be polite in your approach and make sure your mule understands that this strange, noisy monster is not going to hurt him. Soon he will learn to enjoy being groomed by the vacuum. The vacuum will also promote better circulation to the muscle tissue.
BODY CLIPPING
If you plan to show your mule, you might consider body clipping. If you clip in mid-April or May, you will expedite shedding and the hair that grows in will be more manageable than the heavy winter hair. Equines that are not going to be shown should be left with their natural hair coat, as it insulates them from both cold and heat, and protects them from invasive insects. Mules and donkeys shed more slowly than horses and are not usually fully shed out until late summer.
There’s a bonus to clipping a show mule or donkey—their hair won’t grow back as quickly as that of a horse. Just remember that clipped animals should be stabled and blanketed during cold weather. If you do blanket your mule, you must be ready to add or remove blankets and hoods as the weather changes each day. To keep the coat from growing back too quickly, it helps to have them under 16 hours of light (summertime light duration).
To body clip your mule, begin with a quick bath. Your clippers will last longer if your mule is clean. When he’s dry, use your rubber currycomb to bring any dirt and dead hair to the surface. Follow with a good brushing. If it’s too cold for a bath, use a vacuum to get him clean.
Begin clipping the legs and head, because these are usually the hardest areas to do. If he’s a little difficult, don’t hesitate to use the restraints you learned about in DVD #2. Use a twisted lead rope hobble to restrain the front legs, a scotch hobble for the rear legs, or a face tie for the head, but be sure to use them as described and don’t be punitive in your approach. Start with small clippers on the coronet band and fetlock, working your way up each leg.
Do the body last with large animal clippers. Clip against the lay of the hair. Start at the rear and work your way forward, clipping first one side and then the other. Pay special attention to the flanks, the mane and the fuzzy areas under the belly and around the forearms and buttocks.
If your mule has a nice mane, leave it and clip a bridle path. The length of the mane and the bridle path will depend on trends in the event you are participating in. For example, in English riding, manes are kept shorter to make braiding easier, but if your event is reining, keep the mane as long as possible. I like to grow the manes as long as possible (they help to keep flies and insects at bay), give crew cuts through the bridle path to the males and leave a foretop and bridle path on the females.
If you’re packing, you might want to shave or trim the mane short for the sake of simplicity. Many people shave the foretop and bridle path with a #10 blade, and then trim the rest of the mane to half an inch. You may trim the outside edges and backs of the ears, but leave the inside hair to prevent irritation from flies and bugs.
The tail is another area where there are many variations. I recommend applying Johnson’s Baby oil to the base during each grooming and letting the tail hair grow. This is a good idea if you compete in open events with horses. A second method is to shave the first two inches of the tail for a clean, well-groomed look (however, it does grow back even fuzzier!). A third variation is to “bell” the tail in three tiers. This looks best with a thick tail and is generally used for identification purposes by packers and the military, but is not recommended for normal grooming, as it is difficult to maintain.
Now you’re ready to trim the head. This will include trimming the bridle path, muzzle hairs, hair under the jaw, long hairs around the eyebrows and the backs and edges of the ears.
Lastly, remove chestnuts and ergots by soaking them with baby oil for about 30 minutes and peeling them off. If the ergots don’t peel off, you may cut them off with scissors or nippers.
Now you’ve got an equine that looks great! It will be easy to keep him looking good with a weekly trim that should include bridle path, ears, around the face and coronet bands.
BRAIDING FOR SHOW
Depending on the event you plan to show in, treatment of the mane varies considerably. For Western pleasure, you may want to simply band the mane so it lies flat. The tiny rubber bands can be purchased in tack shops in colors to match your mule’s hair. Tradition dictates the braiding of the mane for hunters and English classes for a neat, clean appearance. A thick, heavy mane cannot be properly braided and must be thinned until all the hairs are about four to six inches long and lay flat on the neck. This is done by using a mane comb to pull out the long hairs from the underside of the mane. This can be a big job and it’s annoying to your equine, so limit mane pulling to a few minutes a day. Make sure the hair is the same length from poll to withers. Don’t even think about cutting it with scissors—it will just end up short but way too thick to braid.
You can spritz a little water and hair spray to make the hair easier to handle. The quickest way to secure the braids is by using tiny rubber bands. It’s also very easy to do and it’s great for one-day shows or quick changes between classes.
Sewing with thread or weaving yarn looks very professional and is more permanent, but it’s also more time consuming.
Once the braid is finished it should be folded once and fastened with either rubber bands or a piece of yarn or thread. It can also be rolled and tacked into place. How you finish your braid will depend upon the time you have and the look you want to achieve, as well as what looks good on your equine!
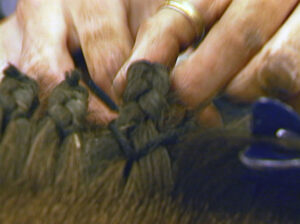
Braiding the tail begins with a clean, well-groomed tail. Even short hair can be braided if you use a lot of hair spray to make it sticky. Moisten all the hairs along the dock with a damp sponge and bring them forward. Take a section of hair from each side of the tail, as close to the top as possible, pulling the sections out from as far under as you can.
On a horse, you can pick up a third section from the middle of the tail, but on a mule’s thin tail, take the hair from the side. Cross it over one of the outer strands. Begin braiding with three strands down the center of the tail. With each twist of the braid, pick up a little more hair from either side or from the middle. Continue braiding until you reach the root of the tail, then don’t add any more hair, but braid until you reach the end.
Fasten the end of the braid with a tiny rubber band or a piece of yarn. Now fold the braid once and pull the end up into the braided root, tying it at the base with yarn or thread.
In showmanship and halter classes, it goes without saying that your equine must be groomed to perfection. This means that, for months prior to the show, you’ve given your equine a good brushing or vacuuming at least once a week. Brushing stimulates the skin and brings out the natural oils that make the coat shine. No amount of “shine in a can” will replace the natural luster of an equine that’s been brushed regularly.
To learn more about Meredith Hodges and her comprehensive all-breed equine training program, visit LuckyThreeRanch.com or call 1-800-816-7566. Check out her children’s website at JasperTheMule.com. Also, find Meredith on Facebook, YouTube and Twitter.
It’s 2004 and “You’ve come a long way, Baby!” The movement to have mules accepted by major equine organizations began with the United States Dressage Federation in 1986, 17 years ago! There was still the hurdle of being accepted by the most prestigious equine organization in the country at the time, the American Horse Show Association that sanctioned all upper level shows and competitions. Since then, the mules’ participation in significant horse events was a long, uphill climb and membership in the A.H.S.A. was only a dream. Even though they were accepted at the schooling level back then, there were still many areas that were unwilling to comply with the United States Dressage Federation’s acceptance at this level and mules continued to be discriminated against in many shows and competitions.
However, our undaunted mule riders persisted in their quest for perfection and showed the mule as a competent Dressage and Combined Training candidate. Bishop Mule Days rewarded their efforts and added Dressage classes at Bishop for these dedicated people and their mules. As more riders began using Dressage as a basis for training, and A.H.S.A. judges were being used for the classes at Bishop, even more professional equestrians began to see the competence of our beloved mules and our riders’ dedication to excellence.
The same kinds of things were happening in the disciplines of Competitive Trail Riding, Endurance, and Driving. The first discipline of the United States Equestrian Federation (formerly the American Horse Show Association) to accept mules was in Endurance Riding, and was then followed by their acceptance in Driving through the valiant efforts of Dave Ketscher and his mules, Mariah Carey and Jeremiah.
Dressage rider, Carole Sweet, began her quest for acceptance in the U.S.E.F. Dressage Division several years ago and has single-handedly become the proponent of a major rule change in the Dressage Division of the U.S.E.F. This was no easy task as it was critical to take this through proper channels just for consideration! The culmination of all her hard work and persistence was rewarded in December of 2003, when she was notified that the mule issue would be on the agenda for a final decision during the U.S.E.F. convention to be held in January of 2004.
It was at this time that Carole Sweet requested the assistance and support of anyone who could help at this convention. Linda Pitman from the American Mule Association, Leah Patton, administrator/editor of the American Donkey & Mule Society, and I (Meredith Hodges), longtime longears promoter, judge and animal inspector for the A.D.M.S., descended on the convention, attended appropriate meetings, and lobbied every chance we had in between meetings to make sure that the people involved were informed of the mules’ valuable assets to their organization. It was an exhausting three days, but on January 18, 2004, at the General Board Meeting, the rule was approved with consideration. In the U.S.E.F. Rulebook, it now reads:
GR125 Horse.
1. The term “horse” as used in these rules denotes either a horse or a pony. 2. In all levels of all Federation recognized Driving and Endurance Competitions and in the
Case of any other federation Rule as it relates to the Driving or Endurance disciplines as The context permits it, the term “horse” shall also include a mule. See DC111.4, EN104.2.1 a. Mules are also eligible to compete in dressage classes with the exception of (1) USET Championships, USET qualifying and selection trails, and observation classes. (2) any other classes designated as qualifying or selection classes for international or international high performance competition, and (3) championships where such participation is prohibited in the championship selection procedures. See DR119.1 BOD 1/18/04. Effective 4/1/04
There were concerns from the Safety Committee, but they approved with the stipulation that they would be keeping an eye on the competitions to make sure that the mules would not pose serious safety concerns.
“The ‘Vision’ of the United States Equestrian Federation is to provide leadership for equestrian sport in the United States of America, promoting the pursuit of excellence from the grass roots to the Olympic Games, based on a foundation of fair, safe competition and the welfare of it’s horses, and embracing the vision to be the best national equestrian federation in the world.” In keeping with their vision, they have seen the mules as a valuable asset to the Federation and it is both a privilege and an honor to become part of this prestigious organization.
As viable members of this organization, it is now our responsibility to go forward and participate in these events in a considerate and productive manner. Any problems that arise at competitions should be dealt with fairly and through the proper channels. Understand that we will be dealing with people at all levels of Horsemanship, with varying levels of comprehension and ability. The principles of good sportsmanship are paramount as we set the example to beginners and the young riders of the future. No unsportsmanlike conduct will be tolerated and could result in the revocation of this privilege.
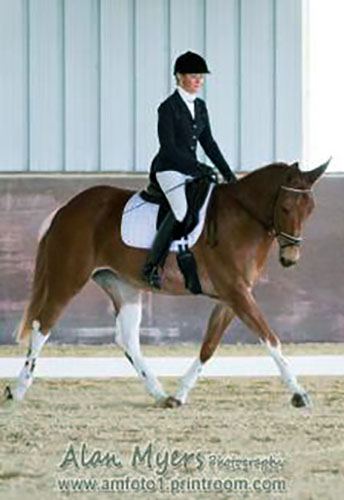
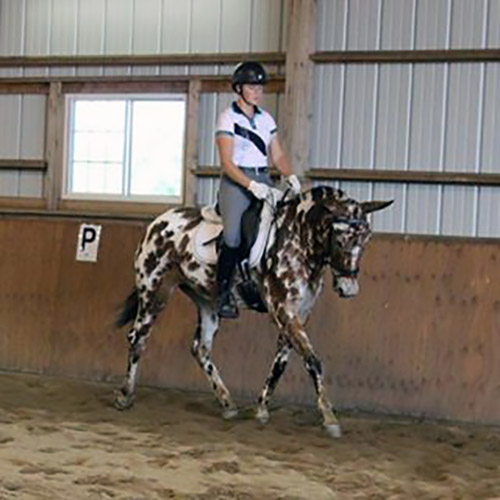
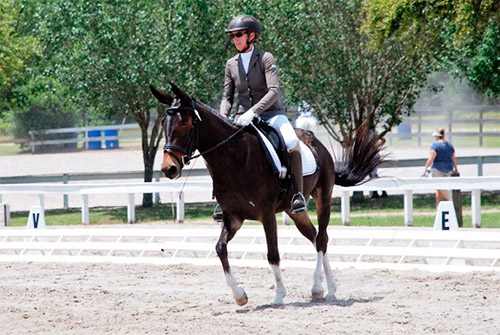
More and more mules are getting into dressage after Carol Sweet’s, Leah Patton’s and my work over eighteen years of petitioning for the acceptance of mules into the United States Equestrian Federation! Shown here are Meredith Hodges and Lucky Three Sundowner, Meredith and Lucky Three Mae Bea C.T., Laura Hermanson and Heart B Dyna, Audrey Goldsmith and Heart B Porter Creek, Sammi Majors and Buckeye and Vicky Busch and Slate. I am so happy to see so many young riders taking advantage poof all our hard work and they are doing so well! We hope even more dressage riders will take advantage of this wonderful opportunity with their mules!
So, fellow “Mule Enthusiasts,” go forward and bask in the sunshine of opportunity that has been so graciously given to us all! Take the opportunities provided to improve your skills and marvel at your own progress! Take advantage of the new comrades you will meet along the way that share your interests, so we can all take our equines into the future with pride and dignity together!
To learn more about Meredith Hodges and her comprehensive all-breed equine training program, visit LuckyThreeRanch.com or call 1-800-816-7566. Check out her children’s website at JasperTheMule.com. Also, find Meredith on Facebook, YouTube and Twitter.
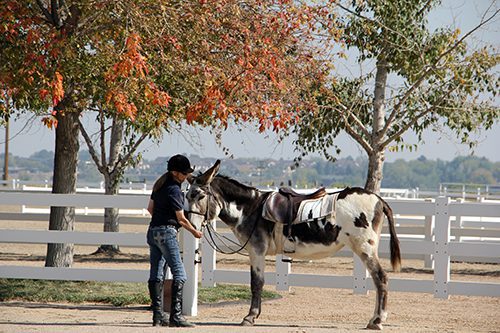
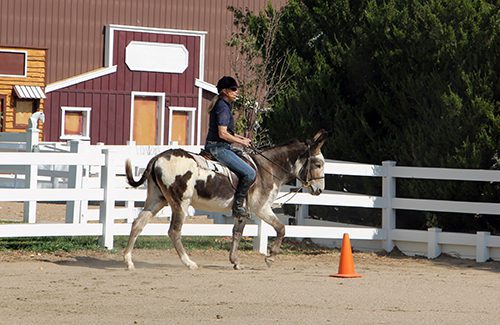
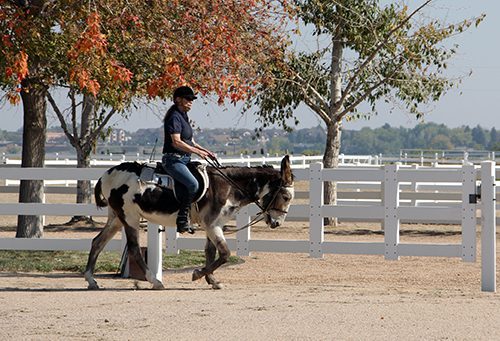
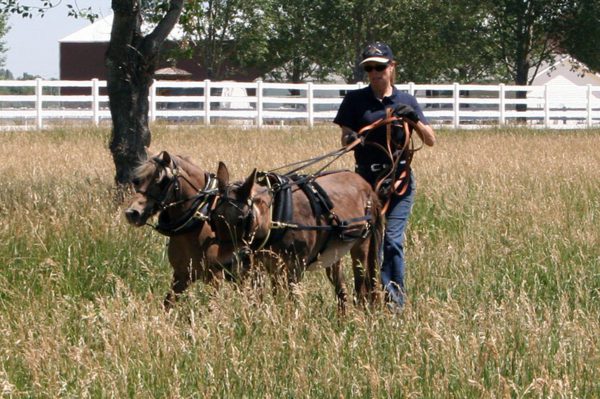
Chasity and Wrangler enjoy working with each other nearby and seem to learn things a lot quicker with a lot less resistance. It also affords me the ability to work more animals in less time. It’s a win-win situation. It doesn’t mean they won’t work by themselves. They will do that as well when they get to work with and without each other. This consistent routine with minimal variety greatly reduces anxiety and bad behaviors. The “Elbow Pull” is convenient for tying one while the other is working. There is no need to fuss with halters and lead ropes. I tie Wrangler while Chasity waits her turn patiently. It is a passive way to teach them to stand quietly when tied.
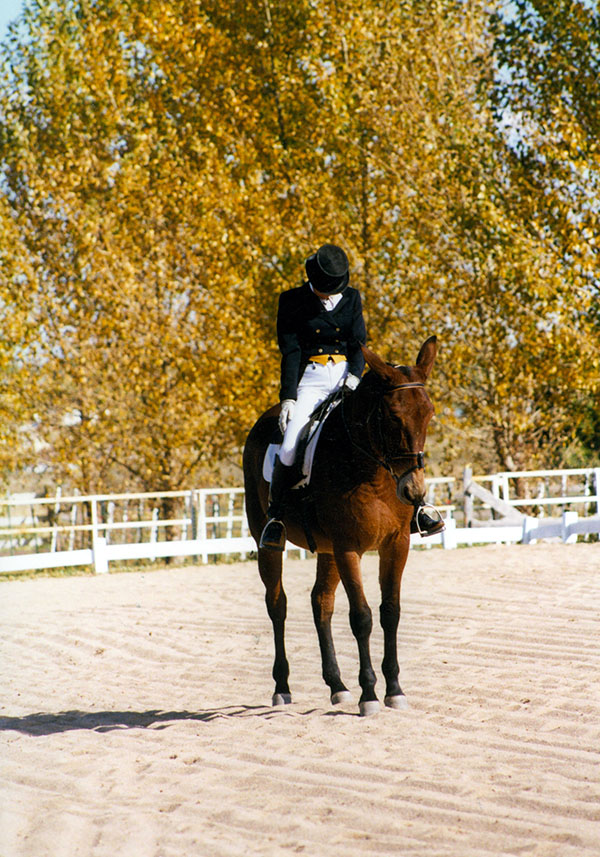
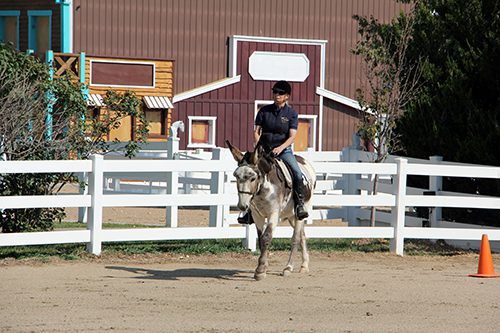
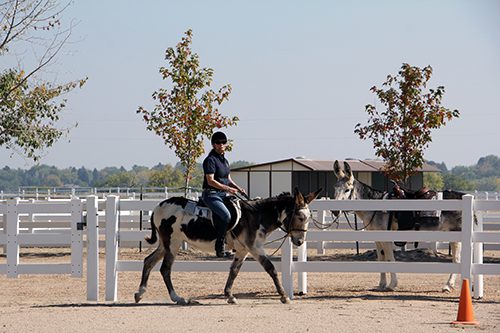
Today we will be going to the outdoor arena for riding in the Hourglass Pattern, but I opt to do some warm-up in the Round Pen first because I do not want to ask Chasity to trot in the Hourglass Pattern just yet. It is better to get her exercise done first, so we can then work on fine tuning her response to the aids: hands, seat and legs. Trotting will come later when she is consistent in her good posture, ultra-light in the bridle, moving off my legs easily and is following my seat.
Wrangler is tied outside the arena just as he has been tied outside the Round Pen. Chasity comes through the gate, stands squarely and receives her reward with no abrupt changes to the routine.
Chasity stands quietly as I mount, settle gently onto her back and politely receives her reward. She is enjoying being in a larger space, but is not anxious to walk off. She will do so only when I ask.
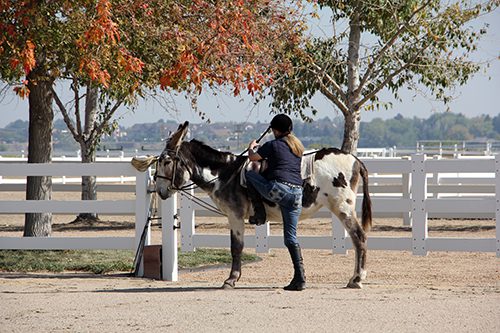
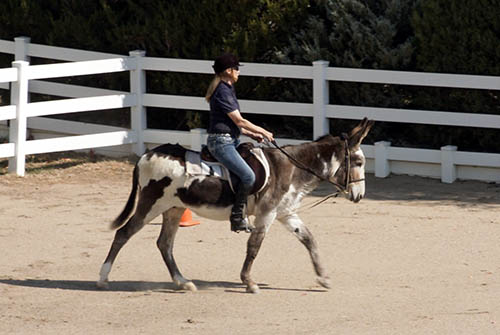
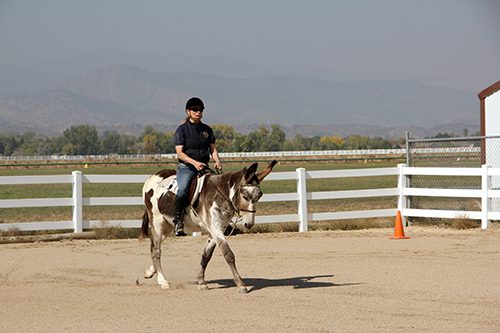
Chasity’s rein back is greatly improved and she is offering more steps upon request each time. She will only step one step at a time as I ask for them, and will also stop when I relax my seat and loosen the reins. I maintain a light connection to her mouth and I give the cue to move forward with my calves wrapped lightly around her belly. I maintain this contact with my legs and just nudge her on each side through the turns while I give a slight squeeze/ release with my little finger in the direction of travel.
Chasity enjoys the feeling of “being hugged” by my legs with only gentle nudges from each side that push her into the direction of travel, and a nudge from both sides at once should she lose energy.
Most of the time, my legs lightly hug her sides and allow her the freedom to move while they simply support the even balance through the straight lines in the pattern. As we turn, the inside leg will move forward to the girth to keep her erect while the outside leg is back further and supports the bend to the arc of the turns.
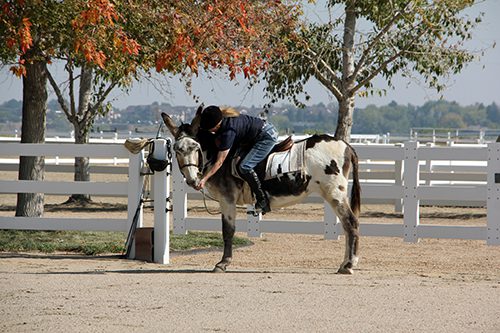
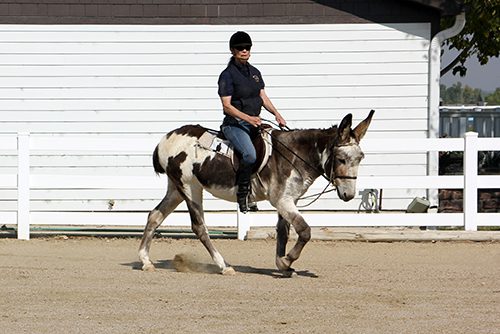
When Chasity is balanced in self-carriage, the “Elbow Pull” remains loose, she is light in the bridle and sensitive to my seat and legs. Wrangler watches her with intense interest! He knows he will soon have a turn!
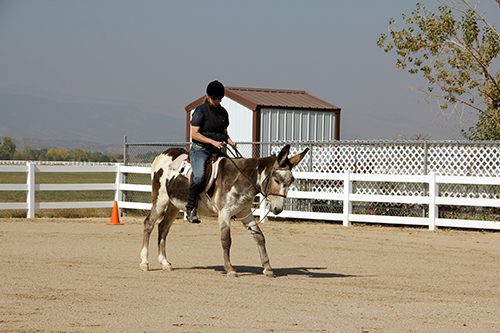
Keeping lessons short, slow and accurate will enhance Chasity’s ability to learn. We track once around the Hourglass Pattern with circles at the cones, then cross the diagonal and do the same in the opposite direction.
In the beginning, I do not use the ground rails as I did for leading exercises. It is more important for Chasity to focus on balancing my newly added, shifting weight before asking her to shift her own body weight and mine over any obstacles. I want her secure in her own balance with me aboard before we do any obstacles.
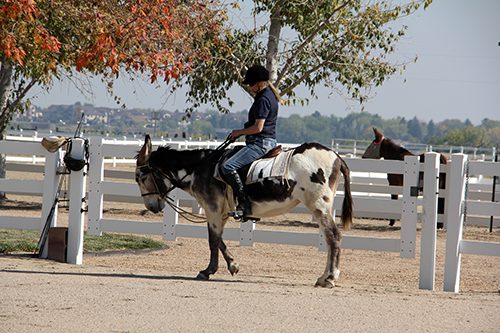
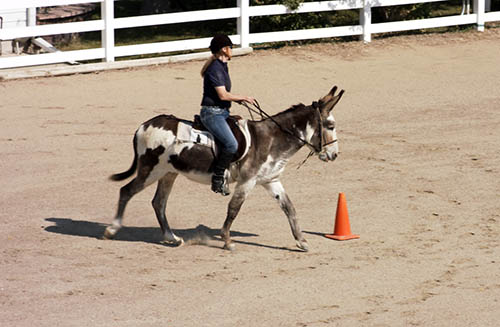
Chasity is learning to execute an energetic, forward working walk in complete postural balance. She makes a smooth turn, maintains her forward energy and tracks up the centerline of the pattern.
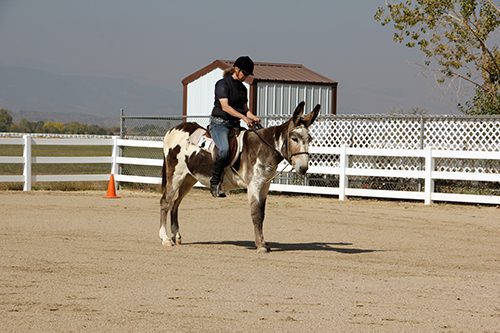
Chasity comes to a nice, balanced halt, waits patiently for a few seconds and then reins back easily upon request.
I dismount, loosen her girth and release the “Elbow Pull.” Chasity remains attentive and then stretches her neck and spine before we exit the arena. It was a relaxing and comfortable workout for us both. Maybe next time, we will be able to add the trot…if she offers it! We want to keep things controlled and accurate so she builds up the core elements in her body symmetrically. This is vital to good health and optimum performance!


 In Part 1 of this article, you learned how to begin your relationship with your miniature equine in a positive and natural way, and how “getting down” to their eye level so they can make eye contact with you discourages striking, jumping on you and other bad behaviors that are common when working with miniature equines. Be sure you have successfully completed the lessons in Part 1 before moving on to the lessons in Part 2 or training may not yield the desired positive results. Also, if possible, it is best to work minis in groups if they are used to being with other equines, as they perform better when they are with their “friends” and it doesn’t hurt to train their friends in the same way.
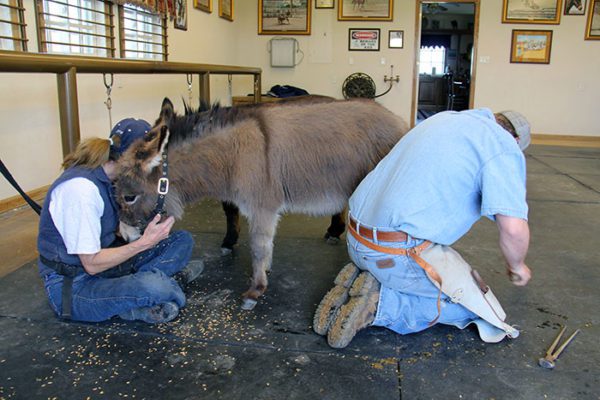 in Part 1), but this time you will be in the work station and you will have a guest…the farrier. Before the farrier attempts to pick up the first foot, ask him to sit down beside your mini in front of the shoulder on the left side and offer a handful of oats as a way of introducing himself. Next, while you sit at your mini’s head and offer the oats reward for good behavior, have the farrier begin with the near side (left) front foot and work his way around from front to back, and then from back to front on the other side (right). While the farrier is working, talk calmly and encouragingly to your mini, and as long as he is doing what is asked of him, offer rewards generously. He should yield his feet easily, but if he does not don’t offer the reward until he complies.
 Don’t shove your mini when you want him to move over. Rather, give him some oats and use your index finger to tap or poke him on the side of his ribcage. If he doesn’t move over, use your whole hand to give him a slight push, always using a “push and release” movement, which is non-confrontational. You don’t want to keep steadily pushing up against him, because as soon as you give him anything to push against, he will and you could find yourself in a pushing match or, worse, a confrontation with him. As soon as he complies and moves, give him the oats reward and slide your body in next to him to help hold him in position for the farrier as he works with each foot. Don’t be afraid and always stay on the same side as the farrier. If the mini decides to make an abrupt move, he will try to slide around you because equines really don’t like stepping on, or running over, soft, squishy things like our bodies, so if your mini can get out of your way, he will. Even if he was to jump up in the air, he would more than likely jump over or around you, taking the path of least resistance. Trust your mini, stay calm and avoid becoming tense or exhibiting fear and things should go smoothly.
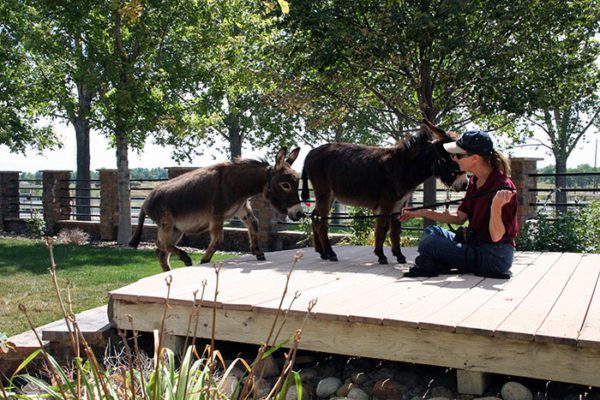 This approach becomes particularly important when negotiating something like a dock or a bridge where you are not only dealing with an obstacle, but an obstacle that makes you substantially taller than you already appear to your mini. This is another instance when you can “get down” on your mini’s eye level the way you did in the pen and at the work station. Remember to do things in small steps. When you walk onto the surface of the dock or bridge or any other large, flat surface, leave enough room for your mini to come up. When you get to the end of the lead rope, take up the slack and then sit down and offer the reward. Then, once your mini has negotiated the obstacle, give him the oats reward and just have another picnic. If a companion equine is accompanying you, be sure to tie the companion animal in front of the obstacle so your mini can always see him. If you tie him behind, your mini will worry and want to go back instead of forward.
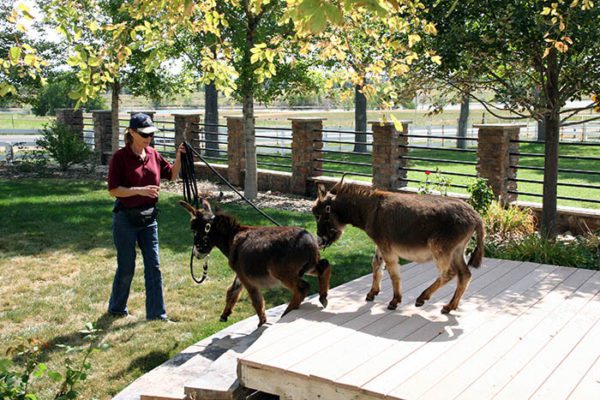 When you are ready to step down off the dock or bridge, it would be unsafe to be lower than your mini, so at this point you should stand up, go to the end of the obstacle and ask him to come forward off the raised obstacle, making sure he has plenty of room to come off the obstacle without you having to move. Stand quietly and keep the lead rope taut as you verbally encourage him and invite him to come down off the bridge. As soon as he jumps down, ask for a halt and reward him for jumping down and stopping right in front of you. (He will learn to negotiate the obstacle more slowly with practice.) Once he has finished negotiating the obstacle and halted and is chewing on his reward, you can then proceed to the next obstacle. Having definite, purposeful and timely pauses will help alleviate anxiety and resistance in your mini.
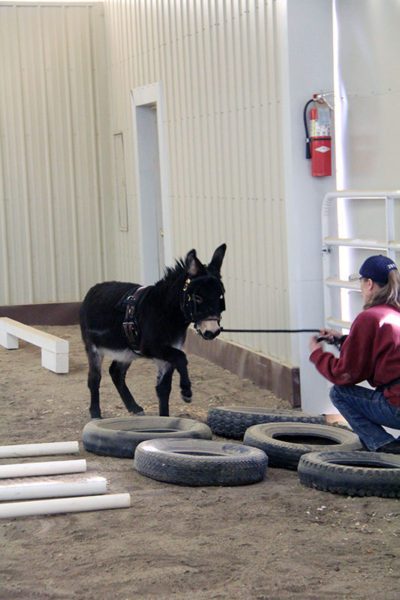 longer he must go without making eye contact with you, the greater the chance of resistance, but eye contact on his level will give him confidence in your judgment and will help to facilitate a real bond between you. If negotiating an obstacle such as a tractor tire or six tires, just extend the lead rope over the tire or tires, sit on that side, keep the rope taut and proceed as you did with the bridge obstacle.
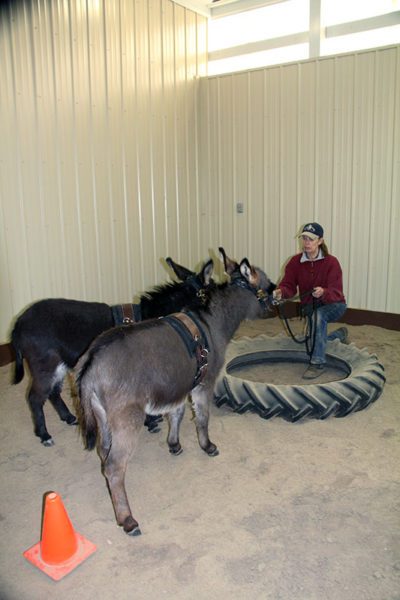 I call this technique “OATS.” (Observe, Approach, Touch and Sigh). It allows your mini time to observe each situation, then approach and touch the obstacle, finally giving a sigh as a signal that he is relaxed and not afraid. Always reward him for his efforts so he can begin to gain confidence and trust in you. By following the OATS technique you are turning your mini’s fear into curiosity, which will serve to keep him calm in future situations.
 Miniature horses, donkeys and mules all have one thing in common; everyone else is taller than they are! That makes eye contact with the trainer very difficult if not impossible for them. As the saying goes, the eyes are the window to the soul so it is understandable that they would become anxious if they are unable to look into a person’s eyes to decide whether they are friend or foe. I have five miniature equines: a mini horse named Mirage, a mini mule named Franklin, a mini molly mule named Francis, and two mini donkeys named Augie and Spuds. To help them all succeed and thrive, I’ve structured my training program for them based on the same one I use for all of my other equines, with one important modification. With safety always as my first priority, I work with my minis from a lower position whenever it’s safe to do so. That way, I can make eye contact with them, and I make certain they are always lavishly rewarded with an oats reward for their compliance. The results have been amazing! I’ve received total cooperation from them almost all of the time.
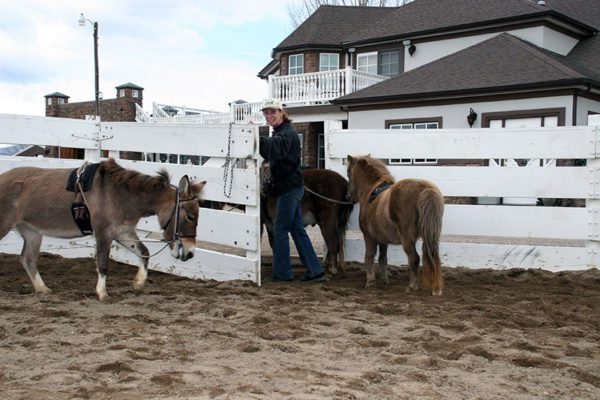 None of my minis were born at my ranch, so I knew that they would each first need to explore their surroundings a little at a time, and would also need ample time to get used to my staff and me. Mirage, the miniature horse, was my first mini. It wasn’t long after I acquired him that I acquired Franklin, the mini mule, who quickly became Mirage’s buddy. Since both Mirage and Franklin had previous training and because minis seem to accept training more willingly when done with a partner, we did all of Mirage’s and Franklin’s groundwork lessons together and, true to form, they learned very quickly because they were allowed to be together.
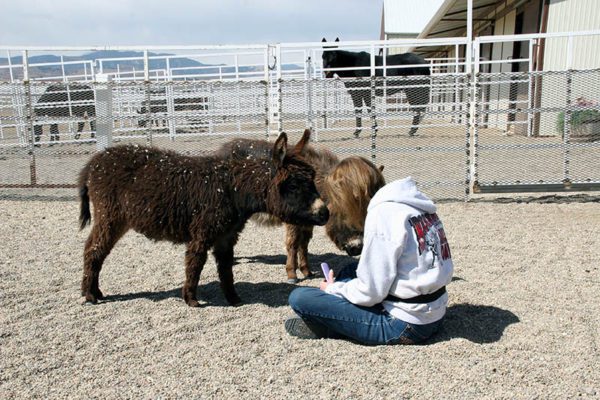 I think it is critically important that all equines have a space they can call their own—their personal oasis of comfort and privacy—so when I got my mini donkeys, Augie and Spuds, I decided that the first thing they would learn about was their living quarters or, as I like to call it, their “bedroom.”
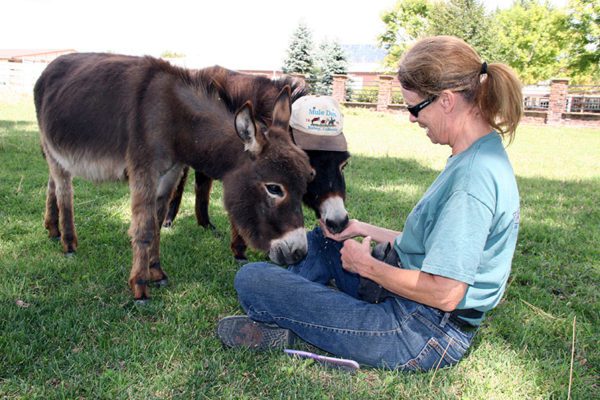 When your mini is comfortable with you coming into his pen and interacting with him, the next step is to ask him to go into a bigger turnout area, where you should repeat the same simple lessons. Now that your mini can be loose in a larger space, ask him to come to join you for another picnic. After a few times, bring a hairbrush with you (It’s the most efficient brush to use on donkey hair).
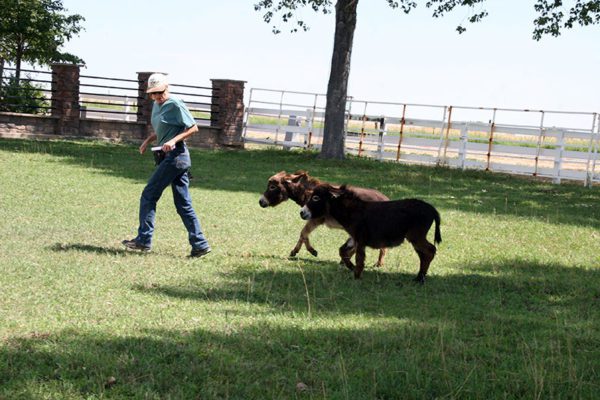 A halter doesn’t even come into play until after grooming in the pen is easily achieved and your mini will follow you to and from the pen without the halter. When it is time to introduce the halter, bring it with you into the pen for your picnic. Do the brushing and then show your mini the halter while you sit on the ground. When he sniffs the halter, he should be rewarded. Once he is unafraid of the halter, hold it on both sides of the noseband, feed your mini some oats, and then gently push the noseband of the halter over his nose and then take it off, rewarding him again. At this point you’ve got all kinds of oats in your lap and your mini’s got his head down, eating the oats, so when you put the noseband on again, just reach over his neck, grab the strap of his halter on the other side, bring it behind his ears and fasten it. If done correctly, this should not bother him. Then reward him with more oats, pet him as he complies and say, “Oh, how good is that?!” You can then take the halter off again and end the first lesson there.
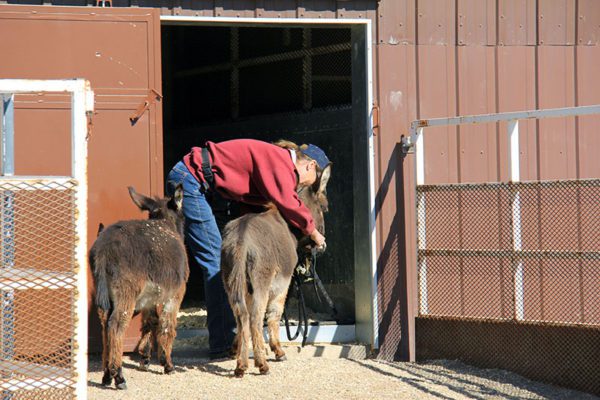 Once your mini is used to having his halter put on, let him graze while supervised in a larger pasture area with his halter on while he drags the lead rope behind him. When you want him to walk away from you, simply stand up and let him go off on his own. After a few minutes, approach him again, grab the end of his lead rope and sit down again. You can give a little tug, say his name and ask him to “Come.” He should come easily when you gently tug on his lead rope. This action makes him look at you and think, “Oh, my human is sitting down again, so I’m going to come over and get more oats!” As he comes toward you, take up the slack on his approach. Once he comes to you easily, you can stand up and ask him to come while you’re standing up and reward him for it. And that’s how to teach a mini to follow you.
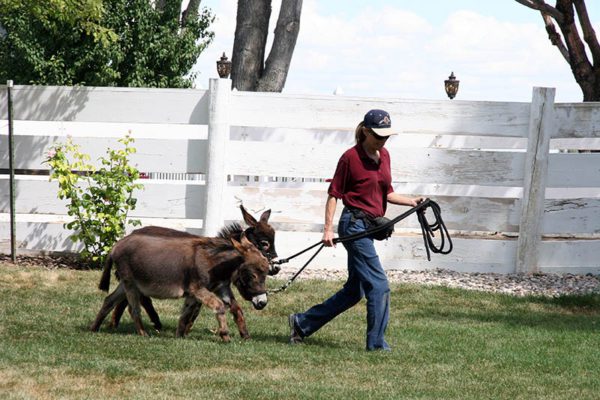 Breaking things down into little do-able steps seems like a long process in the beginning, but as your mini begins to understand the reasoning behind your approach, his reactions to tasks will become calmer, more automatic and more natural for him. When you allow your mini to learn to follow your lead without the halter in the beginning of each task, learning to follow you on the lead rope will be a lot easier for him, and when you finally move on to more specific tasks in training, he will oblige you much more willingly. In Part 2 of “Getting Down With Minis,” I will cover how to approach the tasks necessary for formal training.


 After grooming the left side, move to the right side. Brush the head with a Dandy brush and use a multi-bristled human hairbrush on the mane and tail. By adding a little Johnson’s Baby oil to the mane and tail during grooming, you can train a mane to fall to one side and keep other equines from chewing on manes and tails. Finish with a soft body brush. Finally, use the grooming cloth to wipe around the ears, face, eyes, nose, lips, sheath (if it’s a male) and the dock of the tail.

 You can spritz a little water and hair spray to make the hair easier to handle. The quickest way to secure the braids is by using tiny rubber bands. It’s also very easy to do and it’s great for one-day shows or quick changes between classes.