

MULE CROSSING: National Western Stock Show 1987
By Meredith Hodges
 As the Denver Broncos were leaving for the Super Bowl, the mules were arriving in Denver for their debut at the National Western Stock Show held January 22-25, 1987. Mules had been absent from the Stock Show for 30 years, until 1983 when they were cordially invited by the Draft Horse Association to show between the draft horse classes. This arrangement has proven to be equally beneficial to both the draft horses and the mules. It allows for more time for tack changes between classes as well as giving the spectators a more varied show. The mules and draft horses do complement each other quite nicely and I wish to express my gratitude and appreciation to Coors and the Draft Horse Association for extending this invitation to mules. We truly appreciate your support.
 Preparing for a show such as the National Western Stock Show is probably a lot more difficult than most people realize. Preparations for next year’s show begin immediately following this year’s show. There is a lot of careful planning and time-consuming work to be done, and the efforts of those involved often goes without thanks. Thank you all who have helped make this show the success that it is! Our special thanks to Tom Mowery, a man who has worked hard in support of mules and who has almost single-handedly brought mules before the public in Colorado with his continuous willingness to do what needs to be done. Thank you, Bill Rossman for all your efforts in coordinating the mule show and for doing a great job keeping most of the exhibitors happy and contented throughout the show. This is a tough job and your gracious, diplomatic attitude was duly appreciated. And thank you so much to mule judge Ernie Fanning from Sparks, Nevada, who did a sensational job in judging our mules and more. He inspired us all to keep trying to improve!
 Still, what is a show without the exhibitors? The folks who show at National Western Stock Show are probably among the hardest working people in the country. It is a real art to be able to groom and condition an animal well enough to compete in the dead of winter, yet our hearty National Western Stock Show competitors showed that it can be done under a variety of living conditions. Mule exhibitors ranged from those with heated barns to those who must winter their animals outdoors. Collectively, they all did a great job! I would like to introduce a few of these exhibitors to you:
Grand Champion Model Mule went to our own Lucky Three Mae Bea C.T., a five year old, brown dun molly mule; she was also Grand Champion Single Hitch mule and Reserve Champion Youth Mule (13 years and under), ridden by my daughter, Dena Hodges. Lucky Three Ranch showed  eight animals this year, and although Bea was our star performer, the others did very well which was reflected in the show results. Our animals are kept in an insulated barn under lights and blankets to enhance the condition of the hair coats. They are in training every other day year round with a week or two off after each show. All the training is done by me and the riders consist of my husband, Gary, my daughter, Dena and my riding students when needed. We have a minimum staff, but those who work with us, work very hard. We wish to show the public that… Mules can do!
First place halter yearling mule went to L.J.’s Hanna, a mule sired by Lucky Three’s Little Jack Horner and out of a lovely Albino mare named Hula, owned by Donna Groh of Fort Collins, Colorado. Despite Donna’s rather serious leg injury, she saw to it that Hanna showed, even if she couldn’t show her by herself. Her efforts were duly rewarded in the class. The mother/daughter team of Zella and Cindy Brink were to be congratulated on their performances with mules Nifty and Sally, who took first and third place in the Ranch Riding class. Even with much work of her own, Zella was kind enough to take the time to help her friend Donna Groh to prepare Hanna for the show. Both women had to winter their animals outdoors, but the animals were well groomed and showed very well. Zella is a wonderful lady with mules, and her patience is further exhibited by her patient instruction of her darling daughter, Cindy. With Zella’s careful instruction, Cindy is becoming quite the mule person herself!
 More youth in the news! Fifteen-year-old Kimberly Nordyke rode her mule, Wonder Judy to a fifth place victory in the Ladies Side Saddle class against thirteen other competitors! Good going, Kim! Her younger sister, Crystal (11 years), rode to Grand Champion on Nordyke’s Tuffy in the Youth Pleasure class for those thirteen years old and under. Both girls have been taking lessons at the Lucky Three Ranch for several months and it seems their hard work and dedication is paying off! Congratulations, Crystal! Amy Wilfong riding Ramblin’ Rose for Hal and Diane Walston of Longmont, Colorado, captured Grand Champion in the Youth Pleasure (14-17) and a splendid ride it was! Good job, Amy! And “Hats Off” to all of our dedicated youth!
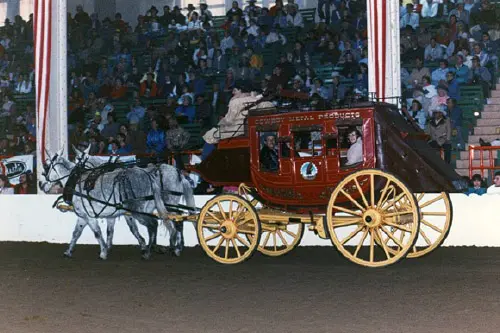
In addition to Grand Champion Youth Mule (14-17), Joan Triolo rode and drove Ramblin’ Rose, owned by Hal and Diane Walston, to Grand Champion in the Sidesaddle and the Drive & Ride classes. Look out world – here’s a pair to keep your eyes on! The work that has gone into this mule is apparent and a hearty “Congratulations” is definitely in order! Another plus for this year’s show was the attendance of many more draft mules. Congratulations to W.D. and Verle Hamm of Cowboy Metal Products, Inc., on their first and second places in the Draft Halter class! This was a tough class. Their team of beautiful gray draft mules, Kate and Jennie, were a real bonus to the show— thanks, guys, for bringing them!
Last, but certainly not least, congratulations to our Grand Champion Model Jack, Scott’s Gallant Eagle, owned and shown by Ann Greer-Rankine of the Thunderbolt Jack Station in Grass Creek, Wyoming; and, congratulations to the Reserve Grand Champion Model Jack, Blue Zebulon, owned and shown by Frank Howe of the Bitterroot Mule Company in Bennett, Colorado. Both these jacks exhibited the characteristics necessary in the production of high quality saddle mules. It might be of further interest to know that Scott’s Gallant Eagle was judged World Champion Model Jack and Blue Zebulon was judged World Champion Standard Jack at Bishop Mule Days in 1986. So, you see, folks, we stand “The Best Jacks in the West” right here in our part of the world. That’s really something of which to be very proud!
Thank you all…exhibitors, Stock Show personnel, and spectators for making this year’s Best of the Rockies Donkey and Mule Show the best ever!
To learn more about Meredith Hodges and her comprehensive all-breed equine training program, visit LuckyThreeRanch.com, MEREDITH HODGES PUBLIC FIGURE Facebook page, or call 1-800-816-7566. Check out her children’s website at JasperTheMule.com. Also, find Meredith on Pinterest, Instagram, MeWe, YouTube and Twitter.
Covered in TRAINING MULES & DONKEY: A LOGICAL APPROACH TO TRAINING, TRAINING WITHOUT RESISTANCE and EQUUS REVISITED at www.luckythreeranchstore.com.
© 1987, 2016, 2024 Lucky Three Ranch, Inc. All Rights Reserved.

 By Meredith Hodges
 Friday morning, the stable area was thick with curious spectators and busy exhibitors, yet they all had one thing in common… that curious grin that Longears bring to one’s face. Spectators commented on the resemblance some mules had to their relatives, then laughed at their own clever jokes. In the face of all the noise and chaos, the mules themselves radiated the character and sense of humor that is a mule! Each mule was host to a multitude of mule-scratching fingers—just imagine getting a 16-hour massage! Colorado Poncho reveled in bliss, Scott’s Gallant Eagle excitedly played with his chain and Little Jack Horner brayed with enthusiasm. The barn reverberated with the musical voices of over a hundred donkeys and mules, and the spectators all made new friends!
 Mules and exhibitors wish to express their deepest appreciation to the sponsors and supporters of this year’s National Western Stock Show Mule Show. First, our gratitude to Coors and the National Western Stock Show for making this show possible. Also our thanks to our class sponsors for their loyal support: Adopt A Burro, Bennett Hardware & Lumber, Bennett Vet Clinic, Bitteroot Mule Co., Colorado Poncho Syndicate, Cooper’s Haulin’ Ass Ranch, HW Leasings, Jackson’s Jackasses, Lucky Three Ranch, Nordykes Circle Bar N Mules, Plumsilly Stables, Potestio Bros. Equipment, Sherer’s Auto Parts, Thunderbolt Jack Station, Ranch Supply of Evergreen, VL7 Mule Ranch, and Watkins Feed & Supply.
 By Meredith Hodges
 Yes, there is no doubt that all this mule stuff can be pretty confusing, but everyone seems to have such fun trying to understand it all! The Lucky Three Ranch of Loveland, Colorado, reaffirmed its reputation for the production of high quality saddle mules by placing in every class they entered, and by winning most of them. Lucky Three Sundowner took first place in Halter for mules 56” & over, three years and older, first in Western Pleasure, first in Reining, and then was named Grand Champion Model Mule of the show! In addition, Lucky Three Ciji won the halter class for mules 48” to 56”, three years and older; Lucky Three Mae Bea C.T. took sixth at halter for mules 56” & over, three years and older, then third in the Single Mule Hitch driving class. Little Jack Horner, Sire-Supreme of the Lucky Three Ranch, completed the picture by taking fourth in the Drive & Ride class against seven mules, first in Halter for Large Standard Jacks and finally named Reserve Champion Jack of the show!
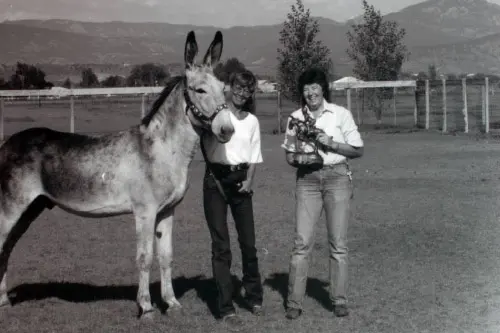 Grand Champion Jack of the show was Laramie, owned by Bud and Georgia Andrews of Northglenn, Colorado, and shown by Georgia Andrews. He was also shown under saddle in the Mule Western Pleasure class. Reserve Champion Model Mule was awarded to Jewel, owned and shown by Ray Godfrey of Rapid City, South Dakota. Jewel also took first at Halter for Draft Mules, first in the Single Mule Hitch driving class, and first in the Mule Pull with her teammate Roy in the class for mules 2001 lbs. and over. Taking first in the Mule Pull class for 1200 lbs. and under went to Six and Seven, owned and shown by Bud Stockwell of Loveland, Colorado. First in the Mule Pull class for 2101 lbs. to 2000 lbs went to Eenie and Meenie, owned and shown by Jess Johnson of Ft. Collins, Colorado.
 Arthur Silvester for sharing Blue Moon, the mule out of a mule, with this year’s National Western Stock Show. Everyone enjoyed meeting this extra-special celebrity!
 By Meredith Hodges
 Careful selection of classes for the show enabled spectators to get a broader view of what is actually being done with both mules and donkeys, as well as giving exhibitors a chance to put the true talents of their animals to the test. Improvement in all areas of performance, obviously due to hard work and dedication, was quite apparent at this show. The beauty of these animals was amply exhibited in the halter classes, relaxation and control emanated from the pleasure classes, and style and grace governed the driving classes. Still, humor, suspense, and excitement were maintained in packing and gymkhana events. All these things combined made for the best show that Colorado has ever
  hosted! The true talents of the donkey and mule trainers showed through the incredible performances of their Longeared counterparts. Patience and ingenuity are the name of game. These are special people with very special animals!
 Following the Donkey and Mule Show, on Saturday, October 13, was the Segelke Dispersal Sale, where over 75 head of Mammoth jacks and jennets were auctioned off to the highest bidder; the quality of these donkeys reflected a careful and deliberate breeding program, obviously aimed at upgrading the breed. The bidding was fast and furious as buyers form such states as Iowa, Arkansas, Arizona, Wyoming, Montana, Texas, and California fought to take possession of this quality stock. Now these beautiful animals will go to their respective new homes and continue to help upgrade the quality of donkeys and mules in America.
 The donkey and mule industry is still a young industry, and I would like to encourage all of you to ask yourselves if you might want to contribute your talent to help in its growth. What was once just a novelty, is no more a novelty; the rapid growth of these animals in California and Missouri denotes that these Longears are here to stay this time, as we find many new and interesting uses for them. Besides the obvious uses such as riding, driving, and packing, these animals are now being used as embryo transplant recipients—who can predict what other uses we may find in the future? As in any industry, we need people with many different talents: we need people in advertising, communication, transportation, and the list goes on! This business has something for nearly everyone and our Longeared friends are giving each of us a tremendous opportunity to help ourselves regain the dignity and self-confidence that we might have lost through the years of economic hardships—so if you have talents to contribute, please don’t let them go to waste. We need you!
 It is no secret that mules, due to their innate sensibility and incredible surefootedness, are the equine of choice for packing and riding into untamed wilderness areas. Dependable mules carry thousands of tourists down the steep trails of the Grand Canyon each year. This enables many to take in the splendor and beauty of an otherwise nearly inaccessible corner of the world.
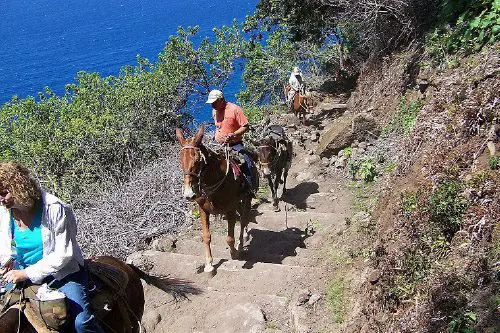 conveniences. Though the settlement is only 12 square miles, there are cars and mini-buses to aid in transportation. After the mule ride down the cliff trail, mini-buses give personal tours around the settlement where you can learn about everyday life then and now. You’ll see their homes, general store, dock, medical facilities, lonely graveyards, the old settlement of Kalawao, and Father Damien’s church, St. Philomena.
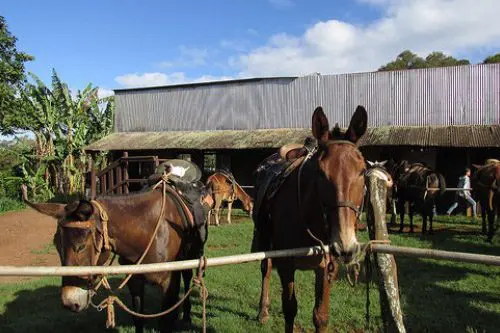 The mules were trained for the cliff trail primarily by Buzzy. He would lead them down and ride another animal, or let them follow back up the trail the first few times. The mules are not broke to reins and are expected only to walk and follow. Passing is discouraged. Should a mule decide that he prefers to speed over the trail, Clyde enters the scene and quickly puts any thought of speed out of the mule’s head. If the mule wishes to “run” the trail, Clyde will oblige him…over and over, until the mule decides that slow is better! Any that do not comply, they will not use. With all the inexperienced riders with which they must deal, these mules must be fail-safe!
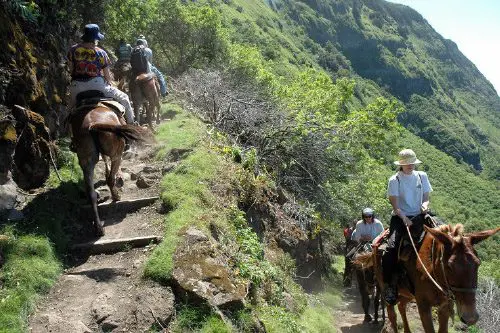 If you thought that Hawaii was only for those who love lolling on the beach in a tropical paradise, think again. The mules of Molokai can contribute a lot more diversity to your tropical vacation. They can take you on quite an historic adventure through the most beautiful and spectacular scenery in the world. Without the mules, this would not be as safely possible. These trail trips, of course, must be limited to those who are physically fit, weighing no more than 225 pounds and not too advanced in age. A minimum age of 16 years is required by Hawaii State Law to enter the Kalaupapa Settlement. The owners of the Molokai Mule Ride, Buzzy and Clyde Sproat, took every reasonable precaution to help make this an enjoyable and unforgettable experience. Should you be interested in taking this excursion, you can contact them for further information through your travel agent. “Wouldn’t you rather be riding a mule on Molokai?”
 1993 was a good year for
  competition, and the horse establishment—the U
 My
My
 With some reservation
 their established Western, English
 just at home alone.
 had been in D
 The C
The C Now that it’s done, the U
 It is no secret that the popularity of mules in this country is on the rise and their uses are quite varied. Many people believed that mules were used solely for packing and pulling, but modern-day mule lovers have competed successfully with mules in all areas of equine athletics, exhibiting the mules’ true abilities and versatility. Western style riders were the first to catch on to mules, but English riders soon followed suit. Perhaps the most elite form of English riding, Dressage was avoided for many years. There could have been any number of reasons for this, however, an adventurous lady from Montana chose to train her more than 16 hand mule, Baby Huey, for Dressage and competed successfully in many shows. This opened still another door for mules.
 One of the basic differences between training mules and training horses is the essential maintenance of a calm attitude by the trainer. Mules will not respond positively to a bad temper. The calmer and more deliberate the trainer, the more responsive the mule. Training in this manner will reveal the true abilities of the animal. His paces will be free and regular and his movements will be harmonious, light, and easy. Impulsion from the hindquarters is reflected by lightness on the forehand with quiet acceptance of the bridle with no tenseness or resistance. An animal trained in Dressage will appear to be doing of his own accord what is required with an air of confidence and always attentive. The walk is regular and free, and unconstrained. The trot is free, supple, regular, sustained and active. The canter is united, light and cadenced. These all reflect active and animation of the four quarters. He is never sluggish. He will respond to the slightest cue from the rider and thereby, give life and spirit to rest of his body. In all his work, a Dressage animal will be “on the bit” with a light, soft contact and submissiveness throughout. Many good trainers use these basic principles in turning out their best-trained animals. It just doesn’t always get labeled as “Dressage”.
 One need only try to bully a mule once to find out that it simply doesn’t work. The mule, with the strength of the jack, can crook his neck so that no amount of pull can cause him to bend and the wide opening of the mouth leaves you pulling on virtual “rubber!” Consequently, you are left doing primarily what he wants. Slow and methodical training in Dressage can unite a mule and rider in a beautiful, flawless picture. Communication between equine and rider is, after all, what Dressage is all about.
 The mule, as anything but a packing and pulling animal, has not been tried too much in the past. This is why they have not been seen in many places of equine athletics. Mule lovers today are trying mules in all areas of equine sports and are exhibiting that mules can do it all! With the intense training and showing of more mules, more of the uneducated public is able to see that there is far more to mules than was portrayed in the past. Horsemen are continually surprised and amazed… and in some cases, even converted to mules!


 By Meredith Hodges
 owner would have to paint his face orange and blue and ride a mule all the way around the hotel. Well, guess who won and, guess who the mule was?! Yes, it was our own Lucky Three MaeBea C.T.!
 Although they never finished the movie, DIX Country Pictures chose Beaas Wadi’s understudy from hundreds of applicants.
 In 1998, we did a shoot with the Discovery Channel and Bea can be seen as the mule in their production of “The Ultimate Horse.” What a gal!
 Everyone loves a parade and Bea was no exception! She competed in numerous costume classes and parades, but dressing up for the holidays was her favorite. She placed first in many a parade and had no problem with any theme you might want to try.
 Bea may be a perfectionist, but she was certainly not a prude. She was always willing to try anything you might ask. At home, Bea worked hard checking fences, moving cattle and much more.
 shrubs and bushes. We were headed up one hill behind the cattle and the two cowboys when we came upon a three foot diameter tree that had fallen across our path. The cattle dove into the underbrush on either side of the tree, the cowboys slid to an abrupt halt and Bea came right up the middle, jumped the tree and stayed on the heels of those cattle the entire way! No one was more surprised than those two cowboys, except maybe their horses!
 there, she cleared fences without batting an eyelash. She always took the jumps right over the center and never expended any more energy than necessary to clear the fence in beautiful form.
 Her shortened frame allowed her to make sharp turns and still clear the fences in timed classes where she would ordinarily be at a disadvantage against taller mules.
 In 1986, Bea and I began lessons with instructor/trainer Melinda Weatherford in Dressage. The same year, I went to the United States Dressage Federation Convention and introduced them to the idea of allowing mules such as Bea to compete in dressage schooling shows and competitions. There were some discrepancies in the rules, but they finally decided to allow mules in lower levels at schooling shows with the discretion of the individual show committees. This was a major breakthrough for mules in equine society!
 She has shown dressage in all sorts of different disciplines: Dressage Shows, Dressage Schooling Shows, Two-Phase Combined Training Shows, Three-Phase Combined Training Shows and in Two-Phase Combined Driving Shows. Her scores were always high and she was always in the ribbons right from the start. The most remarkable thing about the training in Dressage was how it enhanced her driving skills so drastically that she won the first, second and the only two Two-Phase Driving Shows she had ever entered. People were always skeptical to start, and the first to applaud her performances after they saw her! The most prevalent comment during the ribbons ceremonies was, “My God! It’s a mule!”
 For a decade, Bea was shown in numerous classes by my daughter, Dena Hodges from the age of six to sixteen. They showed together in Western Pleasure, English Pleasure, Driving, Mule Jumping, and Two-Phase Combined Training shows. They were always in the ribbons and most often first or second in their class.
 Driving was always one of Bea’s strengths. I remember when I broke her to drive. I didn’t really know what I was doing. She took to the harness well, ground drove along side of the cart and didn’t seemed to be bothered by any of it, so within three days, I hitched her to the cart and proceeded to lead her out to the pasture where we would have more room. We were going around a 90-degree turn as I was leading her, hitched to the cart, when one of the wheels caught on the fence. She did a quick little scoot for a step or two which only caused the cart to flip over. She wound up with on of the shafts over her head and the other between her front legs. She stopped cold and allowed me to right the cart and get her untangled. Then we went out to the pasture and had our first drive with me in the cart with no further incidents. No big deal!
 Bea was always so steady that she was the perfect Side Saddle mount. She competed in Side Saddle at numerous shows and won many of those classes. She competed in Side Saddle at the National Western Stock Show with several different riders, but always placed in the top three regardless of who was riding her.
 In 1993, I rode her Side Saddle in the Inaugural parade in Washington D.C. It was a grueling 24 hours, standing around waiting to go in very cold weather and in the midst of more “mule eaters” than you could count. Bea seemed to take exception to the 50-foot Elvis Presley float, but otherwise handled the whole situation with her usual grace and dignity. Bea must have caught Clinton’s eye as she strolled elegantly past the viewing area because he turned away from the man he was speaking to and gave her a hearty thumbs up! We responded in kind and in her usual style, Bea smiled broadly!
 when we lightly weighted her front legs to encourage some reach. In nine months, she had increased her length of stride by 18 inches!
 the trail disappeared into a rock slide. She was trapped on the narrowest part of the trail with four horses behind her. She couldn’t turn around and she couldn’t back up. After assessing the situation, I asked her to do a 180-degree turn on the haunches and swing her front legs over the 100-foot ledge to get turned around. She did as I asked and got us through that compromising situation with the finesse of a ballet dancer! The people on the horses were nothing short of amazed! When we went trail riding, or down the road, everyone wanted to ride Bea!
 she did Western exhibitions at various local events and was the subject of many a newspaper or magazine article throughout her career.


 A horse can be dominated by man
 Funny, fuzzy Fara finally fanned her floppy ears for family and friends;
 Little Jack Horner stood in the corner
 By Meredith Hodges
 “It’s got possibilities,” I said enthusiastically. My mother scowled, then grinned and said, “Yeah, it’s got possibilities all right.”
 We built fences and sheds out of discarded lumber and made do as best we could. Each day I set aside one hour to spend with the first mule that was ever totally mine!
 that trailer?” No one can ever say that Ernie Fanning doesn’t know his Longears! We introduced ourselves and sat there along the highway talking mules for about a half an hour. Afterwards, we were again on our way with our trailer full of hopes and dreams.
 Lucky Three Mae Bea C.T., a molly by Colorado Poncho and out of our Appaloosa mare, Sam’s Nickey (bred before Little Jack Horner was old enough to breed), was foaled in 1982 and had over 40 titles to her credit, including National Western Stock Show Drive & Ride Champion in 1986, Single Hitch Champion in 1987 and 1988 and Bishop Mule Days Reserve World Champion Drive & Ride and Single Hitch Mule in 1986 and 1987. Mae Bea C.T. had won numerous titles in Halter, English & Western Pleasure, Trail, Reining, and Dressage in her short career. She is the first mule I ever trained without any interference from anyone. In my opinion, she was the best mule I ever produced of the 30 or better that I had trained before. Still, there were many more Little Jack Horner offspring to come! Bea’s crowing glory was to beat 56 horses in Combined Training in 1993 at the Novice Level. Given the right start in a carefully planned training program, our mules provided us with the additional finances we needed to expand to the breeding and training operation that we had for twenty years, but it is more than just this for which we stand.
 We began as a family of three enthusiastic people, loving and living Longears and that part hasn’t changed. Good hired help is next to impossible to find, so we built up our ranch so that it would be relatively easy to care for it ourselves. In 1984, we added 70 more acres and a hay business to our operation—still managed entirely by our small family and a few friends on occasion. Experience and dedication to Longears caused us to cover a wide spectrum of training with our mules, ranging from Western to English and finally to Dressage and Combined Training. Little Jack Horner became the Sire-Supreme of mules that naturally possessed the athletic ability and conformation to accomplish a wide variety of interests. This further exhibited the true versatility of quality mules. In 1984, we bought a 14.2 HH jennet at the Segelke Dispersal sale in Denver in hopes of developing a Mammoth donkey jack with the refined
  characteristics of the Large Standard and Standard donkeys.
 Society that operated out of our ranch for more than two years. It wasn’t long ago that we were knocking on the doors of horse shows everywhere, begging for acceptance. When we formed the Colorado Donkey and Mule Society, we had horse people knocking on the doors of our learning clinics! At the same time, we had nearly six times the number of Longears shows in Colorado that we had before!
 Acceptance by the United States Dressage Federation in 1986 was the most inspiring influence we encountered in our 15 years with Longears. A tradition in equestrian arts, the United States Dressage Federation literally lives by its motto, “A Circle of Friends.” They aided us in putting our mules to the test and allowed us to test their capabilities at numerous schooling shows. We also discovered that Dressage Training (as tradition already has it) only enhances an animal’s performance. It is for this reason that we always start our young mules this way, though each individual may be suited for something different. It was our U.S.D.F. instructor, Melinda Weatherford, who inspired Gary, Dena, and I to go one step farther into Combined Training. The mule’s natural jumping ability lent itself beautifully to this avenue of training—besides, it’s just a lot of fun for both mules and riders! Our daughter, Dena, worked diligently to try to become a United States Equestrian Team rider. She said if she finally made the Olympic team, she hoped they would allow her to exhibit her three-day event mule, Lucky Three Nuggett at the Olympics. Although they never did have this opportunity, it looks like Longears will continue to prosper through a third generation in this family with my granddaughters as they love Longears, too!
 Our Longears have given us many memorable moments in our lives, most of them pleasurable and it is my desire to share this knowledge with others that keeps me going. Lucky Three Ranch only produced three to four mules per year because that is all we could handle for training. Our mules proved their quality and value many times over in the show ring.


 By Meredith Hodges
 Months of preparation went into the show and like any show there were numerous things to be considered and changes to be made. Every time a change was made, people had to be notified and the mailing list for Longears was more than 400 names. We had hoped to pull in quite a few mules and donkeys, but one major glitch nearly cost us the show. Horse shows, because of their stability and increasing popularity, are able to charge much more for entries, not to mention breed and club fees. When the premium book was released, we found that the mules were charged the same fees as the horses. Two weeks before the show, management conceded to drop a lot of the superfluous fees, however by that time, it was too late to repair the damage. It is my contention that we might have had a lot more animals show up had the fees been initially reasonable, but this too, is speculation.
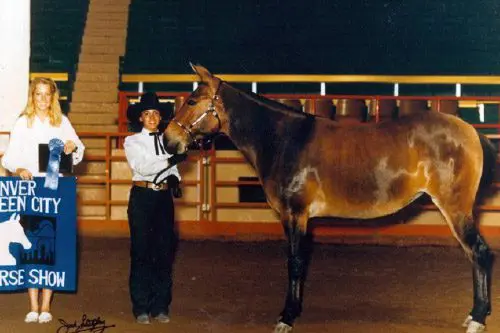 We are experiencing an economic slump in this country, and people just don’t have the extra money to spend on other than their own basic needs. Still, I would like to say that this show did not bomb out. Nineteen people and 23 mules put on a show that was well received by our American Show Horse co-exhibitors and spectators. We are also especially proud to say that every mule in the show, and donkey too, was well-conditioned, well-groomed and well-trained, making for one extraordinarily impressive show. Twenty-three mules and donkeys filled22 classes, once again reaffirming the true versatility of these incredible animals! Champion Model Donkey went to Blue Zebulon, shown by Fran Howe of the Bitterroot Mule Company in Bennett, Colorado, with Lucky Three’s Little Jack Horner taking Reserve Champion. Champion Model Mule was Lucky Three Nuggett, a two-year-old molly mule shown by the Lucky Three Ranch in Loveland, Colorado. Reserve Champion went to Mountain Shadow Mules’ Rambling Rose, shown by Diane Walston of Longmont, Colorado. Detailed results can be obtained through the Lucky Three Ranch.
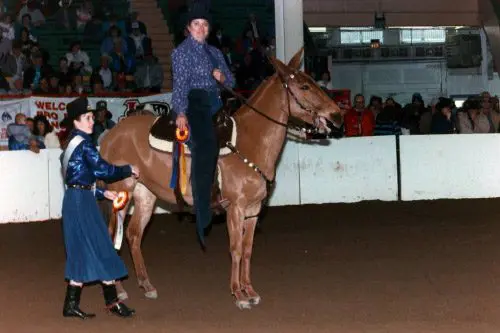 CDMS members and their friends are to be congratulated for all the hard work and dedication it took to make this show as impressive as it was. It was obvious that the several months of preparation were worthwhile. The monthly clinics sponsored by C.D.M.S. and attended with enthusiasm had indeed paid off in the show ring. It had made much better riders of us all and quiet, obedient companions of our mounts. We can be especially proud of our youth for their outstanding performances throughout the show. They have probably progressed faster than the adults! Their classes reflected an aura of concentration and determination. These “kids” are serious riders with a serious case of Mule Fever, and dreams of a bright future for Longears. They will carry mules and donkeys into new challenges and greater recognition. Keep up the good work: Justin GrandPre, Amy Wilfong, Leslie Busque, and Kim Nordyke (Youth Showmanship & Pleasure 14-17); Dena Hodges, Donnie Jo Neal, Cindy Brink, and Crystal Nordyke (Youth Showmanship & Pleasure 13 and under). A special congratulations to Leslie Busque for her first place win in the adult English Pleasure class, and to Kim Nordyke for her beautiful ride to second place in the Ladies Sidesaddle. We are very proud of all of you!
 By Meredith Hodges
 Americans, by nature, love a challenge with a good cause. They love to explore new frontiers and mules have given them every opportunity to do just that. Over the past 40 years, mules have been used in both English and Western activities, as well as in harness. In 1986, they were again challenged as an acceptable sport animal and their owners have met this challenge with much enthusiasm. In November of 1986, the United States Dressage Federation recognized mules as a viable competitor in the world of Dressage. Since then, many mule owners have elected to pursue this challenge. One must appreciate the determination of such people. Although the U.S.D.F. was quite receptive, the American Horse Show Association was not. So, we were faced with the task of gaining yet more approval from the governing branches of the horse industry if we were to realize our full potential in Dressage and Combined Training. Actually, since A.H.S.A. does sponsor all major horse shows, their sanction of mules was all-encompassing and all-important. There may have been a time when mule people were “those who couldn’t make the grade on a horse,” but this is quite to the contrary these days.
 Being the intelligent animal that they are, they pose very different and very difficult training problems compared to horses. It takes a person with “a very special something” to help a mule realize his potential. The mule not only needs to learn the “moves,” but the discipline of performance as well. Being the personable character that he is, the mule sometimes forgets how important a show may be to his rider. Only through consistent and patient discipline can a mule be expected to perform in a consistent and quality way. This is also true with horses, but after training both, I am convinced that the mule can meet you with much more resistance than can a horse and must be dealt with very carefully. Consequently, the end result in a mule has demanded a lot more work on the part of the trainer, or rider, than it would in the case of a horse. The successful mule trainer has justly earned a pat on the back and the opportunity to exhibit his talents.
 Mules have, in 40 years, proven to be quite competent equines and have been bred to possess a similar beauty to horses. Not only that, scientifically they have been successfully utilizing molly mules (females) as embryo transplant recipients. It has been theorized that they make the best recipients since they are virtually “untouched.” With these kinds of contributions to the equine industry, how can anyone with a conscience ban them from the major challenges of the industry?
 Even if all I was going to do was rescue equines, I knew I would have to have at least some experience in equine management and training, so I read numerous training books and attended many clinics and seminars. The more I learned, the more overwhelmed I became. There were so many vastly different ideas about how to do things with equines. Different authors wrote about different stages of training and they all had a different approach. There was no one author who produced anything with continuity from foal all the way to advanced levels of training. To make matters worse, in the early 1970s when I got involved with Longears, I found that there was virtually nothing available about training them for recreational purposes. That is when I decided to begin documenting everything I learned that worked well (and forgot about what didn’t).
 Like most people, I started off thinking that leaving equines to just be equines without human interference was the ideal. Oh, how they would just love to exist in a large plot of pasture to live out their days in leisure! I soon found out how deadly that could be to an equine. Equines in the wild will travel for miles, exercising and grazing sporadically, balancing their diet and exercising themselves. Since the majority of the world’s equines are not wild and can no longer run free (no more wide-open spaces available), leaving them alone in a pasture to eat freely only results in obesity and all the ailments that go with it. In reality, allowing this “free grazing” is a passive form of neglect, and is usually the result of just plain human laziness. Equine owners may often feel like they “do not have the time” to do everything correctly, when, in actuality, it takes less time (and is less costly) to correctly feed, manage and train equines. That is how I can successfully be the sole trainer of 30 equines at this late date in my life.
 Trainers in general advise owners to set things up so it is hard for the equine to do the wrong thing. Why not just concentrate on setting him up to be able to easily do the right thing? Wouldn’t you get a better reaction from your equine if he received rewards for a job well done rather than focusing on the punishments and intimidation if he didn’t comply?
 Restraints should only be used to suggest compliance to the equine and not for complete control over any resistance. Patience, calmness and purposeful action during the use of restraints are all paramount in teaching the equine how to cope with things that are difficult for him. In the use of restraints, one runs the risk of being more severe than intended, which will have a negative impact on the equine’s response to the restraint used. I have discovered some very simple restraints that work well.
 By Meredith Hodges
 All of this opened our shows to the political arena, devaluing quality training and hard work, while emphasizing gimmicks and popularity of individuals for the sake of monetary gain. The original intent of promoting the breed began to take a backseat to economics and personal gain. The result of this was a decrease in the number of people willing to compete in the shows, a lot of artificially trained animals produced and a decreased number of spectators attending the shows. Seeing the same individuals win over and over again, from one show to another, deserving or not, became boring and uninteresting to the general public. Thus, a lot of spectator support and amateur competitors were lost.
 To continue to grow and prosper, our industry must keep several things in mind. We need to appreciate what our shows can do for Longears, as well as what they cannot. Large shows do bring in a lot of spectators, but those who attend shows usually already have a certain interest in equines. They will spread the word throughout the equine set in our society, but if we wish to promote new interest, we need to be more creative in our promotional thinking and target those who are unfamiliar with equines.
 specialties. This absence of judges allows the spectator to observe and be the judge himself, allowing him to become an active part of our industry, giving him not only entertainment, but involvement, increasing his personal feeling of commitment to the industry. As we investigate this avenue of promotion, we find many more new and interesting ways of promoting our equines. In Kansas City, riders have been asked to join the symphony orchestra in an evening of classical entertainment with a fantasy of visual equine aids. This surely targets people who would otherwise, not necessarily see equines perform and may gain future support from their interest.