

MULE CROSSING: National Western Stock Show 1986
 By Meredith Hodges
After three months of record lows and an abundance of snow, the sky opened up and the sun shone brightly with warmer temperatures for the National Western Stock Show Mule Show held in Denver, Colorado, January 16-19, 1986. Mule exhibitors worked hard the first day getting settled and prepared for the three-day mule show. Cooperation and determination got the jobs accomplished and by evening, mules and exhibitors were tired, but excited about the show to come.
 Friday morning, the stable area was thick with curious spectators and busy exhibitors, yet they all had one thing in common… that curious grin that Longears bring to one’s face. Spectators commented on the resemblance some mules had to their relatives, then laughed at their own clever jokes. In the face of all the noise and chaos, the mules themselves radiated the character and sense of humor that is a mule! Each mule was host to a multitude of mule-scratching fingers—just imagine getting a 16-hour massage! Colorado Poncho reveled in bliss, Scott’s Gallant Eagle excitedly played with his chain and Little Jack Horner brayed with enthusiasm. The barn reverberated with the musical voices of over a hundred donkeys and mules, and the spectators all made new friends!
The improvement in the quality of performance was apparent this year, including the barn exhibits. Exhibitors made signs and posters to enhance the spectator’s experience, the Rocky Mountain Longears courtesy booth was a tremendous success and the actual performances of mules and exhibitors reflected more professionalism than ever before. Tack and harness were all cleaned and shiny and the carts and buggies were all quite impressive. Despite longer coats on some mules, they were “dressed to a tee” and showed well. The audience was unconditionally supportive.
There were disputes to deal with as in any show. However, mule people welcome the improvements these disputes will bring. Learning is an important part of growing, and those of us with mules are learning all the time!
 Mules and exhibitors wish to express their deepest appreciation to the sponsors and supporters of this year’s National Western Stock Show Mule Show. First, our gratitude to Coors and the National Western Stock Show for making this show possible. Also our thanks to our class sponsors for their loyal support: Adopt A Burro, Bennett Hardware & Lumber, Bennett Vet Clinic, Bitteroot Mule Co., Colorado Poncho Syndicate, Cooper’s Haulin’ Ass Ranch, HW Leasings, Jackson’s Jackasses, Lucky Three Ranch, Nordykes Circle Bar N Mules, Plumsilly Stables, Potestio Bros. Equipment, Sherer’s Auto Parts, Thunderbolt Jack Station, Ranch Supply of Evergreen, VL7 Mule Ranch, and Watkins Feed & Supply.
Congratulations to all of our winners and a special salute to our champions:
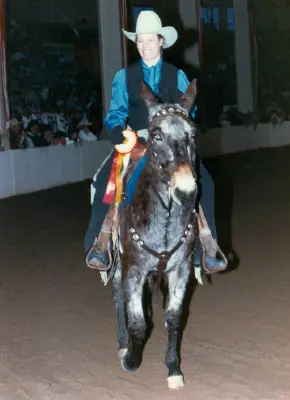
*Champion Model Mule was Lucky Three Mae Bea C.T., owned and shown by Meredith
Hodges of the Lucky Three Ranch in Loveland, Colo.
*Reserve Champion Model Mule went to Cody, owned and shown by Gale W. Fortney of
Colorado Springs, Colo.
*Our 1986 Grand Champion Jack was Blue Zebulon, owned and shown by Fran Howe of
the Bitterroot Mule Co. of Bennett, Colo.
*Reserve Champion Jack went to Scott’s Gallant Eagle, owned and shown by Ann
Greer-Rankine of the Thunderbolt Jack Station of Grass Creek, Wy.
*Youth Pleasure Champion went to Jill, shown by Krystal Nordyke and owned by Larry
Jarrett of Franktown, Colo.
*Ranch Riding Champion was JD Diamond’s Blackjack, owned and shown by Jack
Dishong of the JD Diamond Ranch in Bennett, Colo.
*Sidesaddle Champion went to Sally, owned and shown by Zell Brink of Ft. Collins,
Colo.
*Mule Pleasure Champion went to Nift,y owned and shown by Zell Brink of Ft. Collins,
Colo.
*Single Hitch Champion (48” and under) went to Sweat Pea, owned and shown by Bud
Stockwell of Loveland, Colo.
*Drive and Ride Champion was Lucky Three Mae Bea C.T., owned and shown by
Meredith Hodges of the Lucky Three Ranch in Loveland, Colo.
*Single Hitch Champion (over 48”) was Jill, shown by Boomer Navarro and owned by
Larry Jarrett of Franktown, Colo.
*Multiple Hitch Champions were Maude and Cocoa, owned and shown by Vernon and
Sandy Miller of Strasburg, Co.
*Lightweight Champions were Maggie and Jiggs, owned and shown by Larry Jackson of
Commerce City, Colo.
*Heavyweight Champions were Jerry and Kate, owned and shown by Marsh Bates of
Evergreen, Colo.
*High Point Mule went to Jill, owned by Larry Jarrett of Franktown, Colo.
I would also like to extend a special thanks to all of those in the Costume Class; everyone did an excellent job portraying mules in their various authentic uses, making this perhaps, the largest and best costume class ever!
Mule people are special! They work harder loving mules than most and are always there to lend a helping hand as was apparent at this show. Congratulations to all for helping this year’s National Western Stock Show Mule Show to be better than ever! We cordially invite you all to participate next year. The more mules, the merrier!
NATIONAL WESTERN STOCK SHOW RESULTS
M-1 Miniature Mule Halter
M-2 Sponsored by: COPPER’S , Loveland, Colorado
1 Minnie The Mule Cynthia F. Wolf Littleton, Co.
2 Bitteroot Banjo Bitteroot Mule Co. Bennett, Co.
3 Jean Gordon Nordyke Bennett, Co.
M-3 Saddle Mule Halter
Sponsored by: RANCH SUPPLY, Evergreen, Co.
1 Cody Gale W. Fortney Co. Springs, Co.
2 Lucky Three Firestorm Meredith Hodges Loveland, Co.
3 Callipoe Arthur Boyd Ft. Lupton, Co.
4 Bitteroot Super Bill Bitteroot Mule Co. Bennett, Co.
5 Jezebel Arthur Boyd Ft. Lupton, Co.
6 Bushrod Gaye Stockwell Loveland, Co.
M-4 Saddle Mule Halter
Sponsored by: COLORADO PONCHO SYNDICATE, Bennett, Co.
1 Calico Gorgon Nordyke Bennett, Co.
2 Peggy Sue Gaye Stockwell Loveland, Co.
3 Rusty Joseph Giesler Longmont, Co.
4 Chester William Rossman Longmont, Co.
5 Funnybutt Skip Jackson Aurora, Co.
6 Sally Zell Brink Ft. Collins, Co.
M-5 Saddle Mule Halter
Sponsored by: POTESTIO BROTHERS EQUIPMENT, Parker, Co.
1 Shenandoah Mimi Weeks Co. Springs, Co.
2 Lucky Three Stardust Meredith Hodges Loveland, Co.
3 Bitteroot Spider Dee Bitteroot Mule Co. Bennett, Co.
4 Prhzutah Tanka Patricia Barnard Littleton, Co.
5 Casper William L. Millard Montrose, Co.
6 Velvet Lilly Hal & Diane Walston Longmont, Co.
M-6 Saddle Mule Halter
Sponsored by: SHERERS AUTO PARTS, Bennett, Co.
1 Lucky 3 Mae Bea C.T. Meredith Hodges Loveland, Co.
2 Rambling Rose Hal & Diane Walston Longmont, Co.
3 Frijoles Dixie Belle Sharon Anthony Co. Springs, Co.
4 Lucky Three Ciji Meredith Hodges Loveland, Co.
5 Dummy Larry Jarrett Franktown, Co.
6 Pepsie Georgia Andrews Northglenn, Co.
M-7 Draft Mules Halter
NO ENTERIES
M-8 Draft Mules Halter
Sponsored by: WATKINS FEED AND SUPPLY, Watkins, Co.
1 Jewel Ray Godfrey Rapid City, SD.
2 Roy Ray Godfrey Rapid City, SD.
3 Merle Half Ass Boat Co. Wallace, KS
4 Maude Vern & Sandy Miller Strasburg, Co.
5 Cocoa Vern & Sandy Miller Strasburg, Co.
NATIONAL WESTERN STOCK SHOW RESULTS CONT’D
M-9 Standard Jack Halter
Sponsored by: HW LEASINGS, HAL WILSTON, Longmont, Co.
1 Blue Zebulon Bitteroot Mule Co. Bennett, Co.
2 Little Jack Horner Meredith Hodges Loveland, Co.
3 Colorado Poncho Co. Poncho Syndicate Bennett, Co.
4 Ed Boykin Larry D. Jackson Commerce City, Co.
M-10 Mammoth Jack Halter
Sponsored by: NORDYKES CIRCLE BAR N MULES, Bennett, Co.
1 Scott’s Gallant Eagle Ann Rankine-Greer Grass Crk. Wy.
2 Beau Bonanza Thomas G. Smidt Montrose, Co.
3 Laramie LeRoy Andrews Northglenn, Co.
CHAMPION MODEL MULE
Sponsored by: BITTEROOT MULE COMPANY, Bennett, Co.
LUCKY THREE MAE BEA C.T. MEREDITH HODGES Loveland, Co.
RESERVE CHAMPION MODEL MULE
CODY Gale W. Fortney Co. Springs, Co.
CHAMPION MODEL JACK
Sponsored by: RMLEA
BLUE ZEBULON BITTEROOT MULE CO. Bennett, Co.
RESERVE CHMAPION MODEL JACK
SCOTT GALLANT EAGLE Ann Rankine-Greer Grass Crk. Wy.
M-20 Youth Pleasure Ridng
Sponsored by: BENNETT FFA, Bennett, Co.
1 Larry Jarrett Jill Franktown, Co.
2 Ann Rankine-Greer Drifter Grass Crk, Wy.
3 JD Diamond Ranch Miriah Bennett, Co.
4 JD Diamond Ranch Black Jack Bennett, Co.
5 Gail Allen Jasper Genoa, Co.
6 Larry Jarrett Rufus Franktown, Co.
M-21 RANCH RIDING
Sponsored by: JACKSON’S JACKASSES, Commerce City, Co.
1 JD Diamond Ranch JD Black Jack Bennett, Co.
2 Zel Brink Sally Ft. Collins, Co.
3 Larry Jarrett Gin Franktown, Co.
4 JD Diamond Ranch JD Miriah Bennett, Co.
5 Lee Schweizer L.J. Larkspur, Co.
6 Larry Jarrett Babe Franktown, Co.
NATIONAL WESTERN STOCK SHOW CONT’D
M-22 SIDE SADDLE
Sponsored by: BITTEROOT MULE CO., Bennett, Co.
1 Zell Brink Sally Ft. Collins, Co.
2 Ann Rankine-Greer Drifter Grass Crk, Wy.
3 JD Diamond Ranch JD Diamond Miriah Bennett, Co.
4 Larry Jarrett Gin Franktown, Co.
5 Larry Jarrett Rufus Franktown, Co.
6 Debbie McLain Cletus Larkspur, Co.
M-23 PLEASURE RIDING
Sponsored by: BENNETT HARDWARE & LUMBER, Bennett, Co.
1 Zell Brink Nifty Ft. Collins, Co.
2 Sharon Anthony Frijoles Dixie Belle Co. Springs, Co.
3 Alan McLean Bucko Golden, Co.
4 Meredith Hodges Lucky 3 Sundowner Loveland, Co.
5 Meredith Hodges Lucky 3 Mae Bea C.T Loveland, Co.
6 Bitteroot Mule Co. Bitteroot Martha Bennett, Co.
M-24 SINGLE HITCH
Sponsored by: THUNDERBOLT JACK STATION, Grass Valley, Wy.
1 Buddy Stockwell Sweet Pea Loveland, Co.
2 Gordon Nordyke Jean Bennett, Co.
3 Garrie Bates Grubstake Evergreen, Co.
M-25 RIDE AND DRIVE
Sponsored by: NORDYKES CIRCLE BAR N MULES, Bennett, Co.
1 Meredith Hodges Lucky 3 Mae Bea C.T Loveland, Co.
2 Georgia Andrews Pepsi Northglenn, Co.
3 Luann Arney Bonnie Sandpoint, ID.
4 Larry Jarrett Jill Franktown, Co.
5 Zell Brink Sally Ft, Collins, Co.
M-26 SINGLE HITCH
Sponsored by: LUCKY THREE RANCH, Loveland, Co.
1 Larry Jarrett Jill Franktown, Co.
2 Meredith Hodges Lucky 3 Mae Bea C.T Loveland, Co.
3 Luann Arney Bonnie Sandpoint, ID.
4 Georgia Andrews Pepsi Northglenn, Co.
5 Berl Vinsonhaler Sparky Littleton, Co
6 Zell Brink Sally FT. Collins, Co.
M-27 COSTUME
Sponsored by: BENNETT VET. CLINIC, Bennett, Co.
1 Garrie Bates Grubstake Evergreen, Co.
2 Larry Jarrett Jill Franktown, Co.
3 Haulin’ Ass Acres Goliath Loveland, Co.
4 Joseph Giesler Rusty Longmont, Co.
5 Haulin’ Ass Acres Buttermilk Loveland, Co.
6 Meredith Hodges Lucky 3 Sundowner Loveland, Co.
NATIONAL WESTERN STOCK SHOW CONT’D
M-28 MULTIPLE HITCH
Sponsored by: VL7 MULE RANCH, Montrose, Co.
1 Vern & Sandy Miller Maude & Cocoa Strasburg, Co.
2 Westernaires Francis & Josle Lakewood, Co.
3 Luann Arney Bonnie & Bess Sandpoint, ID.
4 Ray Godfrey Roy & Jewel Rapid City, SD.
5 Bud Stockwell 6 & 7 Loveland, Co.
6 Shayne Copper Robin & Lou Loveland, Co.
HI POINT DONKEY
Sponsored by: ADOPT A BURRO, Evergreen, Co.
GRUBSTAKE Garrie Bates Evergreen, Co.
HI POINT MULE
Sponsored by: PLUMSILLY STABLES, Commerce City, Co.
JILL Larry Jarrett Franktown, Co.
M-30 LIGHTWEIGHT MULE PULL TEAM
Sponsored by: HAULING ASS RANCH, Loveland, Co.
1 Larry Jackson Maggie & Jiggs Commerce City, Co.
2 Freeman Hollandsworth Jack & Liz Brighton, Co.
3 Shayne Copper Robin & Lou Loveland, Co.
4 Bud Stockwell 6 & 7 Loveland, Co.
5 Rockie Stockwell 8 & 9 Loveland, Co.
6 LeRoy Andrews Socks & Sally Northglenn, Co.
M-31 HEAVEYWEIGHT MULE PULL TEAM
Sponsored by: LUCKY THREE RANCH, Loveland, Co.
1 Curtis Boswell Jerry & Kate Elizabeth, Co.
2 Ray Godfrey Roy & Jewel Rapid City, SD.
3 Joe Freund Bill & Bob Elizabeth, Co.
4 Paul Dickerson Tiny & Red Eagletown, OK.
5 W.M. Heincker Jack & Jill House Spring, Mo.
6 Stockwell Bisquits & Gravy Loveland, Co.
To learn more about Meredith Hodges and her comprehensive all-breed equine training program, visit LuckyThreeRanch.com, MEREDITH HODGES PUBLIC FIGURE Facebook page, or call 1-800-816-7566. Check out her children’s website at JasperTheMule.com. Also, find Meredith on Pinterest, Instagram, MeWe, YouTube and Twitter.
Covered in TRAINING MULES & DONKEY: A LOGICAL APPROACH TO TRAINING, TRAINING WITHOUT RESISTANCE and EQUUS REVISITED at www.luckythreeranchstore.com.
© 1986, 2016, 2024 Lucky Three Ranch, Inc. All Rights Reserved.

 By Meredith Hodges
 Yes, there is no doubt that all this mule stuff can be pretty confusing, but everyone seems to have such fun trying to understand it all! The Lucky Three Ranch of Loveland, Colorado, reaffirmed its reputation for the production of high quality saddle mules by placing in every class they entered, and by winning most of them. Lucky Three Sundowner took first place in Halter for mules 56” & over, three years and older, first in Western Pleasure, first in Reining, and then was named Grand Champion Model Mule of the show! In addition, Lucky Three Ciji won the halter class for mules 48” to 56”, three years and older; Lucky Three Mae Bea C.T. took sixth at halter for mules 56” & over, three years and older, then third in the Single Mule Hitch driving class. Little Jack Horner, Sire-Supreme of the Lucky Three Ranch, completed the picture by taking fourth in the Drive & Ride class against seven mules, first in Halter for Large Standard Jacks and finally named Reserve Champion Jack of the show!
 Grand Champion Jack of the show was Laramie, owned by Bud and Georgia Andrews of Northglenn, Colorado, and shown by Georgia Andrews. He was also shown under saddle in the Mule Western Pleasure class. Reserve Champion Model Mule was awarded to Jewel, owned and shown by Ray Godfrey of Rapid City, South Dakota. Jewel also took first at Halter for Draft Mules, first in the Single Mule Hitch driving class, and first in the Mule Pull with her teammate Roy in the class for mules 2001 lbs. and over. Taking first in the Mule Pull class for 1200 lbs. and under went to Six and Seven, owned and shown by Bud Stockwell of Loveland, Colorado. First in the Mule Pull class for 2101 lbs. to 2000 lbs went to Eenie and Meenie, owned and shown by Jess Johnson of Ft. Collins, Colorado.
 Arthur Silvester for sharing Blue Moon, the mule out of a mule, with this year’s National Western Stock Show. Everyone enjoyed meeting this extra-special celebrity!
 1993 was a good year for
  competition, and the horse establishment—the U
 My
My
 With some reservation
 their established Western, English
 just at home alone.
 had been in D
 The C
The C Now that it’s done, the U
 It is no secret that the popularity of mules in this country is on the rise and their uses are quite varied. Many people believed that mules were used solely for packing and pulling, but modern-day mule lovers have competed successfully with mules in all areas of equine athletics, exhibiting the mules’ true abilities and versatility. Western style riders were the first to catch on to mules, but English riders soon followed suit. Perhaps the most elite form of English riding, Dressage was avoided for many years. There could have been any number of reasons for this, however, an adventurous lady from Montana chose to train her more than 16 hand mule, Baby Huey, for Dressage and competed successfully in many shows. This opened still another door for mules.
 One of the basic differences between training mules and training horses is the essential maintenance of a calm attitude by the trainer. Mules will not respond positively to a bad temper. The calmer and more deliberate the trainer, the more responsive the mule. Training in this manner will reveal the true abilities of the animal. His paces will be free and regular and his movements will be harmonious, light, and easy. Impulsion from the hindquarters is reflected by lightness on the forehand with quiet acceptance of the bridle with no tenseness or resistance. An animal trained in Dressage will appear to be doing of his own accord what is required with an air of confidence and always attentive. The walk is regular and free, and unconstrained. The trot is free, supple, regular, sustained and active. The canter is united, light and cadenced. These all reflect active and animation of the four quarters. He is never sluggish. He will respond to the slightest cue from the rider and thereby, give life and spirit to rest of his body. In all his work, a Dressage animal will be “on the bit” with a light, soft contact and submissiveness throughout. Many good trainers use these basic principles in turning out their best-trained animals. It just doesn’t always get labeled as “Dressage”.
 One need only try to bully a mule once to find out that it simply doesn’t work. The mule, with the strength of the jack, can crook his neck so that no amount of pull can cause him to bend and the wide opening of the mouth leaves you pulling on virtual “rubber!” Consequently, you are left doing primarily what he wants. Slow and methodical training in Dressage can unite a mule and rider in a beautiful, flawless picture. Communication between equine and rider is, after all, what Dressage is all about.
 The mule, as anything but a packing and pulling animal, has not been tried too much in the past. This is why they have not been seen in many places of equine athletics. Mule lovers today are trying mules in all areas of equine sports and are exhibiting that mules can do it all! With the intense training and showing of more mules, more of the uneducated public is able to see that there is far more to mules than was portrayed in the past. Horsemen are continually surprised and amazed… and in some cases, even converted to mules!


 By Meredith Hodges
 owner would have to paint his face orange and blue and ride a mule all the way around the hotel. Well, guess who won and, guess who the mule was?! Yes, it was our own Lucky Three MaeBea C.T.!
 Although they never finished the movie, DIX Country Pictures chose Beaas Wadi’s understudy from hundreds of applicants.
 In 1998, we did a shoot with the Discovery Channel and Bea can be seen as the mule in their production of “The Ultimate Horse.” What a gal!
 Everyone loves a parade and Bea was no exception! She competed in numerous costume classes and parades, but dressing up for the holidays was her favorite. She placed first in many a parade and had no problem with any theme you might want to try.
 Bea may be a perfectionist, but she was certainly not a prude. She was always willing to try anything you might ask. At home, Bea worked hard checking fences, moving cattle and much more.
 shrubs and bushes. We were headed up one hill behind the cattle and the two cowboys when we came upon a three foot diameter tree that had fallen across our path. The cattle dove into the underbrush on either side of the tree, the cowboys slid to an abrupt halt and Bea came right up the middle, jumped the tree and stayed on the heels of those cattle the entire way! No one was more surprised than those two cowboys, except maybe their horses!
 there, she cleared fences without batting an eyelash. She always took the jumps right over the center and never expended any more energy than necessary to clear the fence in beautiful form.
 Her shortened frame allowed her to make sharp turns and still clear the fences in timed classes where she would ordinarily be at a disadvantage against taller mules.
 In 1986, Bea and I began lessons with instructor/trainer Melinda Weatherford in Dressage. The same year, I went to the United States Dressage Federation Convention and introduced them to the idea of allowing mules such as Bea to compete in dressage schooling shows and competitions. There were some discrepancies in the rules, but they finally decided to allow mules in lower levels at schooling shows with the discretion of the individual show committees. This was a major breakthrough for mules in equine society!
 She has shown dressage in all sorts of different disciplines: Dressage Shows, Dressage Schooling Shows, Two-Phase Combined Training Shows, Three-Phase Combined Training Shows and in Two-Phase Combined Driving Shows. Her scores were always high and she was always in the ribbons right from the start. The most remarkable thing about the training in Dressage was how it enhanced her driving skills so drastically that she won the first, second and the only two Two-Phase Driving Shows she had ever entered. People were always skeptical to start, and the first to applaud her performances after they saw her! The most prevalent comment during the ribbons ceremonies was, “My God! It’s a mule!”
 For a decade, Bea was shown in numerous classes by my daughter, Dena Hodges from the age of six to sixteen. They showed together in Western Pleasure, English Pleasure, Driving, Mule Jumping, and Two-Phase Combined Training shows. They were always in the ribbons and most often first or second in their class.
 Driving was always one of Bea’s strengths. I remember when I broke her to drive. I didn’t really know what I was doing. She took to the harness well, ground drove along side of the cart and didn’t seemed to be bothered by any of it, so within three days, I hitched her to the cart and proceeded to lead her out to the pasture where we would have more room. We were going around a 90-degree turn as I was leading her, hitched to the cart, when one of the wheels caught on the fence. She did a quick little scoot for a step or two which only caused the cart to flip over. She wound up with on of the shafts over her head and the other between her front legs. She stopped cold and allowed me to right the cart and get her untangled. Then we went out to the pasture and had our first drive with me in the cart with no further incidents. No big deal!
 Bea was always so steady that she was the perfect Side Saddle mount. She competed in Side Saddle at numerous shows and won many of those classes. She competed in Side Saddle at the National Western Stock Show with several different riders, but always placed in the top three regardless of who was riding her.
 In 1993, I rode her Side Saddle in the Inaugural parade in Washington D.C. It was a grueling 24 hours, standing around waiting to go in very cold weather and in the midst of more “mule eaters” than you could count. Bea seemed to take exception to the 50-foot Elvis Presley float, but otherwise handled the whole situation with her usual grace and dignity. Bea must have caught Clinton’s eye as she strolled elegantly past the viewing area because he turned away from the man he was speaking to and gave her a hearty thumbs up! We responded in kind and in her usual style, Bea smiled broadly!
 when we lightly weighted her front legs to encourage some reach. In nine months, she had increased her length of stride by 18 inches!
 the trail disappeared into a rock slide. She was trapped on the narrowest part of the trail with four horses behind her. She couldn’t turn around and she couldn’t back up. After assessing the situation, I asked her to do a 180-degree turn on the haunches and swing her front legs over the 100-foot ledge to get turned around. She did as I asked and got us through that compromising situation with the finesse of a ballet dancer! The people on the horses were nothing short of amazed! When we went trail riding, or down the road, everyone wanted to ride Bea!
 she did Western exhibitions at various local events and was the subject of many a newspaper or magazine article throughout her career.


 A horse can be dominated by man
 Funny, fuzzy Fara finally fanned her floppy ears for family and friends;
 Little Jack Horner stood in the corner
 By Meredith Hodges
 “It’s got possibilities,” I said enthusiastically. My mother scowled, then grinned and said, “Yeah, it’s got possibilities all right.”
 We built fences and sheds out of discarded lumber and made do as best we could. Each day I set aside one hour to spend with the first mule that was ever totally mine!
 that trailer?” No one can ever say that Ernie Fanning doesn’t know his Longears! We introduced ourselves and sat there along the highway talking mules for about a half an hour. Afterwards, we were again on our way with our trailer full of hopes and dreams.
 Lucky Three Mae Bea C.T., a molly by Colorado Poncho and out of our Appaloosa mare, Sam’s Nickey (bred before Little Jack Horner was old enough to breed), was foaled in 1982 and had over 40 titles to her credit, including National Western Stock Show Drive & Ride Champion in 1986, Single Hitch Champion in 1987 and 1988 and Bishop Mule Days Reserve World Champion Drive & Ride and Single Hitch Mule in 1986 and 1987. Mae Bea C.T. had won numerous titles in Halter, English & Western Pleasure, Trail, Reining, and Dressage in her short career. She is the first mule I ever trained without any interference from anyone. In my opinion, she was the best mule I ever produced of the 30 or better that I had trained before. Still, there were many more Little Jack Horner offspring to come! Bea’s crowing glory was to beat 56 horses in Combined Training in 1993 at the Novice Level. Given the right start in a carefully planned training program, our mules provided us with the additional finances we needed to expand to the breeding and training operation that we had for twenty years, but it is more than just this for which we stand.
 We began as a family of three enthusiastic people, loving and living Longears and that part hasn’t changed. Good hired help is next to impossible to find, so we built up our ranch so that it would be relatively easy to care for it ourselves. In 1984, we added 70 more acres and a hay business to our operation—still managed entirely by our small family and a few friends on occasion. Experience and dedication to Longears caused us to cover a wide spectrum of training with our mules, ranging from Western to English and finally to Dressage and Combined Training. Little Jack Horner became the Sire-Supreme of mules that naturally possessed the athletic ability and conformation to accomplish a wide variety of interests. This further exhibited the true versatility of quality mules. In 1984, we bought a 14.2 HH jennet at the Segelke Dispersal sale in Denver in hopes of developing a Mammoth donkey jack with the refined
  characteristics of the Large Standard and Standard donkeys.
 Society that operated out of our ranch for more than two years. It wasn’t long ago that we were knocking on the doors of horse shows everywhere, begging for acceptance. When we formed the Colorado Donkey and Mule Society, we had horse people knocking on the doors of our learning clinics! At the same time, we had nearly six times the number of Longears shows in Colorado that we had before!
 Acceptance by the United States Dressage Federation in 1986 was the most inspiring influence we encountered in our 15 years with Longears. A tradition in equestrian arts, the United States Dressage Federation literally lives by its motto, “A Circle of Friends.” They aided us in putting our mules to the test and allowed us to test their capabilities at numerous schooling shows. We also discovered that Dressage Training (as tradition already has it) only enhances an animal’s performance. It is for this reason that we always start our young mules this way, though each individual may be suited for something different. It was our U.S.D.F. instructor, Melinda Weatherford, who inspired Gary, Dena, and I to go one step farther into Combined Training. The mule’s natural jumping ability lent itself beautifully to this avenue of training—besides, it’s just a lot of fun for both mules and riders! Our daughter, Dena, worked diligently to try to become a United States Equestrian Team rider. She said if she finally made the Olympic team, she hoped they would allow her to exhibit her three-day event mule, Lucky Three Nuggett at the Olympics. Although they never did have this opportunity, it looks like Longears will continue to prosper through a third generation in this family with my granddaughters as they love Longears, too!
 Our Longears have given us many memorable moments in our lives, most of them pleasurable and it is my desire to share this knowledge with others that keeps me going. Lucky Three Ranch only produced three to four mules per year because that is all we could handle for training. Our mules proved their quality and value many times over in the show ring.


 By Meredith Hodges
 Months of preparation went into the show and like any show there were numerous things to be considered and changes to be made. Every time a change was made, people had to be notified and the mailing list for Longears was more than 400 names. We had hoped to pull in quite a few mules and donkeys, but one major glitch nearly cost us the show. Horse shows, because of their stability and increasing popularity, are able to charge much more for entries, not to mention breed and club fees. When the premium book was released, we found that the mules were charged the same fees as the horses. Two weeks before the show, management conceded to drop a lot of the superfluous fees, however by that time, it was too late to repair the damage. It is my contention that we might have had a lot more animals show up had the fees been initially reasonable, but this too, is speculation.
 We are experiencing an economic slump in this country, and people just don’t have the extra money to spend on other than their own basic needs. Still, I would like to say that this show did not bomb out. Nineteen people and 23 mules put on a show that was well received by our American Show Horse co-exhibitors and spectators. We are also especially proud to say that every mule in the show, and donkey too, was well-conditioned, well-groomed and well-trained, making for one extraordinarily impressive show. Twenty-three mules and donkeys filled22 classes, once again reaffirming the true versatility of these incredible animals! Champion Model Donkey went to Blue Zebulon, shown by Fran Howe of the Bitterroot Mule Company in Bennett, Colorado, with Lucky Three’s Little Jack Horner taking Reserve Champion. Champion Model Mule was Lucky Three Nuggett, a two-year-old molly mule shown by the Lucky Three Ranch in Loveland, Colorado. Reserve Champion went to Mountain Shadow Mules’ Rambling Rose, shown by Diane Walston of Longmont, Colorado. Detailed results can be obtained through the Lucky Three Ranch.
 CDMS members and their friends are to be congratulated for all the hard work and dedication it took to make this show as impressive as it was. It was obvious that the several months of preparation were worthwhile. The monthly clinics sponsored by C.D.M.S. and attended with enthusiasm had indeed paid off in the show ring. It had made much better riders of us all and quiet, obedient companions of our mounts. We can be especially proud of our youth for their outstanding performances throughout the show. They have probably progressed faster than the adults! Their classes reflected an aura of concentration and determination. These “kids” are serious riders with a serious case of Mule Fever, and dreams of a bright future for Longears. They will carry mules and donkeys into new challenges and greater recognition. Keep up the good work: Justin GrandPre, Amy Wilfong, Leslie Busque, and Kim Nordyke (Youth Showmanship & Pleasure 14-17); Dena Hodges, Donnie Jo Neal, Cindy Brink, and Crystal Nordyke (Youth Showmanship & Pleasure 13 and under). A special congratulations to Leslie Busque for her first place win in the adult English Pleasure class, and to Kim Nordyke for her beautiful ride to second place in the Ladies Sidesaddle. We are very proud of all of you!
 By Meredith Hodges
 Americans, by nature, love a challenge with a good cause. They love to explore new frontiers and mules have given them every opportunity to do just that. Over the past 40 years, mules have been used in both English and Western activities, as well as in harness. In 1986, they were again challenged as an acceptable sport animal and their owners have met this challenge with much enthusiasm. In November of 1986, the United States Dressage Federation recognized mules as a viable competitor in the world of Dressage. Since then, many mule owners have elected to pursue this challenge. One must appreciate the determination of such people. Although the U.S.D.F. was quite receptive, the American Horse Show Association was not. So, we were faced with the task of gaining yet more approval from the governing branches of the horse industry if we were to realize our full potential in Dressage and Combined Training. Actually, since A.H.S.A. does sponsor all major horse shows, their sanction of mules was all-encompassing and all-important. There may have been a time when mule people were “those who couldn’t make the grade on a horse,” but this is quite to the contrary these days.
 Being the intelligent animal that they are, they pose very different and very difficult training problems compared to horses. It takes a person with “a very special something” to help a mule realize his potential. The mule not only needs to learn the “moves,” but the discipline of performance as well. Being the personable character that he is, the mule sometimes forgets how important a show may be to his rider. Only through consistent and patient discipline can a mule be expected to perform in a consistent and quality way. This is also true with horses, but after training both, I am convinced that the mule can meet you with much more resistance than can a horse and must be dealt with very carefully. Consequently, the end result in a mule has demanded a lot more work on the part of the trainer, or rider, than it would in the case of a horse. The successful mule trainer has justly earned a pat on the back and the opportunity to exhibit his talents.
 Mules have, in 40 years, proven to be quite competent equines and have been bred to possess a similar beauty to horses. Not only that, scientifically they have been successfully utilizing molly mules (females) as embryo transplant recipients. It has been theorized that they make the best recipients since they are virtually “untouched.” With these kinds of contributions to the equine industry, how can anyone with a conscience ban them from the major challenges of the industry?
 Even if all I was going to do was rescue equines, I knew I would have to have at least some experience in equine management and training, so I read numerous training books and attended many clinics and seminars. The more I learned, the more overwhelmed I became. There were so many vastly different ideas about how to do things with equines. Different authors wrote about different stages of training and they all had a different approach. There was no one author who produced anything with continuity from foal all the way to advanced levels of training. To make matters worse, in the early 1970s when I got involved with Longears, I found that there was virtually nothing available about training them for recreational purposes. That is when I decided to begin documenting everything I learned that worked well (and forgot about what didn’t).
 Like most people, I started off thinking that leaving equines to just be equines without human interference was the ideal. Oh, how they would just love to exist in a large plot of pasture to live out their days in leisure! I soon found out how deadly that could be to an equine. Equines in the wild will travel for miles, exercising and grazing sporadically, balancing their diet and exercising themselves. Since the majority of the world’s equines are not wild and can no longer run free (no more wide-open spaces available), leaving them alone in a pasture to eat freely only results in obesity and all the ailments that go with it. In reality, allowing this “free grazing” is a passive form of neglect, and is usually the result of just plain human laziness. Equine owners may often feel like they “do not have the time” to do everything correctly, when, in actuality, it takes less time (and is less costly) to correctly feed, manage and train equines. That is how I can successfully be the sole trainer of 30 equines at this late date in my life.
 Trainers in general advise owners to set things up so it is hard for the equine to do the wrong thing. Why not just concentrate on setting him up to be able to easily do the right thing? Wouldn’t you get a better reaction from your equine if he received rewards for a job well done rather than focusing on the punishments and intimidation if he didn’t comply?
 Restraints should only be used to suggest compliance to the equine and not for complete control over any resistance. Patience, calmness and purposeful action during the use of restraints are all paramount in teaching the equine how to cope with things that are difficult for him. In the use of restraints, one runs the risk of being more severe than intended, which will have a negative impact on the equine’s response to the restraint used. I have discovered some very simple restraints that work well.
 By Meredith Hodges
 All of this opened our shows to the political arena, devaluing quality training and hard work, while emphasizing gimmicks and popularity of individuals for the sake of monetary gain. The original intent of promoting the breed began to take a backseat to economics and personal gain. The result of this was a decrease in the number of people willing to compete in the shows, a lot of artificially trained animals produced and a decreased number of spectators attending the shows. Seeing the same individuals win over and over again, from one show to another, deserving or not, became boring and uninteresting to the general public. Thus, a lot of spectator support and amateur competitors were lost.
 To continue to grow and prosper, our industry must keep several things in mind. We need to appreciate what our shows can do for Longears, as well as what they cannot. Large shows do bring in a lot of spectators, but those who attend shows usually already have a certain interest in equines. They will spread the word throughout the equine set in our society, but if we wish to promote new interest, we need to be more creative in our promotional thinking and target those who are unfamiliar with equines.
 specialties. This absence of judges allows the spectator to observe and be the judge himself, allowing him to become an active part of our industry, giving him not only entertainment, but involvement, increasing his personal feeling of commitment to the industry. As we investigate this avenue of promotion, we find many more new and interesting ways of promoting our equines. In Kansas City, riders have been asked to join the symphony orchestra in an evening of classical entertainment with a fantasy of visual equine aids. This surely targets people who would otherwise, not necessarily see equines perform and may gain future support from their interest.
 In the early sixties, mules were among those animals quickly becoming extinct in this country. Thanks to the formation of clubs such as The American Donkey and Mule Society, founded in 1967, and the British Donkey Breed Society, founded in 1966, the trend was reversed and the animals began to get the recognition they justly deserved.
 For those of you who are unfamiliar with the breeding of a mule, he is the cross between a male donkey, called a jack, and a female horse, a mare. The reverse of that–a cross between a male horse, a stallion, and a female donkey, a jenny on jennet–is called a hinny, although many still refer to them as mules. Years ago people used low quality mares to breed to jacks to obtain mules, but today we are improving the breed by crossing better quality animals to obtain better and stronger mules.
 Many have asked about the training of mules. Training mules is much like training horses, but sophisticated trainers would probably agree that they are more like teaching young children. A mule is more likely to perform to the best of his ability if he is allowed to build trust in his trainer. This is where mules and horses differ. Horses have a forgiving nature and are able to forget a loss of temper by the trainer; mules do not forget. When a mule is nervous about a trainer, his ability to perform for the trainer is impaired. Pat Parelli, a California mule trainer, put it quite nicely: “Mules separate crude trainers from artistic trainers.” The mule handled by a crude trainer will generally epitomize the traditional belief that mules are stubborn and ornery. The mule handled by an artistic trainer will not. A technique widely used among mule trainers with great success is the psychological science of Behavior Modification, whereby the animal’s natural behaviors are modified to achieve the desired response through the use of positive reinforcement. Negative reinforcement is also used sparingly. When using negative reinforcement, one must remain calm, patient, and just to ensure the success of the temporary discipline. One must remember that negative reinforcement does not build desirable behavior. It is only used to stop a bad behavior long enough to substitute a desirable behavior. A mule trained in this manner will become a more trustworthy, willing, and predictable friend and companion. Let’s dispel the old saying that mules are “stubborn” and “ornery” and say that there are really no bad mules, only bad trainers.
 The Mule Days celebration in Bishop, California is the largest mule show in the world. Mule lovers, their friends and family enjoy four days of mule-related fun and entertainment. At this particular show there is a little something for everyone: Western cuisine, games, dancing, and conversation in addition to the mule show itself. In 1984, there were over 70 different classes and events for the competitors such as Pleasure classes, Reining classes, Trail, Musical Tires, Barrel Racing and Pole Bending. Also Jumping, Cattle Penning, Steer Stopping, Team Roping, and a Balloon Bust. For the packers: Pack Train classes, Packing contests, Box Hitch and Diamond Hitch packing contests (pro and non-pro), Team Packing and the Team Packing Scramble which you have to see to believe! There are Halter classes, Pulling, Driving classes, and for you race fans: Chariot races, Flat Track races, and yes, even a Backwards race! To highlight the events, there are featured performances by special people and mules. Almost every year, the 20-mule team makes an appearance and in 1981 Slim Pickens, Grand Marshall of the Mule Days Parade, drove his team to victory in a chariot race! In 1984, Colorado’s own Al Kaly Shrine Temple Mule Train World Champion Drill Team out of Colorado Springs gave a memorable performance on their beautifully matched, black army mules. This mule show brings together so many people with different backgrounds and interests for a perfectly glorious weekend. Each year leaves you looking forward to the next.
 By Meredith Hodges
 In 1979, I witnessed my first Bishop Mule Days Sierra Nevada packer’s rendezvous. That was where my career in training mules and donkeys in every recreational equine event began. I was “ass-tonished” at the impeccable way these knowledgeable men and women handled their mules, wagons, packs and equipment with such grace and dignity…and not without a proper measure of good humor! I caught a very bad case of “Mule Fever” and began my own pursuit with Longears in ALL forms of equine athletics. Bishop Mule Days grew from the weekend packer’s rendezvous into the weeklong show over Memorial Day weekend that it is today and they continue to add new classes each year to accommodate the accomplishments of a lot of Longears-lovers like myself along the way. Little did I know, the friendships I started then were to last a lifetime!
 In 1980, I founded the Lucky Three Ranch in Loveland, Colorado and embarked on a breeding and training program of my own with Lucky Three Sundowner, the last mule and Little Jack Horner, the last donkey jack born at Windy Valley Ranch in 1980. Sundowner was shipped to the ranch right away, but Little Jack Horner had to wait and be picked up a year later. Just outside of Sparks, Nevada in 1981, we were hailed to pull over by a jolly and quite charming man, Ernie Fanning who ran up to my truck and blurted through the driver’s side window, “I just KNOW you have a Windy Valley jack in the back of that trailer!” To this day, I don’t know how he could tell it was a Windy Valley jack only by the head and ears that showed above the stock trailer back door. All I can say is that man certainly knew his mules and donkeys, and I made yet another friend for life that day!
 Years passed, Bishop Mule Days grew as did my love for Longears and the people that came with them. I bred and showed Longears for many years, then judged and began a promotional career in support of Longears everywhere. Bishop Mule Days was where I met Bonnie Shields, the leading half-ass Tennessee Mule Artist and illustrator for my children’s series of books and DVDs, Jasper the Mule. Even though I no longer showed, I was still a welcome part of the Bishop Mule Days rendezvous family year after year as a respected dignitary and sponsor. One of our greatest thrills was when Bonnie, Jasper and I were invited by Bobby Tanner to ride in the old Borax Wagons pulled by the 20-Mule Team in the Bishop Mule Days parade three years in a row (2012-2014). What an incredible honor that was!
 On January 1, 2017, the new Borax Wagons and the 20-Mule Team made their debut in the Tournament of Roses parade in Pasadena, California. They held a practice in the desert near Bishop before they left for the parade and the mules all did great! On the parade route, they would be asked to make a tight turn onto Colorado Avenue in the midst of a lively crowd and would be asked to “jump the chain” to make that turn. What a spectacular feat to behold and they did it beautifully on parade day.
 Welcome to Mule Xing; this is a column designed to take care of some of those unanswered questions about mules. Mules have made contributions to the building of this country since its beginning: they brought the pioneers across rough and rugged country to their new homes in the West, carried arms and equipment for the army, and worked long days in the fields. With industrialization came a gross decline in the mule population; there no longer seemed to be any use for the mule.
 animal capable of performing well in all forms of equine athletics. He can do cow work, work and pleasure driving, packing, jumping and is better suited for long trails, yet he still possesses all the traits that have made mules popular throughout the centuries: a willingness to work, an easy keeper, more resistance to parasites and disease, extremely surefooted and his indubitable intelligence that is often confused with stubbornness.
 What of the person who is curious about mules, but shies away because of the stigma attached to them? I can only say that there was a time when people would laugh, but in this new age a new breed of mule is causing mockers to choke on their laughter. He is better bred than his ancestors and his ability turns laughter to awe. The modern contemporary saddle mule has been banned from competing with horses in such events as Cutting and Jumping because he has proven to be consistently and considerably better than the horses in those events. In keeping with the evolution of the mule, more and more all-mule shows are springing up all over the country sponsored by concerned mule enthusiasts. The shows cover a wide spectrum of mule activities, from judged events to just plain fun and games. The growth of such shows has more than tripled since the late 1970s and is ever growing. The modern contemporary mule is now taking the credit he so richly deserves; he sees what the horse can do and thinks, “Anything he can do, I can do better!”
 By Meredith Hodges
 walking in sync with first his front legs and then with the back legs to teach your own body to follow his rhythm and cadence, prepping your body for his motion when you finally mount and ride him. Your equine must now become accustomed to direction coming from his bac (over his head), but first he must learn to adjust his balance to your additional weight.
 yourself aboard, dragging your right leg against his body gently, but firmly, up his hip, over his rump, and down the other side to the stirrup on the off side. If this does not disturb your equine, while verbally reassuring him, rock your weight from side to side and let him feel how the saddle over his back. Touch him gently and reassuringly all over the parts of his body that you can reach easily from your position. The more movement that he can tolerate while standing still, the better he will do later. Do only as much of this in any one lesson that he is able to calmly tolerate. Always try to end your lessons on a positive note! Do not get in too much of a hurry…that’s when the trouble starts!
 The first time or two ask only for the walk and back it up with soothing verbal commands to “Walk on.” When he is calm and quiet during the walk, you can then give him the command to “Trot” and gently squeeze/release with your legs to send him forward. You should always have a gentle, but firm, contact with his barrel so your leg cues to not “come out of nowhere” and startle him. Be sure to work evenly in both directions. Keep your assistant on hand throughout this stage of training until your equine works reliably at walk, trot, canter and back with no resistance or bolting. He WILL need to go faster at those gaits until he builds up his strength enough to support your additional weight, so don’t get too excited about…just ride it! he will slow down as he gains strength and confidence. If you begin to fight with him through the reins, he will only become more excited and anxious and resist. We want to set things up so he can SUCCEED in his tasks! This will prevent you both from becoming unnecessarily hurt, or seriously injured.