CHASITY’S CHALLENGES: The Hourglass Pattern for Good Posture: 4-14-20

2

4-14-20

The “Hourglass Pattern” is an amazing therapeutic approach to conditioning that I have used with all of my equines of varying ages, sizes and breeds. It builds a foundation of symmetrical strengthening at the core involving the ligaments, tendons muscles and soft tissue that support the skeletal frame and promotes even wear of the cartilage between bones in the joints. It can prevent arthritis as the animals age. This is vital to your equine athlete’s health. Chasity and I open the gate to her rebalancing and rehabilitation exercises in the “Hourglass Pattern.”

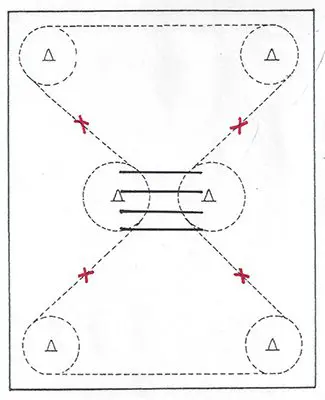
The red “X’s” in the pattern represent the points where you are to halt, square up, reward and wait. This process becomes helpful as your equine learns to navigate gates properly and learns to wait patiently through repetition and consistency in your behavior. Always go through gates exactly the same way so your equine knows what to expect. Abrupt actions lead to chaos.

We want to promote self-carriage, so we do not hold the lead rope in the right hand when leading from the left side where it can subtlety cause movement in the head and neck from side to side, adversely affecting their balance. Rather, we hold the lead rope in the left hand when leading from the left side and in the right hand when leading from the right side. We lead from the inside of the arcs in direction through the pattern. Always, say the animal’s name, give the command to “Walk On,” look where you are going, point in the direction of travel with your other hand and walk in sync with the equine’s front legs. This facilitates good posture for both of you!

When negotiating the “Hourglass Pattern,” there is an internal pendulum that swings back and forth and comes to center each time the animal halts and is squared up. If you were to work only along straight lines there is an optical illusion that takes place along the perimeter and makes the animal’s body lean to the inside of the track, and when halted, they cannot find the center of balance. Every time you halt, square up your equine and reward with the crimped oats that you keep in your fanny pack around your waist (other “treats” will not work the same way!). Then wait until they finish chewing so they can settle into their perfect balance unobstructed.

As they progess, they learn to bend to the arc of the turns through their rib cage, carry their body erect in good posture supported by stronger ab muscles that round the back upward as they learn to give to the “Elbow Pull” such that it remains loose. When it is tight, they are simply having difficulty holding their good posture and lean on the “Elbow Pull” much like a beginning ballet dancer must use the bar on the wall. Many people think that you do your equine a favor by not putting a bit in their mouth, but you cannot affect their posture without one. The animals that are not bitted and schooled in good posture can have all kinds of postural issues as they age. Chasity is falling in and out of good posture because she is only in Week Three of her training. As she improves, she will be able to keep the “Elbow Pull” loose for longer periods of time until it is always loose.

As this way of moving and standing becomes more habitual, so does their comfort in these positions. When they rest, they will stand 4-square instead of with splayed legs, or a hip dropped and a foot cocked. They are happy and deliberate in their movements and good posture continues to improve until this become their new habitual way of moving and resting. You will see marked changes in their play and rest patterns while in turnout.

Adding rails to the center of the pattern keeps them attentive, alert and teaches exact hoof placement (hoof-eye coordination). As their movement becomes more deliberate and balanced, their confidence is increased as is their trust in you for making them feel so comfortable in their own skin. They learn to wait for your command  before moving. They look forward to their time with you and will gladly leave the herd to be with you! No more herdbound behaviors!

We build this foundation through the “Hourglass Pattern” first during leading training,  then after obstacles and lunging training during Ground Driving, and finally Under Saddle. Each stage produces new challenges to the equine’s body and mind that add to their overall development in a logical, sequential and healthy way. Because of all these small steps, with gradual difficulty, it is easy and fun for both you and your equine to do. You are never over-faced with difficulty and you learn to appreciate the little victories along the way! Chasity was somewhat of a pushy, bully to start with, but she now waits patiently when I ask and navigates movement in much better posture, even after only three short weeks! More dramatic changes to Chasity’s body and mind are still to come! It’s not just about the end result. It’s all about the journey!


  1. Julie Dabritz04-23-2022

    Thank you for sharing your program and teaching explainations. It is so generous and kind to offer such valuable information. May I ask how do you measure of fit the elbow pull? How do you check it after its on, that it is effective? How do you thread the rope thru the bit ?
    So it slides and doesn’t pinch lip corners?

    • Meredith04-29-2022

      The Elbow Pull – A Self-Correcting Device for Equines
      Invented by Meredith Hodges (First Published in Training Without Resistance 2003)

      If you have our video tapes series, in DVD #2, in the Training Without Resistance manual (2003) and in the Equus Revisited DVD (2009), we talk about using a restraint called the “Elbow Pull.” In the Equus Revisited DVD, we teach you how to measure it for your individual equine and how to make it. This device puts your animal in the correct posture to be able to balance and adjust the body position and to encourage the hindquarters to come underneath the body when the animal is driven forward. After doing this in the round pen for several months, the animal should begin to travel this way automatically. Then, when you begin riding, you should use the “Elbow Pull” while you are riding the hour glass pattern under saddle for the next year or two to help your equine to keep his balance and good posture while he balances your weight on his back.

      The “Elbow Pull” puts your animal in the correct posture to be able to balance and adjust the body position and encourage the hindquarters to come underneath the body when the animal is driven forward. After doing this in the round pen for several months, the animal should begin to travel this way automatically. Then, when you begin riding, you should use the “Elbow Pull” while you are riding the hour glass pattern under saddle. If rehabilitating an older animal that has not had the benefit of strength in good equine posture training, you can also use the “Elbow Pull” during the leading lessons both on the flat ground and over obstacles.

      The “Elbow Pull” is a 3/8″ twisted nylon rope that has small snaps (so they can fit through the saddle D-rings) on both ends. The length of the rope will be determined by the size of your equine. Just measure a length of rope in the “Elbow Pull” position and add 4″ to double over and braid in the snaps. When it’s adjusted correctly and the equine is in good posture, it will not put any pressure on the animal at all. When he is out of good posture, it puts pressure on the poll, the bit rings, behind the forearms and over the back.

      Place it over the poll, through the snaffle bit rings, between the animal’s front legs and over the back and then snap the two ends to a surcingle D-ring or D-rings on the saddle you are using. If using the “Elbow Pull” on a horse, do not hard tie to the saddle or surcingle. Rather, just loop the two ends over each other twice like you are tying a knot, but don’t tie it off and snap the ends to the d-rings so they are loose, but don’t move. If the horse raises his head against it and pulls, it should slide loose and then you will need to stop him and re-adjust the tension each time he does it. When he finally learns to submit to the pressure of the “Elbow Pull” (and not offer to go over backwards), you will then be able to hard-tie it. It should be adjusted so he can only raise his head 3-4 inches above the level of the withers (just before he hollows his neck and back). When he tries to go out of frame, the “Elbow Pull” will put pressure on any of the four and often multiple pressure points it touches. The “Elbow Pull” needs to be adjusted loosely enough so that he can relieve the pressure at the poll, bit rings, elbows and back without having to drop his head below the withers. Usually when lunging, if the “Elbow Pull” is correctly adjusted and he still wants to carry his nose to the ground, encouraging him with the whip to speed him up a bit will cause him to engage his hindquarters and raise his head into the correct position. The only way he can really go forward with his nose to the ground is if he is not engaged in the hindquarters. As soon as the hindquarters are engaged, he will have to raise his head to the correct position to maintain his balance.

      When being lead in the “Elbow Pull,” lowering the head is not a problem because you will have control of the lead rope attached a ring underneath his noseband (not attached to the bit!).

      In the round pen, the “Elbow Pull” helps the animal learn to travel in good equine posture without the added weight of a rider first and in doing so, increases his strength to carry a more balanced posture of his own volition. The added weight of the rider under saddle will challenge the animal again to maintain this good posture with the rider. This will take further strengthening of the muscles. The “Elbow Pull” will keep the animal in the correct posture while carrying the rider, so he doesn’t ever build muscle out of balance and out of good equine posture. When you do this, you are changing old habitual movement into good equine posture and a balanced way of moving. This eventually (after two years) will become his habitual way of moving and playing, even during turnout.

      Your equine should stay in the “Elbow Pull” when working for two years (3-6 mos leading on flat ground, 3-6 mos. leading over obstacles, 3-6 mos. lunging & 3-6 mos. ground Driving) to make sure that the muscles are indeed conditioned around correct equine posture. This means that when your year of lunging and ground driving is over and he begins to work with a rider or while being driven, you would still use the “Elbow Pull” to help him to stay in good posture for another year with the added weight of the rider on his back. If driving your equine, you should also use it during the first two years in your driving arena to promote good equine driving posture and engagement of the hind quarters while pulling. This assures that the muscles are being built correctly and symmetrically over a balanced and physically aligned frame.

      Making the Elbow Pull

      Although the “Elbow Pull” is a very simple and straight forward device to help keep you equine in good posture, it is also a device that needs to be custom made to fit each individual equine. Equines that are approximately the same size in the front quarters will probably be able to use the same one. First, you need to obtain a package of 3/8″ X 50′ nylon and polyester twisted rope. This is the way it is sold. Do not substitute any other kind of rope or leather reins, etc. as this will have a different weight and slippage around the bridle and will not have the same effect.

      You will also need two snaps that are narrow, yet fairly strong that can fit easily through the rings on your surcingle, or Western saddle. English saddle D-rings are generally too small and in this situation, we do not attach to them, but rather attach the “Elbow Pull” to itself over the top of the saddle. If the rope tends to twist and the snaps slide off to one side, you can often just snap one snap to the d-ring and the other snap snapped to the first snap. Or if the elbow pull is a bit shorter and the right length, you can just snap it to the small D-ring on each side. The reason for small snaps and twisted rope is so you can actually go through the larger D-rings and snap it into the twisted rope itself for a more exact setting. You would just untwist the rope at the setting point and snap into the middle of the rope so it won’t slide. With horses, you would just twist the rope over the back as shown in the photo so the snaps are snapped loosely to the saddle or surcingle until the horse learns to be submissive to the “Elbow Pull” and can then be hard tied.

      Have the equine standing at the hitch rail with the snaffle bridle on. To get a measurement for how long a piece of rope you will need for his elbow pull, take a length of rope from the coil. Feed the end of the rope from the inside to the outside of the snaffle bit ring, drape it over the poll of your equine and feed it from the outside of the snaffle bit ring to the inside on the opposite side of your equine. Then pull enough slack to go down through the front legs, behind the forearm, up and over the back such that it hangs one foot, or more (but not less) on the other side of the spine. Then, go back to the side on which you started and do the same on that side with the remainder of the 50″ foot length of rope and cut the rope at the 1 foot mark on the other side of the spine.

      Once you have the proper length of rope for your equine, you will need to unravel 3″- 4″ of one end of the rope and loop it through the ring on your first snap. Then you will braid the rope back into itself. First, pick the loose strand that is on top as you lay the rope across your hand, bend it around the end of the snap and feed it under a twist of the rope such that it creates a loop around the end of you snap and pull it snug. Then take the next loose strand (which would be the middle of the three strands) and feed it under the next twist down from the one you just did. Then do the same with the third loose strand under the third twist in the rope. Take all three strands in your hand, hold the rope so it doesn’t twist and pull all three strands snug. They should all line up.

      Next, turn the rope over so you can see where the angled lines of the twisted rope begins again and feed the first strand under the first twist, the second under the second twist and the third under the third twist. Pull all three strands snug at the same time, turn the rope over, locate the first twist in the line and repeat until you have all 3″-4″ braided back into the twisted rope. You will have some loose ends sticking out and nylon rope can slip, so you now need to trim the ends, then take a lighter and burn all the ends until they are melted together and will not slip. Be sure that you burn them so they are smooth and without bumps or it will be difficult to feed the ends through the D-rings. Do the same thing with your second snap on the other end of the rope. Now you have your own custom made “Elbow Pull!”

Leave a Reply