
Featured This Month
MULE CROSSING: Surge of Mule Shows
All Articles
MULE CROSSING: Understanding the Use of Cruppers and Breeching
By Meredith Hodges
- The purpose of tack and equipment has always been to give man comfort and leverage against the equine’s resistance during training, but I believe that the equine is “talking” with his resistance, and this is a cue to find another alternative to achieve harmony when something isn’t working.
- Trail Riding and Jumping are two activities where it is positively essential to do core postural training with your equine to solidify his symmetrical balance when in motion, or even standing still.
- The animal with deliberate foot placement and a solid balance is a much safer smoother riding animal.
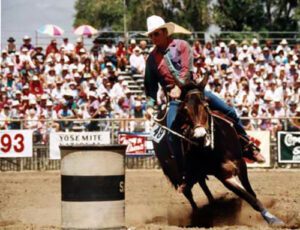
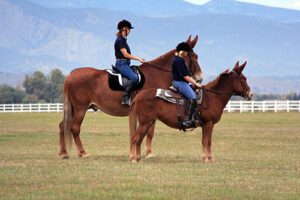
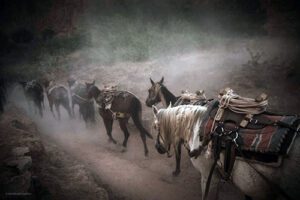
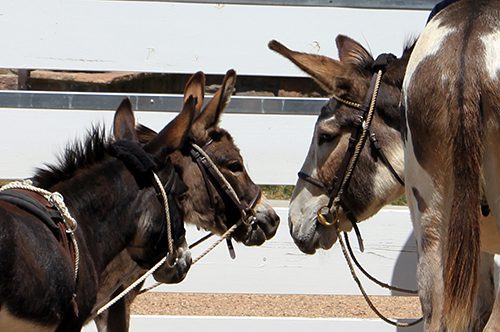
- There is an ongoing discussion about the use of cruppers and breeching when riding mules and donkeys, and even some horses. The purpose of both is to keep the saddle from sliding forward when the equine is in motion, whether he is tracking on flat ground or going up and down hills. Inappropriate use of both devices could give the equine problems.
- Whether or not to use a crupper or breeching is not an either/or decision. My equines taught me that in order to make an educated decision about which to use, one needs to take into account the anatomy of the equine and the effect of a lot of moving parts have on his body in motion during different activities.
 Good conformation is important in allowing the equine to perform to the best of his ability, but so is developing core strength elements such that the skeleton is ideally being supported symmetrically so the equine’s body can move properly and in good equine posture.
- FEEDING: When developing the equine’s body, it is important to know what feeds are the healthiest for him. There are lots of different ways to feed your equines today, but I have found a regimen that works best. I did this through constant and continual research using a field study for more than 50 years with 32 equines of varying breeds, types and sizes.
- Most feeds are tested in laboratories.
- Dehydrated feeds take fluids from the digestive tract and can cause choking (researched with my vet). You cannot add enough water to replace the fluids that are naturally in the digestive tract.
- The oats, Sho Glo, Mazola corn oil and grass hay produce ideal body shape and conditioning, even with minimal exercise.
- Sho Glo gives the body the nutrients it needs for daily maintenance.
- Supplements should not be fed without first getting a base line of what the animal is lacking.
- Salt and other minerals should be free fed in a trace mineral salt block. White salt alone, or minerals measured and put in the feed, can often be the wrong amounts.
- The equine will use the trace mineral salt block when and how often they need to. It is their “Natural instinct.”
- Mazola corn oil (no other) keeps the hair coat healthy, the feet ideally lubricated and hard, and maintains the ideal conditioning of the digestive tract regularity.
- We feed a Brome/Orchard Grass mix that we harvest ourselves. We feed the hay three times a day and the oats mix once a day in the evenings. Never feed broad leaf hay like Alfalfa, or Fescue Grass Hay.
- Fescue Grass Hay has been proven to cause spontaneous abortions. Since it has this toxic effect, it would probably not be good for any equine, pregnant or not.
- Our equines are kept in dry lots, or stalls and runs. We limit their turnout to five hours a day to prevent obesity and other problems like allergies, prolonged exposure to flies and other insects that live in the grassy pastures.
- Use no types of rewards or “treats” besides crimped oats (or any other kind that is broken open). They cannot digest whole oats, and other “treats” can cause gas or other irregularities in the digestive tract that can lead to colic, twists, founder and even allergies.
- Our equines are wormed with Ivermectin every other month with the cycle broken in November with Strongid. This regimen prevents the cycle of worms (No fecal tests are needed because the larvae never have a chance to mature and show up in the manure).
- This regular and frequent use of Ivermectin helps to repel flies along with a weekly spray of Farnam Tri-Tech 14 (sometimes twice a week if the flies are inordinately thick). Ivermectin is a totally safe drug and their bodies do not build up a resistance to it.
- Most equines on other kinds of feeding programs develop bodies with a protruding spine and a “hay belly” hanging from it. The shape is quite different from a balanced body with core strength. They have an indentation along both sides of the spine instead of having a spine that “melds” into the torso with uniform conformity. My feeding program produces an ideal body shape with ALL my equines with minimal exercise. The SHAPE of the animal’s body is important for the correct fit of the tack and equipment.
- Energy and blood circulation find open tracks throughout the body and when unobstructed, will run freely from the core of the body to the extremities in a healthy equine. Core and bulk muscles that are developed symmetrically will support the skeletal frame, the cartilage and ligaments that surround the joints, and the tendons and soft tissues that tie the skeletal frame together.
- All these things work together to support the proper internal organ functions. When the equine is in good posture with symmetrical core strength and balance, the vital organs are unobstructed and function as they should.
 Good conformation is important in allowing the equine to perform to the best of his ability, but so is developing core strength elements such that the skeleton is ideally being supported symmetrically so the equine’s body can move properly and in good equine posture.
TACK & EQUIPMENT should fit you and your equine like a glove. Good postural movement coupled with close fitting and properly adjusted tack and equipment create harmonious movement with minimal resistance and chafing.
- The tack and equipment we use has an effect on the equine’s movement in spite of his shape. In order to obtain freedom of movement, the elements of the equine’s anatomy must be allowed to move freely through every joint of his body.
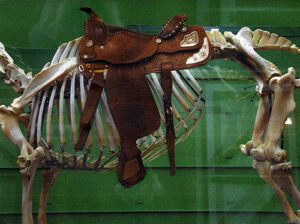
- The saddle should be placed over the center of gravity, which is in the center of the torso, equidistant from the stirrup to the front legs and from the back legs. When correctly placed, the front girth will hang four inches behind the elbow (forearm) where the body begins to swell and the skin is thicker than the sensitive skin right behind the forearm (where equines most often get chafed). Then it will definitely clear the point of the shoulder (where they also get chafed and develop white hair).
- I like to use string girths in front because they will stretch slightly, allow air flow and breathe. I like leather girths for the back girth.
- The front girth should be snug, but not too tight. The back girth should be snug, but not as tight as the front girth.
- The back girth should be perpendicular to the ground as they were developed only to hold down the back of the saddle (invented by ropers to balance the saddle when the steer is stopped).
- Using the back girth to hold the saddle back might seem like a good idea, but it puts the pressure on the fragile undercarriage rib bones that can break easily. The rib bones underneath a properly placed back girth are thicker and less likely to break with abrupt pressure.
- Any strap or girth that is too tight will irritate the equine and cause bad behaviors, chafing as well as, saddle shifting. Any strap or girth that is too loose, will not do its job and will cause chafing.
- Mule Bars are not necessary if you have a well-made saddle and have a professional saddle maker shave the saddle tree flat at the withers. My 1972 Circle Y Stock, Equitation and Longhorn saddles have worked on all my mules for more than fifty years with that minor adjustment.
- Most saddles appear to be too high in the gullet and with insufficient body conditioning it puts pressure on both sides of the animal…localized pressure, instead of spreading the pressure points over a wider area underneath the saddle. This is particularly true with sawbuck pack saddles. That is why you see so many pack mules with white spots at the withers…unbalanced loads that will shift.
- When the horn sits lower and the saddle is spread across the back, the pressure points are wider spread and more comfortable for the animal.
- People talk about allowing air to keep the spine depressurized and cool underneath the saddle. They use thicker therapeutic pads, or pads that are pre-shaped, stiff and sit stiffly on the equine’s back.
- I prefer to use Navajo blankets and with older animals, or animals with more withers, I will add a fleece pad underneath it. This allows for more flexibility, compression and molding of the saddle and blankets across the animal’s back…like a glove.
- To allow for more airflow, you just stick your arm under the blanket and across the spine before you tighten the girth. The blankets will move upward into the gullet and provide protection of the spine from any undue pressure. The saddle is not PERCHED on top, and when you get on, you can find a place for yourself over the center of gravity.
- If the animal is in good equine posture with core strength in a solid balance, the saddle and equine will move as one with minimal abrasive movement.
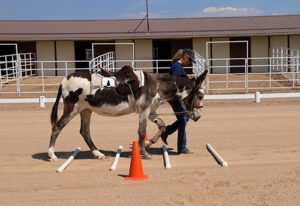
- Beginning with the Leading Training, tacked up in an English, Eggbutt snaffle bridle (sometimes a flash nose band is needed to keep them from flipping the tongue over the bit!) and my “Elbow Pull” postural aid, you can begin to develop ideal postural movement.
- The lessons only need to be about 15-20 minutes a week in my Hourglass Pattern. It is simply important HOW you execute the pattern. Details are very important to allow for self carriage in the equine.
- When fed and tacked up properly, the issue of sweating, which also creates chafing, is minimized.
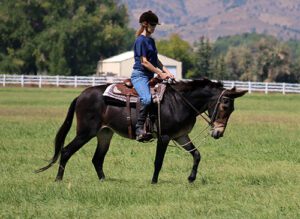
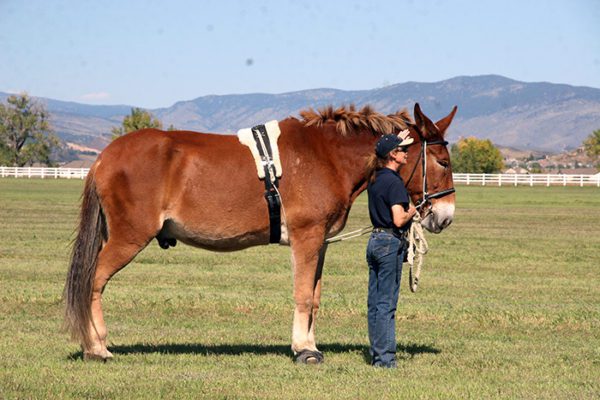
- CRUPPERS. Many people have approached me with many questions about cruppers. How do you introduce the animal to the crupper?
- It should be done in a Round Pen, properly introduced and coupled with the lunging exercise that they already know. Just allow them the time to get used to it before asking them to do any more than that…even if it takes several lessons.
- Note that you will need to reposition the saddle and readjust the crupper after it stretches a bit with the warmth of the animal’s body.
- Another concern is that the crupper can break the tail when under pressure. If there is enough pressure put on the crupper to break a tail, then the crupper should break first!
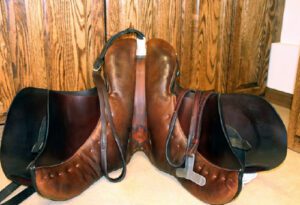
- Cruppers should be made of soft double or triple thick English bridle leather, with the buckles up by the cantle of the saddle and not near the tail!
- If an equine gets his tail stuck in buckles at the dock, it will affect his ability to stay in a balanced alignment, and if he falls he could land on the tail that is bent in an arc to one side.
- Proper adjustment of your tack and equipment is KEY! Tail chafing can be prevented by using Johnson’s Baby oil in the mane and tail during weekly grooming. If anything is too loose or too tight, it will cause chafing.
- Chafing occurs when the crupper is adjusted too tight or too loose.
- Use a D-Ring that is SCREWED into the tree at the cantle on Western saddles and use the metal “T” with English saddles. Do not attach it to the leather on the saddle.
- When the skeletal system is adequately supported with symmetrical muscle strength, especially over the top line, the animal is better equipped to use his body efficiently. With the crupper tension properly adjusted, he can tuck his tail and use his leg muscles to support his own weight while his spine remains flexed upward along the top line to support the weight of the rider.
- The extremities have full range of motion so he can pick each step with confidence and no obstructions.
- An animal with insufficient conditioning and balance will hollow his back and neck and try to compensate for his inefficiencies in muscle conditioning and movement.
- When pressure is put on the crupper of an animal with inadequate muscling, there is weakness over the top line and tail that will not support heavy weight going downhill and could possibly do damage to the spine at the dock of the tail.
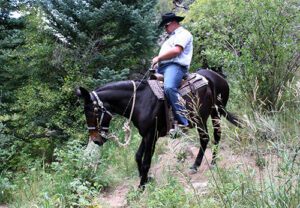
- Just for the record, I have done lots of trail riding and three years of cross country jumping over all kinds of terrain (3 miles, up and down hills, over twenty jumps) and have always ridden with a crupper on all of my mules, English or Western, even with heavy riders with nary an incident.
- If using a crupper, the animal has full range of motion in his body and legs with the maximum strength to back up any movement that would help to correct the rider’s position and keep him over the equine’s center of balance.
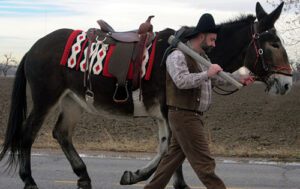
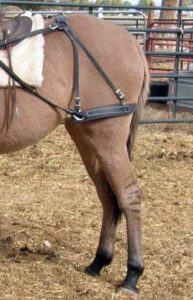
- BREECHING (or BRITCHEN) originates with pack and driving animals and has a distinctive purpose to keep loads from shifting on pack animals and to provide “brakes” for those in harness.
- Breeching generally has a “crupper” built in with straps on both sides to attach to the saddle and help to stabilize the load. Breeching should be adjusted snugly to do the job of keeping the saddle back, but will also shift the weight back and forth with the walking motion of the back legs and also cause chafing.
- Breeching that is being used with an inanimate object will not necessarily cause as much of a problem when the animal adjusts his own body as it does with a rider on board.
- An equine can adjust his load with his own body movements, but he cannot easily adjust a live load that works against his balance like an unbalanced rider would inadvertently do.
- The problem with breeching on a saddle equine is in the configuration and the way it sits anatomically. When going downhill, the breeching must be snug to do its job properly and it will keep the saddle from sliding forward. However, it also compresses the biceps femoris, a large muscle in the hindquarters that functions to extend the hip and hock joints, and causes a flexion of the stifle, and a rotation of the leg inward.
- When pressure is applied to this area, it restricts circulation and extension of the hind leg backwards and causes compromises in the muscles groups resulting in asymmetrical conditioning. This doesn’t pose a real pressure problem going downhill. The stifle joint is configured so it can lock when needed through a stay mechanism between the stifle and hock, but it should still have the freedom of full range of motion if it is to function properly and not get unduly locked up.
- When the actions in the animal’s body remain symmetrical and orderly all of the joints, including the stifle, are able to function properly. The stifle will usually get locked up only when there are chaotic and unsupported directional actions coming through the joint.
- When the equine has had the benefit of core muscle postural training, his movement will be more symmetrical, and his joints will work properly and in balance. Wear and tear is minimized.
- When going uphill, however, the breeching must still be snug to do its job, but the animal is not allowed full extension of the hind legs, so more pressure is put between backward motion of the femur and the breeching.
- This results in compromised circulation, restricted movement in the hind legs and an inability to control hind quarter foot placement. He is at risk of a misstep that could send him over backwards or sideways.
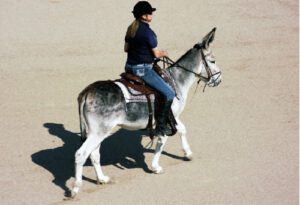
- In a crupper, the animal going uphill has full extension in his hind quarters, an ability to maintain good posture and balance and this results in exact foot placement to maintain that balance comfortably and safely (see photo under CRUPPERS).
- Even when driving, it is important that the harness is adjusted properly.
- The traces need to be the correct distance from the shoulder to the single tree.
- I prefer using collars because the traces are solidly attached and do not ride across the chest like a breast collar harness does and create the possibility of chafing when the equine is in motion.
- I prefer leather over Bio thane and Nylon because they do not warm up with elasticity and flexibility like leather does.
- The crupper assembly should be snug from the surcingle to the tail and adjusted the same way at a saddle crupper in tension and movement. The breeching needs to counter the traces and lock the equine firmly between the front and back, so when he is asked to back, he will have an immediate response. His rear will come into contact with the breeching, which will in turn, immediately begin moving the vehicle backwards. When he resumes forward movement, he will get an immediate response with the vehicle.
- Loose connections create abrupt movements that can spook the animal and may even cause a wreck. A harness that is out of proper adjustment will invariably create chafing.
- WEIGHT & ABILITY OF THE RIDER will determine how much pressure is put against the animal and how much resistance it will cause.
- Even though mules can carry proportionately more weight than a horse of the same size, this doesn’t mean you can indiscriminately weight them down until their knees are shaking.
- Be fair and responsible and do your part in the relationship. Do not expect the animal to carry an obviously overweight body that doesn’t know how to control itself! Learn to ride a balanced seat and practice the basics EVERY TIME YOU RIDE!
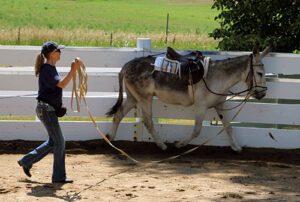
- Participate in training activities that prepare you both, first with groundwork and later under saddle. ALWAYS FOLLOW BASIC GROUNDWORK RULES for leading, lunging and Ground Driving!
- Learn to hold the lead rope in your LEFT hand, keep his head at your shoulder, match your steps with his front legs, point in the direction of travel with your right hand and look where you are going. Walk straight lines, gradual arcs and square him up with equal weight over all four feet EVERY TIME you stop.
- We are building NEW habits in their way of moving and the only way that can change is through routine, consistency in the routine and correctness in the execution of the exercises. Since this also requires that you be in good posture as well, you will also reap the benefits from this regimen.
- Along with feeding correctly (as described), these exercises will help equines to drop fat rolls and to begin to take on a more correct shape and become strong in good posture.
- It is important to lead this way because if you’re carrying the lead rope in your hand closest to the halter, it will not promote self-body carriage. With every step you take, your hand moves (however slightly) to the right and left, and this will adversely affect his balance. Remember, that equines balance with their head and neck!
- When Ground Driving, let your steps and hands follow the hind legs.
- As you learn to ride correctly and in balance, you also learn how to ride supportively by balancing on your seat bones with weight from your core (behind your belly button) going down through your legs and up through your torso.
- Take the stress out of going uphill and downhill by staying relaxed in the saddle, rocking your weight through your core and by keeping your body in good posture.
- Do not jam your heels down. Rather, think of keeping your toes up to stay relaxed. Lean the upper body back when going down hill and forward when going up hill.
- Think of the relaxed position of the Man from Snowy River, Bronc Riders and Bull Riders!
- You will then find the crupper much safer and more efficient when riding in all kinds of terrain…even if you are a little heavier than you should be.
- In between rides, use your Round Pen to practice your equitation skills by riding without stirrups and reins. You can do this with or without an assistant.
- Balance your body over your seat bones and RELAX with your legs freely hanging down while sitting up straight to help develop a secure balanced seat.
- While riding like this, you can use your arms straight out in front and parallel to the ground, behind on the cantle, arms stretched out on both sides parallel to the ground. Do all of these movements with your eyes open and then with them closed.
- You will begin to FEEL the movement of your equine and get in sync with HIS motion and the motion of the tack. It will all become much more harmonious and SAFER!
- You and your animal will both be conditioned properly, and he will be able to pick his way efficiently, safely and unobstructed!
- Once everything is in line, the animal, the tack and you should all be in unison with no chafing.
- Crupper or Breeching? The decision becomes your own, but do remember that the breeching has many more straps and much more risk of chafing than does a crupper.

 When the skeletal system is adequately supported with symmetrical muscle strength, especially over the top line, the animal is better equipped to use his body efficiently. With the crupper tension properly adjusted, he can tuck his tail and use his leg muscles to support his own weight while his spine remains flexed upward along the top line to support the weight of the rider.
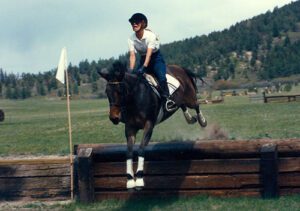 When pressure is put on the crupper of an animal with inadequate muscling, there is weakness over the top line and tail that will not support heavy weight going downhill and could possibly do damage to the spine at the dock of the tail.
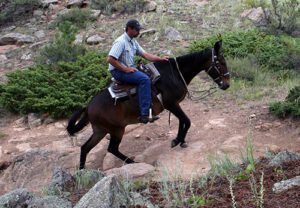 If using a crupper, the animal has full range of motion in his body and legs with the maximum strength to back up any movement that would help to correct the rider’s position and keep him over the equine’s center of balance.
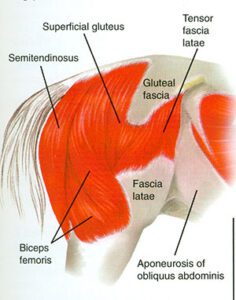
 BREECHING (or BRITCHEN) originates with pack and driving animals and has a distinctive purpose to keep loads from shifting on pack animals and to provide “brakes” for those in harness.
To learn more about Meredith Hodges and her comprehensive all-breed equine training program, visit LuckyThreeRanch.com, MEREDITH HODGES PUBLIC FIGURE Facebook page, or call 1-800-816-7566. Check out her children’s website at JasperTheMule.com. Also, find Meredith on Pinterest, Instagram, MeWe, YouTube and Twitter.
© 2023, 2024 Lucky Three Ranch, Inc. MULE CROSSING All Rights Reserved.
MULE CROSSING: Donkeys As Livestock Guardians
 By Meredith Hodges
There has been a lot of discussion since the early nineties around using donkeys for small livestock protection and predator control. Donkeys can certainly be a formidable opponent for cats and dogs and other smaller animals. One needs to be careful about who the donkey is pastured with since it is in their nature to pursue and sometimes kill animals that are smaller and weaker than them. This is true in all donkeys, although some individual females tend to be more maternal and are not apt to go after smaller livestock. The males will always be more aggressive than the females and do not make good guardians for smaller livestock.
 The other thing to consider is whether or not they have been raised with the livestock they are expected to guard. When raised with the other livestock, they will feel more a part of that “family” and are less likely to do them harm. A donkey that is going to be expected to guard livestock, but was not raised with them, should be carefully introduced to them “over the fence” for several weeks. Then if all seems to go well, you can introduce them in the same pen and watch for any signs of aggression. If there are signs of aggression after a few weeks of being separated, then they probably will never really get along. You must remember that a donkey is NOT a predator, nor a prey animal that will necessarily get along with other livestock. Donkeys prefer to be in a herd with other donkeys. They do not like being alone either. Donkeys have a strong sense of “family” and prefer to be with their own kind. When forced to be with other species, they will blend, but grudgingly.
There are three basic sizes of donkeys: Miniatures, Standard Donkeys and Mammoths. Our American donkeys are further identified by their height when being described rather than specific breeds. This is because they are so interbred from being turned loose during the time of the Spanish explorers. There are no real purebred donkeys in America other than the descendants of the original Andalusian donkeys that were bred from George Washington’s stock at Mt. Vernon. One must go to Europe to see the original BREEDS of donkeys. American donkeys are identified as: Miniature Donkeys (36” & under), Small Standard Donkeys (36.01” to 42”), Standard Donkeys (42.01” to 48”), Large Standard Donkeys (48.01” to 56”) and Mammoth Donkeys (Males 56” & over; Females 54” & over).
Miniature donkeys are not suitable guardians for livestock at all. They are too small and can fall victim to predators themselves. They simply cannot defend themselves. Standard donkey jennets are the most sought after for predator control, however, keep in mind that they are PREY animals and can fall victim to predators that are fairly large, or predators that run in packs. Mammoth donkeys are simply too slow to react. They lack the quickness and athleticism that it takes to combat a predator. Donkeys will never be able to guard against such predators as bears and mountain lions.
Good ranch dogs that are bred for guarding sheep and other livestock are a much better choice for guardianship. They are quick, clever and always on the alert. Their barking can alert the farmer as well. They can even move the livestock to a safer location on their own and will often chase off a predator pretty easily with their confusing way of attacking.
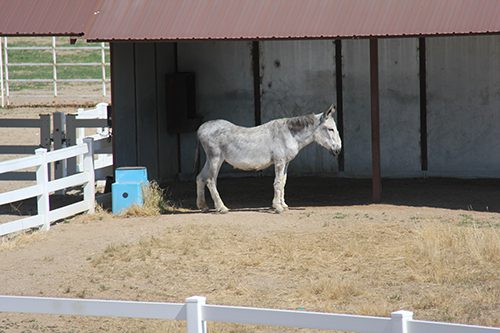 As with all livestock, donkeys need to be provided with adequate shelter from the elements, whether heat or cold, must be provided trace mineral salt blocks and clean, fresh water. Their time on pasture will need to be monitored for optimum health which will often clash with the grazing needs of sheep, goats and other smaller livestock. Donkeys are desert animals and really easy keepers. It is not uncommon when they colic or founder on too much, or too rich, grass. They cannot be on pasture 24/7.
Donkeys will need regular trims and must therefore, be reasonably trained. They will require 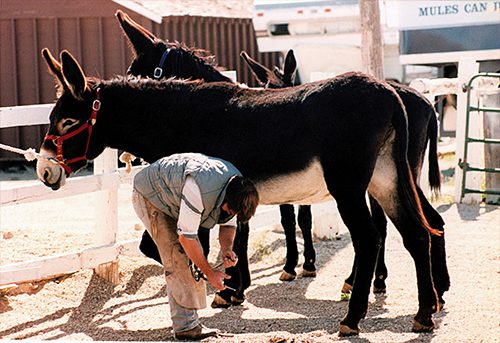 vaccinations twice a year and regular worming. If they are not trained to accept these things, most veterinarians and farriers will be averse to handling them until they are. It takes time and patience to gain the trust of your donkey before you can actually consider him trained.
I have found it better to be smart about livestock control and not make it so easy for the predators. As I said, guard dogs bred for herd management are a much better choice.
“Some of the most important roles of sheep and cattle herding dogs, and herding dogs in general are:
- Protecting the herd from predators
- Keep the animals grouped together
- Help with moving the herd
- Keeping the herd within a perimeter
Best sheep herding dog breeds are:
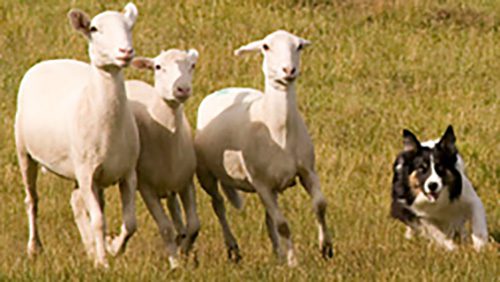
- Border Collies
While they might not be the best apartment dogs, border collies are one of the best sheep herding dogs.
The border collie is a medium-sized herding dog breed originated in the Anglo-Scottish border of Northumberland, bred for herding livestock, particularly sheep.
Border collies normally reach a weigh between 30 and 55 pounds once they are fully grown. Their high energy level, along with their intellect, devotion, and loyalty to their owners, propels border collies to the top of the best herding dogs.
- German Shepherds
This breed was originally produced for herding sheep, but because of their intelligence, docility, strength, and trainability, they were later introduced to many other jobs. At present, German shepherds are utilized as police dogs, in search and rescue activities, as service dogs in assisting people with disabilities, and more.Because German shepherds have been used since their origins as sheep herding dogs, we can say that they have this activity in their DNA, therefore, making them excellent for grazing sheep and cattle.
- Australian Shepherds
Australian Shepherds (also known as Aussie), despite its controversial name, are a dog breed with origins in the United States and not Australia as many people believe.
The reason this dog breed originally appeared is to help farmers and ranchers herding their livestock. They did their job extremely well ever since.
- Belgian Sheepdogs
Belgian sheepdog is a medium-sized herding dog with origins in Belgium. This breed is also known as Belgian shepherd or Chien de Berger Belge.
The members of this breed can be further classified into four separate varieties based on coat type and color:
- Groenendael
- Laekenois
- Malinois
- Tervuren
Like any shepherd breeds, the Belgian sheepdog was and is still used in herding sheep, cows, and other livestock. That’s because they are highly intelligent, agile, high energy level, and other qualities that a good herding dog should have.
- Shetland Sheepdogs
The quality that most highlights the Shetland sheepdogs is their tremendous loyalty and a very strong bond with the family. Hence, making this breed a very good choice for an affectionate family dog.
- Old English Sheepdogs
Old English sheepdog (also commonly known as shepherd’s dog or bob-tailed sheep dog) is one of England’s oldest sheep herding dogs.
They are massive, muscular dogs with a strong bone structure. Their bodies are covered by dense fur that helps them to quickly adapt to the cold mountain areas.
- Welsh Sheepdogs
Welsh sheepdog is a herding dog breed from Wales, United Kingdom.
This breed can have either a short or long coat, which enables them to also withstand cold climates. Besides, they have longer and stronger legs than border collies, which enables them to easily accommodate almost any terrain.
- Miniature American Shepherds
Miniature American shepherds were traditionally used for herding smaller stock such as goats and sheep, but are nowadays very popular house pets and very frequently in canine competitions of agility, intelligence, and skills.
- Rough Collies
One of the most famous rough collies was Lassie, the canine character loved by everyone in the TV series with the same name.
Rough collie (also known as long-haired collie) is a medium to large size dog breed with a short or beautiful long coat, that has its origins in Scotland, United Kingdom.
Based on the coat type, there are two distinct variations of this breed:
Rough-coat collies
Smooth-coat collies
Even though today we can mostly see these pups in dog shows and canine beauty contests, rough collies were incipiently utilized for herding sheep in various regions of the UK.
- Bearded Collies
Bearded collie (also known as beardie) is a breed of dogs with roots in Scotland. Because of their long, double-coated fur, people often confused them with old English sheepdogs.
They gained the nickname of “bouncing beardies” due to their unique way of facing stubborn ewes, through barking and bouncing on their forelegs.” (1)
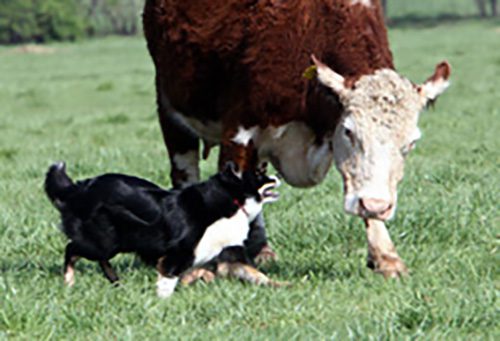
One should NEVER use mules as a guardian as they WILL be dangerous to smaller livestock and other smaller or weaker animals, even older mules! However, I have discovered that when my mules are pastured next to the smaller animals, predators give them a wide berth and thus, skirt the pens where the smaller animals are kept.
 Since miniature donkeys and mules are always at risk, I add another element of safety for them by lining their pens with metal grating over the stock panels. Then, everyone is also brought in every night and turned out for a limited amount of time during the day. This gives me the opportunity to monitor their diet, check for injuries twice a day and keep them safe overnight. All my equines are taught to come in from turnout upon request. They know there is always a crimped oats reward awaiting them.
Wooden barns and wire fences can be easily torn down by larger predators. So over the years, I slowly replaced all of my wood barns and wire fences with metal barns, steel panels and vinyl fencing with hot wires on the top. I also run hotwires on the bottom of the vinyl fencing in areas where animals are likely to come through by climbing underneath. The way my barns and pens are laid out, the mule and large donkey pens surround the miniatures’ housing accommodations. It is not uncommon to see large “cats,” bears, coyotes and other predators in the foothills of Colorado where I live. It is even getting worse as more developments are built in the mountains and drive these predators off the mountains in the wintertime.
In summary, I do not recommend using donkeys as guardian animals. We need to remember that they are PREY animals themselves and can be grossly injured in any altercations with a predator. I think there are better choices for livestock guard animals and setting up the environment in which your livestock (donkeys included) is kept. These two considerations will promote the health and welfare of your livestock, and cost you a whole lot less in the long run!
- Taken from “10 Best Sheep Herding Dog Breeds” October 31, 2020 at PetBlog.org/sheep herding dogs
To learn more about Meredith Hodges and her comprehensive all-breed equine training program, visit LuckyThreeRanch.com, MEREDITH HODGES PUBLIC FIGURE Facebook page, or call 1-800-816-7566. Check out her children’s website at JasperTheMule.com. Also, find Meredith on Pinterest, Instagram, MeWe, YouTube and Twitter.
© 2022, 2024 Lucky Three Ranch, Inc. All Rights Reserved.
MULE CROSSING: Owning an Equine Is Serious Business, Part 3
By Meredith Hodges
As discussed in Parts 1 and 2 of this article, there are many more things to think about before purchasing an equine than you could have ever imagined—from the actual purchase of the equine to the management considerations you need to be aware of on a daily basis. It is so important to always keep in mind that an equine is not an inanimate object like a car that you can tune up, drive (or, in this case, ride) at will, and then put back in 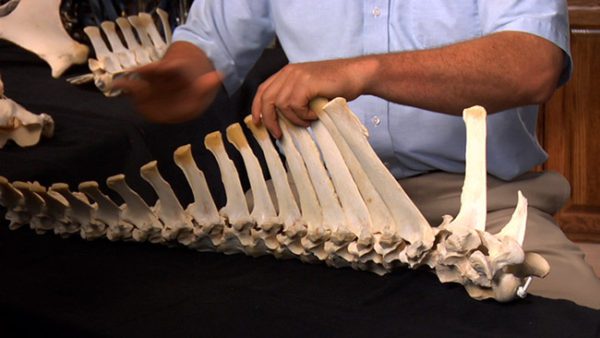 the garage until the next time. In fact, the equine was not anatomically designed to be ridden at all. The idea of riding was a completely human decision.
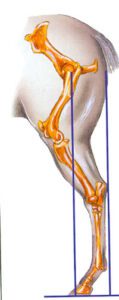
In order to more clearly understand this concept, let’s take a closer look at the equine anatomy. The equine is designed with interlocking vertebra in the spine that have long bony “fingers” called spinus processes,which protrude in varying lengths from the interlocking vertebra. The spinus processes“fingers” support the musculature that surrounds the super spinus ligament, which runs the full length of the back. The highest point of the spinus processes is at the withers, where the spinus processes bones are at their longest. They then taper down toward the croup, becoming shorter as they line up across the back. This is a body design that was intended  to carry the weight below the spine and not on top of it. Everything in the equine’s mind and body supports this position and, when we train, if we do not pay attention to re-programming the muscles, tendons and ligaments to support the additional weight above the spine in a way that is painless and clearly understood by the equine, they become uncomfortable and even sore, and bad behaviors are almost certain to arise.
If you keep the equine anatomical structure and his mental reactions to stimulus in mind, the way to build adequate musculature to carry a rider or pull a vehicle is really quite simple. Equines have a natural willingness to please and become resistant only when they are frightened, hurt or confused by the way they are being asked to do something. Training does not only take place  during lessons in your arena or round pen—lessons begin the moment you are within earshot of your animal, so when you go to get your equinefrom his pen or stall, approach with the attitude that you are visiting a friend. Don’t’ just barge into his living space and try to “catch” him—rather, call out his name and say hello in a cheerful voice. Stand at the gate or door and offer a handful of oats, and when your equine comes to see you, let him know you are happy to see him too. Stroke his neck before you put the halter on your equine, and then give him his oats and let him invite you into his space. It won’t be long before he anticipates your arrival and “talks” back to your “Hello.” If you want to make a friend, you first need to be a friend!
Here are some important techniques to remember each time you approach your equine:
- Be polite and considerate in your approach and your equine will be more willing to want to go with you. An equine that is “herd bound” and won’t leave his pasture buddies has simply decided that his equine counterparts are nicer to be around than the humans who “use” him, but if your animal feels good when he is with you, he won’t mind leaving his equine companions.
- When you want to pet your equine, let him see that your hand is moving toward him, but keep movements low, slow and non-threatening.
- Stroke his neck, going with the grain of the hair, and never against it.
- Touch his head and other sensitive areas only after you have gained his confidence. Note the way he responds to your touch and alter your touch accordingly. If he flinches, you might be touching him either too lightly and tickling him or you could be touching him too strongly and it hurts. Use the flat of your hand and don’t “poke” at him.
 Many people are familiar with imprinting their foals, but what they may not realize is that the purpose of imprinting is not just to get the foal used to human touch and smell. It is, in reality, the first steps in learning
about your equine’s entire body, and then adjusting the way you touch him so that you give him pleasure every time you touch him (except during brief disciplinary actions).
Most of us want to ride and do the more glamorous things that we see people do with equines right away, and we become impatient for the end result and don’t pay adequate attention to the smaller details that lead up to our fantasy. But it is imperative to always remember that equines are very much like young children and need to learn in a slow, logical and sequential way.
Ask yourself these questions:
- How are you leading your animal after you catch him? Are you maintaining good posture?
- How do you groom your animal, and how is the grooming received?
- Are you being polite and considerate in the way you use the grooming tools?
- How is the tack being put on?
Every movement sets the stage for how your equine’s body is being conditioned. So when you are leading your equine, make sure that you are holding the lead rope in your LEFT hand, are that you are moving in good posture yourself. Be sure that you are keeping your equine’s head at your shoulder, that you are pointing in the direction of travel with your right hand and that you are matching your equine’s steps while being clear in your intentions during movement transitions.
Remember: Square up your animal every time he stops to cultivate a new habit of good postural balance through repetition. Be cautious when leading your equine through narrow openings like gates and doorways. Make him allow you to pass through first every time. When you need to make a turn, always take one step forward first and then turn the animal on a gradual arc away from you—don’t make any abrupt movements.
Here are some important points to remember when learning to deal with tack and your new equine:
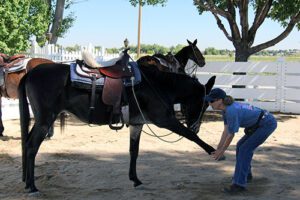
- When approaching with tack and equipment, allow the equine to smell and inspect it before you put it on him, and then reward him for staying calm.
- When putting on the bridle, be aware of how you take it over the animal’s ears so as not to hurt him.
- When saddling, make sure stirrups and girths are put up and not flopping. Be polite and let the girths and stirrups down easily on each side.
- Then ease the saddle onto your equine’s back, being sure not to tighten the girth all at once. Rather, come back several times and tighten just a little bit more each time until it is snug, but not tight.
- When needed, cruppers are used on riding equines in order to keep the saddle in the correct position on the equine’s back. Make sure you know how to properly place the saddle over his center of gravity (so the girth lies four inches behind the forearm) and then adjust this piece of equipment.
- Breeching is an assembly of straps across the rear quarters of the equine and is fine for packing and driving animals, but it can inhibit the hindquarter range of motion on a riding animal. A crupper is preferred for a riding animal to hold the saddle in place for extreme trail riding, etc.
- If you have a double rigging on your Western saddle, always make sure that the front girth is done first and pulled snug—NOT tight—and that the back girth lays against the body and is just snug enough to keep the back of the saddle from flipping up, but it is not too tight.
- Check your girth periodically when riding to make sure it stays snug enough so that the saddle does not roll toward you on the equine’s back when you try to mount.
- Never use bridle reins or drivelines to tie your equine. When tying your equine, always use a halter and lead rope, and tie to a stout post (NOT fence rails) with a safety release knot.
- Always untie your animal before removing the halter.
Coming up next, the fourth and final installment of Owning an Equine Is Serious Business features a discussion of beginning riding, with many valuable details, tips and safety rules and checklists that you can actually take with you while you are working with your new equine.
To learn more about Meredith Hodges and her comprehensive all-breed equine training program, visit LuckyThreeRanch.com or call 1-800-816-7566. Check out her children’s website at JasperTheMule.com. Also, find Meredith on Facebook, YouTube and Twitter.
© 2012, 2016, 2018, 2023, 2024 Lucky Three Ranch, Inc. All Rights Reserved.