
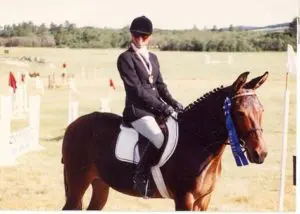
 Tack is like clothing. When it doesn’t fit properly or is not cleaned properly, it can cause such actions as fidgeting, soreness, lameness and even total frustration, resulting in very bad behaviors such as bucking or running off. Still, the equine perceives these inconsistencies as a loss of balance. Balance means that everything is working together with no attention to any specific point, or area, on the body because all parts are working in harmony. This is why it is so important that all tack is adjusted properly and fits both the animal and the rider or driver. Even the weight of the reins plays an integral part in your ability to communicate effectively with your equine, so pay close attention to detail and your equine will pay close attention to you!
When using restraints, remember that they should only be used as a support during training and not a forceful method of compliance! So, learn how to use them properly and fade them out for the best results.
Click on the title below to see the complete question and answer.
Tack
- Attaching Elbow Pull Draw Reins
- Crupper Used in Videos
- Donkey Twisting Head on Lead Rope
- Running off in the Drivelines
- Saddles for Mules
- Skittish on the Drivelines
Tack
MEREDITH HODGES GUIDELINES FOR TACK & EQUIPMENT
Bits & Bridles
Many people believe that if an animal is not complying that they just need a stronger bit. Nothing could be further from the truth. The truth is that the rider needs to address his own skills and learn how to “cooperate” with the animal through the reins or drive lines instead of being so concerned with “controlling” the animal. When you get cooperation, the result is control and it does not happen overnight. It takes years of perfecting your own skills and that of your animal to achieve that kind of harmony.” Any bit can be severe when the reins are in the hands of an amateur. The snaffle bit doesn’t really have the severe leverage that you would get with a curb bit (with shanks) which can be more of an aggravation to the animal than real leverage in the wrong hands.
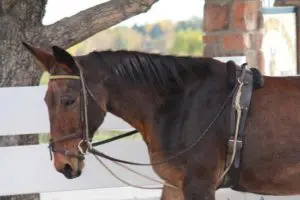
However, the bit is not supposed to be an object of control, but rather an object for communication. Communication begins on the lead line. There are two stages of leading training to go through before introducing the bit, first on the flat ground in a very specific posture and later, over obstacles. When we begin work in the bridle in the round pen, we add our “Elbow Pull” self-correcting equine postural device to maintain the good equine posture we developed at the core with our leading exercises both. When you finally do introduce the bit, it should be introduced with an English bridle that has two nosebands, one in front of the bit and one behind the bit, to encourage him to take contact with the bit and not chew on it. The nosebands should be adjusted snugly, but not too tight. Figure-eight nosebands are not as desirable because they cause too much “squeeze” around the end of the noseband. Putting the tongue over the bit is an avoidance behavior that is better stopped before it even gets started. It is easier to develop good habits than to try to break bad habits. It is your task to learn to give rein cues appropriately so you are not just pulling on his face all the time. It is very important that the bit fits the equine’s mouth properly.
 We prefer to use an Eggbutt snaffle bit for training and general riding because it maintains the direct rein control integrity without additional and sometimes confusing action. For example, a full cheek snaffle bit has direct rein action, but the levers on the sides create pressure on the offside from which you pull on the reins in addition to the direct rein pull causing mixed signals to occur. Since mules and donkeys naturally move into pressure and not away from it, they will be more apt to fight the direct rein with the distraction of the full cheek coming from the other side of their mouth. Snaffle bit mouthpieces do not put pressure on the tongue when you pull on the reins, only on the corners of the lips. When you are starting an equine properly during groundwork training, it is important that the integrity of the direct rein contact be maintained and that the rein cues are always done with a squeeze/release and not a steady pull. That means that when you “vibrate” the right rein, the animals head moves directly to the right freely and when you “vibrate” the left rein, the animal’s head moves directly to the left. When you want your equine to back, do it one rein, one step at a time. This indicates to the animal that he is to back up in sync with your hands. When you release the pressure on both reins, he is allowed to go forward with your hands following the forward motion of his front legs. Your equine can feel the slightest vibration in the corners of his mouth and as he learns what you want when you “vibrate” the direct rein, he will respond to less and less pull pressure each time you school him. If you learn to use the bit properly, they will learn to communicate with you through the reins and will not feel the need to fight you. Think of holding your reins like a thread that can break if you pull too hard, or too much. This will help you to find the right tension for your connection to the mouth. You will learn to give and take to avoid resistance this way, and it will keep your mule from getting too heavy, or leaning on the bridle. Snaffle bits are designed to help you develop good communication through the reins with your hands and this is why the direct rein action is crucial. Improving your own skills will improve your animal’s ability to respond correctly. This is basic learning for your equine and how we get him to be “light” in the bridle. It will seem awkward at first, but just keep things slow and easy and you will progress faster as your technique improves.
The snaffle bit with its direct rein action coming from the corners of the lips will allow your equine to round his topline forward, give at the poll and execute unobstructed lateral motion in the head and neck without undue internal pressure. The repetitive execution of this kind of communication will result in your equine finding his postural balance and becoming sensitive to your seat and leg cues. Then when he graduates to a curb bit for senior classes and trail riding, his “neck reining” skills will come naturally as he follows your seat and allows you to keep your hand quiet on the centerline with a loose rein. Neck reining is not really “neck” reining, but a responsiveness to your seat and legs. Curb bits (bits with shanks, indirect rein) do not have this same action. If you hold the reins in two hands and pull on the direct rein on a curb bit, it gives opposing signals to the animal. He feels you pull in the direction you wish to go, but the upper part of the shank will lever into his cheek causing opposing pressure. Shank bits also put the animal’s mouth in a vice-like grip when the pressure is on. This is confusing to the animal during basic training and creates resistance. This resistance will not allow you to communicate with your equine effectively through the reins. Bosals, bitless bridles, side pulls and halters do not allow the correct lateral movement in the head and neck when you pull on the reins. They can cause resistance problems as you try to balance your mule’s body when riding. Bitless bridles are not usually allowed in most show classes. Oral fixation is an expression of anxiety. Using bits with rollers or other kinds of “playthings” only distract the animal from taking contact with the bit and communicating with you. This just escalates anxiety and causes resistance.
If you go through the leading exercises first and later use an English bridle with a drop noseband as we recommend, you will be better able to affect good postural balance and preserve the integrity of your equine’s balance. It will teach him to happily take contact with the bit inside his mouth, enhancing the communication from your hands through the reins to the corners of his lips. When you adjust the noseband and drop noseband correctly (snug but not tight), the equine will learn to carry the bit in his mouth properly and comfortably. Through repetition of lessons over time, this holding the bit becomes habitual and you will no longer have the problem of him flipping his tongue over the bit…unless of course, you just pull too hard on the reins. He feels the slightest cue from your leading rein at the corner of his lips and will learn to follow it willingly with pressure from your leg on the opposite side, pushing and bending his body into turns.
There are very definite rules for each of all types of shows about which bits are legally allowed and which ones are not. If you are going to show, then you must be aware of the rules for the show you are competing in, or you will be disqualified. People who just use their animals for home, trail riding and packing, etc. do not have these kinds of issues. They are also not as likely to want to engage in training their animals to athletic perfection, so they are more than likely going to just want the bit for control, but this cannot ever replace the response you will get from an animal that has been schooled properly in a humane snaffle bit (direct rein bit). Of course, people can use whatever bit they choose on their own animals. As a teacher, I can only offer educated suggestions. It’s ultimately up to you whether or not to take my advice.
Although some metals can cause equines to salivate through electrolytic reaction, some do not, and salivation does not guarantee that the equine will accept the bit. Accepting the bit comes from kind and patient training that promotes relaxation and calm obedience, resulting in a relaxed jaw and acceptance of the bit. When this happens, your equine will have a soft and responsive mouth with increased salivation. It is a result of his trust in the trainer and contentment with his work.
Just be sure that the bits you use are safe and not negatively reactive to living tissue. Copper and its alloys have been the metals of choice to promote salivation and are often quite expensive, but not necessarily more effective. Iron and its alloys (sweet iron) are supposedly sweet tasting to the equine and promote salivation, but this has never really been proven. Stainless steel is a non-reactive, non-oxidizing metal used for surgeries and is safe for contact with human tissue. Aluminum is not an inert metal and will create aluminum oxides – black smudgy stuff you can rub off the bit. Plastic bits are supposed to taste good and promote salivation, but it is my experience with mules that they eventually chew the bit in half and never come to full acceptance. Plastic seems to promote chewing rather than salivation. You can find more on bits in our book, “A Guide to Raising & Showing Mules” and in DVD #2 of our video training series.
You can purchase an English bridle with the dropped nose band from Dover Saddlery, www.doversaddlery.com, 1-800-989-1500. This can be very disconcerting since they have so many different kinds of bits and bridles. Most are very expensive, but there are some that are perfectly functional and more affordable than the really fancy bridles. Sometimes the less expensive ones are not listed on the website. For future reference, I would ask for their full catalog to keep on file. All the products are listed there with good pictures and a variety of prices. The bridles I usually purchase are:
Dover Saddlery, www.doversaddlery.com:
1) Crown Raised Flash Bridle, QB-12223, horse size, $109.99
2) Suffolk Flash Bridle, QB-12218, horse size, $59.99
3) HDR Pro “Stress Free” Flash Bridle, QB-12645, horse or oversized, $84.99
4) Suffolk Dressage Bridle, QB-12345 (blk/blk) or QB-1212 (blk/wht), horse sized, $59.99
5) Eggbutt Snaffle Bit, RB-0175, 5” or 5 ½” average sized horse/mule, $28.99
If the brow bands are too narrow for your mule, they have oversized brow bands you can order separately (QB-440… A through Q series). They also have flash straps sold separately to just attach to an existing noseband and other bridle parts that you might need if something gets broken.
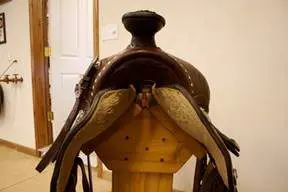
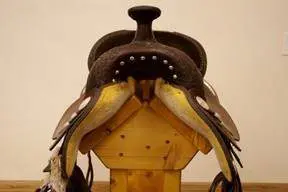
Fitting Saddles:
The mules I have bred here at my ranch all have sufficient withers and are very much like horses in their structure. I have found that Circle Y Western saddles, all-purpose Passier or Courbette English saddles and Kieffer dressage saddles came very close to fitting my mules well. When fitted with a crupper, the English and dressage saddles were fine, but I still needed to fit the Western saddles a little better, so I had my saddle maker flatten the convex swell off the trees on my Western saddles and that helped the saddles fit much better. On the horse, there is an indentation in the musculature below the withers where a rider’s leg would fall if riding bareback. On a mule or donkey, this muscle is thicker and bulges. I had my saddle maker flatten the convex bulge on the trees of my Western saddles to better fit my mules and donkeys, and it worked very well.
For a lot more detailed information, please email me at meredith@luckythreeranch.com.
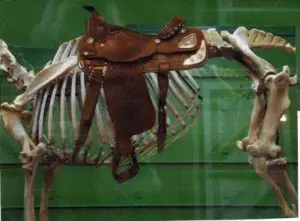
Mules and donkeys are often very short backed and the skirts of the Western saddle can interfere with the movement of the hips. In the case of a short backed mule or donkey, an Arabian saddle tends to fit better because of the rounded and shortened skirts. This is also true with smaller mules. This isn’t a problem with a longer backed mule or donkey. Still, you need to place the saddle in the middle of his back such that the girth lies 4″-5″ behind the forearm clearing the sensitive skin area directly behind the forearm to prevent chafing. The crupper should be adjusted snugly to keep it in place. It is common to see saddles placed too far forward on mules and donkeys causing restriction of shoulder movement which can result in bucking and irregular movement.
There are mules and donkeys whose backs and withers are flatter and in this case, a custom-fitted mule saddle might be a better choice. Often, the solution is as simple as getting an animal to its ideal weight and condition. Obese animals do not carry saddles very well. The saddle will tend to “roll” from side to side. So, I would suggest that you make an assessment as to what would fit your own particular mule, or donkey, the best. They do need to have “clothes” that fit if they are to perform to the best of their ability with no interference from ill-fitting tack. One needs to also realize that as they gain core and bulk muscle tone, their overall shape will change and in most cases, the saddle will then fit better. You can consult with a reputable saddle maker to determine what your particular animal would need. You cannot, however, make a saddle fit properly with the use of pads.
I caution you, to be careful about thinking that the saddle will be the complete solution to any problems you or your mule might have. I do not like treeless saddles as they do not provide enough support for an unbalanced rider and can actually inhibit the equine’s motion, and sometimes even cause sores from undue shifting and rubbing. It is always best to continue to learn and improve together. When you ride, if you do not learn to ride a balanced seat and improve your skills and your equine is not in good condition, any saddle would be difficult to fit. Your mule should not have a problem with a saddle if you are riding correctly and the saddle fits you and the equine properly. The goal is to improve together so the end result is that you both learn to move together in a harmonious fashion.
There are those who think that if the rear girth is set closer to the flanks where the torso becomes narrower, it will hold the saddle back more efficiently than either breeching or cruppers. Having your saddle fit correctly and stay in place is critical when trail riding and during many other equine activities. However, I would be remiss if I did not mention that the way the saddle is rigged has a definite effect on your equine’s anatomy. Personally, I use cotton string girths in front and secure them four inches behind the forearm to clear the sensitive skin where most equines are galled. I use a crupper to keep both English and Western saddles in place over the center of balance on those animals whose withers are not able to keep the saddle back because it allows for free range of motion both in front and in the rear. The back girth on a double-rigged Western, Australian or Side Saddle is to keep the rear part of the saddle from rising up while the equine is in motion over uneven terrain and should only be adjusted snugly enough to keep it where it sits when the equine is at a standstill. Never use the back cinch to keep your saddle back. It easily can put too much pressure on the hind gut, genitalia and fragile undercarriage bones. A double rigged Western saddle should always have the front and back cinches connected underneath to keep them in their proper place. I prefer using cruppers for riding with full range of motion as breeching can restrict hindquarter movement. Breeching is preferred for an inanimate load.
Cruppers
Cruppers should be first used at the lunging stage of training in the round pen and should be put on when the bridle and saddle is first introduced as just another piece of equipment. Some equines take to it with no problem and others will run around and kick for a while. Once they discover it is staying in place and isn’t going anywhere, they will usually stop after a few laps around the round pen. If you just stay calm and let them run it out, and then just ask them to “Whoa” (when you see them slowing down), give an oats reward and then start working without paying much attention to the crazy behavior, they will settle down quickly and go to work. The crupper will no longer be a distraction for them.
Cruppers for English and Western saddles should be made from nice soft leather and slightly narrower than the cruppers that are used with pack saddles that include breeching. You can have a D-ring installed in the back of your saddle tree to attach the crupper to a Western saddle and there is a metal “T” that comes with cruppers that will fit into the underside of an English saddle. The trouble most people have with cruppers is they get one that may have buckles too near the tail and the tail hairs get snagged, or it is too thick and causes sores under the tail.
You will need to make sure that the saddle is placed in the middle of the equine’s back which will allow the girth to fall 3-4 inches behind the forearm. The skin directly behind the forearm is more sensitive than that which is further back. You should use a crupper adjusted snugly to hold the saddle in place. Adjusting the crupper is critical. It must be snug enough to hold the saddle in place, but should not be so tight that it begins to force the tailbone to invert. A crupper that is too loose simply doesn’t do what it is supposed to and will rub them raw under the tail from the shifting back and forth under the tail. We use Johnson’s baby oil in the manes and tails to keep them lubricated and to prevent the animals from chewing on each other’s manes and tails, but this also helps with any chafing from the crupper. Breeching is not advisable to use on a saddle mule because if it is adjusted tight enough to do any good, it will restrict the mule’s ability to fully extend the hindquarters and therefore obstruct his range of motion. Cruppers can be found at www.equestriancollections.com.
Saddle Pads
I prefer to use doubled sided Navajo blankets in general and with mules that have more wither to them, I add a fleece saddle pad underneath the Navajo blankets. They seem to mold better to the equines’ back than do the stiffer pads. As with anything on your mule, the saddle pad would need to be set in the middle of the mule’s back for optimum balance of mule and rider. General rule of thumb is to be able to place your hand easily between the girth and forearm of the mule (roughly 4″). Because the mule is very narrow through the girth area directly behind the forearm, it is easy for the girth to work its way forward when they start to move and if you are sitting on top of it, you will also start to move forward and out of the balanced position, so even a pad must have the crupper rigging behind to hold it back. This is much more important than a breast collar. I discourage using breast collars on mules and donkeys as a functional piece of equipment as it actually can pull the saddle, or pad, forward and out of the correct position. If I am doing any jumping with an English saddle (or pad), I prefer to use a neck strap that is placed around their neck and not attached to the saddle.
Attaching Elbow Pull Draw Reins
Question: I own a four year old molly who I have been trail riding for over six months now. I am on Tape #2 of your series (the free lunging part).
When I am ready to use the elbow pull draw reins, is there a way to attach them directly to the saddle without using a surcingle?
Answer: Yes, there is a way to attach the elbow pull to almost any saddle. There should be either d-rings or a leather piece to hold the excess of the latigo strap from the girth on both sides of your saddle. You can just take the end of the elbow pull rope and pull it through the leather latigo sleeve or d-ring, adjust the length and tie, or snap it off. If the snap won’t fit through, just double the end of the rope, push that through and then tie it off.
If your saddle has neither of these (English saddles usually have small d-rings), you can just attach the elbow pull to itself in front of the saddle horn and tie it to the saddle horn so the snaps don’t rotate out of position. Hope this helps.
Crupper Used in Videos
Question: Meredith, I can’t find a source for the crupper you suggest in your videos. Where can I get one?
Answer: It seems that tack shops are not carrying horse cruppers these days as a rule where they used to have them. You can order them from saddlemaker Rusty May (970) 663-4036 or CM Tack913-631-4677.
Donkey Twisting Head on Lead Rope
Question: My donkey will lead really well most of the time, but sometimes he will twist his head, turn away from me and drag me to the point where I have to let go of the lead rope. How do I stop this behavior?
Answer: Showmanship training is not just for the showmanship class at a show. Perfecting your showmanship technique every time you have your equine on a lead line will command your equine’s attention to detail, build his confidence in you and ensure that he is strengthening his muscles properly throughout his body at a fundamental level.
Just as a baby has to learn to crawl before he can walk, your equine needs to learn to walk at your shoulder in nice straight lines with his balance equally distributed over all four feet, so that when you ask for a halt or a turn he is able to do it easily, without a loss of balance. Be conscious of your own body position when practicing. When preparing to walk off, make sure you hold the lead in your left hand, face squarely forward, extend your right arm straight forward, give the command to “Walk on,” and take a few steps forward. Make sure you walk straight forward in order to give your equine a lead to follow that is definite and not wobbly.
When you ask for a halt, stop with your weight balanced equally on both feet (still facing forward), hesitate for a second or two and turn to face your equine’s shoulder. If his legs are already square, you can then give the crimped oats reward for stopping. If they are not, take a moment to square up the legs and then give the reward. Praise him for standing quietly for a few seconds to allow him to settle. You can then turn back to your forward position, put your right arm forward again, give the command to “Walk on,” and proceed a few more steps before halting again. Each time he complies, you can add more steps before halting. When you practice the turn, he should always be turned away from you to the right, never into you while you are on the left side!
When executing the turns, ask your equine to take one step forward with the right front foot then cross the left front foot over the right to make the turn. Your own legs should execute the turn the same way, again giving your equine a good example to follow. Turns to the left should be schooled to develop the muscles equally on both sides. To do this, just change sides and execute the leading, halting and turning from the other side with the lead now held in your right hand with your left arm extended. Repeat the exact same exercise, but now from this position (though you will rarely have occasion to actually lead from this side). Be sure to dispense rewards only when he is settled and has done what you ask.
Paying attention to this kind of detail will greatly improve your animal’s conditioning, his balance and his attention to your commands over time. Equines will learn EXACTLY what you teach and will be only as meticulous as you are. Lead your animal this way every time you have him on the lead to build good habits, facilitate good posture and to give him the few seconds before each move to prepare for what comes next. The result is a relaxed, compliant and confident companion!
Running off in the Drivelines
Question: My mule is running off in the drivelines. What do I do to make her stop?
Answer: First, I have, over time, come to appreciate the fact that different equines have different personality types. It does seem that a general rule applies: the larger the animal, the more docile the personality. I’ve also learned that when a donkey or mule has a tendency to bolt and run, it’s typically because they don’t agree with what you’re trying to do, or how you are trying to do it. It is ALWAYS the handler’s fault!
I have a mule that is acting the same way. She will allow me to walk beside her and drive her that way, but if I get too far behind her, she’ll run off. I have had to deal with this problem with a few mules and donkeys in the past. What I do is continue to walk beside her and gradually lengthen the distance one inch at a time until she has accepted the drivelines correctly–no matter how long it takes. I will work her no more than 20 to 40 minutes every other day. I will make sure she gets her treats for “Whoa” and “Back.” I will do a lot of “Back” while still close in to her and repeat “Back” frequently at every increased or decreased distance behind her, and I will keep things at a very slow walk until I feel her relaxation through the drivelines (not a trace of pull). I will always be calm and slow around her, willing to take all the time in the world if necessary. I will constantly review the lessons in showmanship in DVD #1, DVD #8 and DVD #9, going to and from the work areas, and during any ground interaction to help her really, truly bond to me on a very personal level. I will treat her as my very favorite. (I actually treat them all this way anyway, but sometimes there are those who are less confident and need this extra moral support.)
These types of personalities simply take much longer to come around, but with great patience, kindness, trust and respect, they eventually do. I just wouldn’t necessarily use them for driving, but they can be very good under saddle. In fact, once they do bond more strongly with you and look to you as their “Protector,” they are the ones who will have more “Go” and thus, more athletic aptitude and ability. Figuring out what kinds of things they like to do naturally also helps.
I have dealt with many animals that were the same way, and I know it takes tremendous patience, but I also know they can come around. You might just need to back up and do things even more slowly and more meticulously than you ever thought you needed to, but you should get positive results if you do. Lower your expectations of her for a while, and try to have more fun with the basics.
When she does bolt, never hang on to the reins, lead, or drivelines. Just let go of her if you are on the ground or let them loose if she bolts under saddle. Just make sure you work in areas that are adequately and safely fenced, so you can catch her easily again. Whether on the lead line, in the drivelines or under saddle, once she realizes that you aren’t going to play “tug-o-war,” that she will get a reward for staying, and it is a waste of her energy to keep running, she will do it less and less.
Saddles for Mules
Question: I have purchased your videos to help with my donkeys. Because of what I have learned I really value your expertise. I just recently bought a mule. She is a love. I am wondering who makes saddles to fit mules properly. I know my current saddle causes bridging.
Answer: There are certain brands of saddles that will fit mules, but a lot has to do with the way their bodies are conditioned and the shape they would be from their work. When they are not conditioned properly, they saddles tend to not fit across the board anyway. The information below should help. If not, please let me know.
The regular horse saddles I use in the TV shows and DVDs have been carefully selected and fitted to my own mules. Equines are similar in their structure, but just like people, there are individual differences that need to be addressed if the “clothes” are going to fit properly. How well the equine is conditioned in his body will have an effect on how the saddle fits. An animal with irregular conditioning will not maintain the same body shape.
The girths I use are cotton string girths, both English and Western types. Then, you need to make sure that the saddle is placed in the middle of the equine’s back which will allow the girth to fall 3-4 inches behind the forearm. The skin directly behind the forearm is more sensitive than that which is further back. You should use a crupper adjusted snugly to hold the saddle in place. You can have a d-ring installed in the back of your saddle tree to attach the crupper to a Western saddle and there is a metal “T” that comes with cruppers that will fit into the underside of an English saddle. If the saddle is placed properly and the crupper adjusted properly, the saddle and girth should not cause the problem. There are some mules that have enough wither to keep the saddle from slipping over the neck, but the saddle can still slip forward just enough to cause problems at the shoulders and in the sensitive girth area if a crupper is not used.
On the horse, there is an indentation in the musculature below the withers where a rider’s leg would fall if riding bareback. On a mule, this muscle is thicker and bulges. I had my saddle maker shave the convex bulge on the trees of my Western saddles to flatten this part to fit the mules and it worked very well given my mules’ shapes. Mules are often very short backed as well and the skirts of the Western saddle can interfere with the movement of the hips. In the case of a short backed mule, an Arabian saddle tends to fit better because of the rounded and shortened skirts. This is also true with smaller mules.
This isn’t a problem with a longer backed mule or donkey. Still, you need to place the saddle in the middle of his back such that the girth lies 4″-5″ behind the forearm clearing the sensitive skin area directly behind the forearm. The crupper should be adjusted snugly to keep it in place. It is common to see saddles placed too far forward on mules and donkeys causing restriction of shoulder movement which can result in bucking.
There are mules and donkeys whose backs and withers are not as horse-like and in this case, a custom-fitted mule saddle would be a better choice. So, I would suggest that you need to make an assessment as to what would fit your own particular mule, or donkey, the best. They do need to have “clothes” that fit if they are to perform to the best of their ability with no interference from ill-fitting tack. One needs to also realize that as they gain muscle tone, their overall shape will change and in most cases, the saddle will then fit better. You can consult with a reputable saddle maker to determine what your particular animal would need. You cannot, however, make a saddle fit properly with the use of pads.
I caution you, however, to be careful about thinking that the saddle will be the complete solution to any problems your mule might have. I do not like treeless saddles as they do not provide enough support for an unbalanced rider and can actually inhibit the equine’s motion and sometimes even cause sores from undue shifting and rubbing. It is always best to continue to learn and improve together. When you ride, if you do not learn to ride a balanced seat and improve your skills, this can happen again with any saddle you may get. Your mule should not have a problem with a saddle if you are riding correctly and the saddle fits properly. The goal is to improve together so the end result is that you both learn to move together in a harmonious fashion.
Skittish on the Drivelines
Question: My mule will do all the obstacles easily on the lead rope and most of the time when I am riding him, but he won’t do it on the drivelines without getting skittish and weaving. What should I do?
Answer: When doing obstacles on the lead line, keep in mind that you are not only teaching the animal to negotiate an obstacle, but you are also conditioning the muscles closest to the bone, teaching balance, coordination and control as well.
If your mule doesn’t approach the obstacle easily, do not withhold the reward until they actually negotiate the bridge, tarp, ground poles, or whatever. Lower your expectations and go back to your lead line training. Walk to the end of your lead line, hold it taut and wait for the mule to step towards you. When he does, give him a reward (crimped oats) and tell him how brave he is being and praise him for it. Let him settle, then walk to the end of the lead line again getting even closer to the obstacle and repeat the same way. When you reach the obstacle, step up onto the bridge, or over the first ground rail and ask again. Stop him if he tries to run through, or over the obstacle, and reward him for standing with front feet into the obstacle. You might even want to back him up and reward for that before proceeding forward. Then go away from the obstacle and come back, putting all four feet into the obstacle. Repeat this procedure yet again and ask him to negotiate the entire obstacle slowly and in control. Breaking the obstacle down into small steps like this will facilitate control and keep your mule’s attention on you.
After he is more willing to come through the obstacle, you can regain your showmanship position with your left hand carrying the lead line and your right arm extended in front of you pointing to the direction you are going. When the mule is finally listening and will follow your shoulder over or through the obstacle, stop or back at any point during the negotiation of the obstacle, you can then turn your attention to whether he is actually traveling forward and backing in a straight line and whether he is stopping squarely. How he negotiates the obstacle will have a direct bearing on how his muscles are conditioned and how his balance and coordination develop, so don’t be afraid to ask for more perfection! Do this the same way first on the lead line, then in the drivelines and lastly, under saddle.